3 Powerful Ways to Convert GPT to MBR in Windows 11 [2022 Guide]
| Workable Solutions | Step-by-step Troubleshooting |
|---|---|
| #1. Qiling Partition Master | Step 1. Install and open Qiling Partition Master on your Windows computer; Step 2. Right-click the GPT disk...Full steps |
| #2. Disk Management | Step 1: Open the Disk Management as an admin by following the navigation to Control Panel > System ...Full steps |
| #3. CMD | Step 1: Open Command Prompt as an administrator and type diskpart. Now type list disk and press Enter...Full steps |
| Bonus Tip: Convert GPT to MBR without Operating System | Step 1. Prepare a USB drive. Connect the USB drive to your computer. Then, launch Qiling Partition Master...Full steps |
Windows 11 supports both MBR and GPT partition styles, but it recommends using GPT for UEFI firmware systems and MBR for legacy BIOS systems. However, if you're upgrading from Windows 10, the partition style will be automatically detected and used by Windows 11. So, you don't need to worry about it during the upgrade process.
To upgrade to Windows 11, you'll need to convert your current MBR disk to a GPT disk, as Windows 11 requires GPT partitioning. This is a requirement according to the Windows minimum specifications.
Windows 11 users may need to convert their SSD to MBR disk for various reasons, including having all drives of the same format, typically for a second drive.
If you're looking to convert your GPT disk to MBR in Windows 11, this guide can help We've got three safe and powerful methods to help you achieve this without losing any data, and we'll guide you through each step in detail. Whether you're a tech-savvy individual or a beginner, this guide can help, so be sure to read it till the end to find the solution that works best for you.
Why Do You Need to Convert GPT to MBR in Windows 11
In Windows 11, users may need to convert GPT to MBR for various reasons, such as when they want to install an older operating system that only supports MBR, or when they need to access a specific feature or tool that is only compatible with MBR partitions. Additionally, some users may have existing systems that were set up with MBR and want to upgrade to Windows 11, which requires a conversion to GPT. Whatever the reason, the process of converting GPT to MBR in Windows 11 can be a bit complex, but it's a necessary step for some users.
- To convert a second drive to Master Boot Record (MBR) for installing Windows 10 or older operating systems, follow these steps: First, ensure the drive is not in use by Windows. Next, open the Command Prompt as an administrator.
- The second OS won't boot from the 2nd GPT disk.
- Windows won't install on the target 2nd drive because the selected disk type is set to GPT, which is not compatible with the Windows installation process.
- The second drive's storage capacity is at least 2TB, and converting from GPT to MBR is a better option for disk partitioning.
To convert GPT to MBR, you can follow three safe and powerful methods. The first method involves booting from a Windows installation media, selecting the "Repair your computer" option, and then using the Command Prompt to convert the disk to MBR.
If you choose to follow the 2nd or 3rd methods to convert your disk from GPT to MBR, make sure to backup all your essential data first, as these methods require deleting partitions. You can use any technique or software to create a backup, but avoid using System Image, which can be unnecessary. Simply backing up your files will suffice.
#1. Convert GPT to MBR using the GPT to MBR Convert Tool in Windows 11
If you're new to technical knowledge and want to convert GPT to MBR quickly, you can use a third-party tool like Qiling Partition Master to help you with the conversion.
This third-party tool is reliable and safe, allowing you to convert the 2nd and 3rd disk from GPT to MBR without losing any data or deleting any partition. It offers free, professional, and server versions, with the latter two providing additional advanced features.
Follow the steps below to convert GPT to MBR via the Qiling Partition Master tool.
Step 1. Install and open Qiling Partition Master on your Windows computer.
Step 2. To convert a GPT disk to MBR, click on the GPT disk you want to convert and select "More..." from the context menu, then choose "GPT -> MBR" from the options.
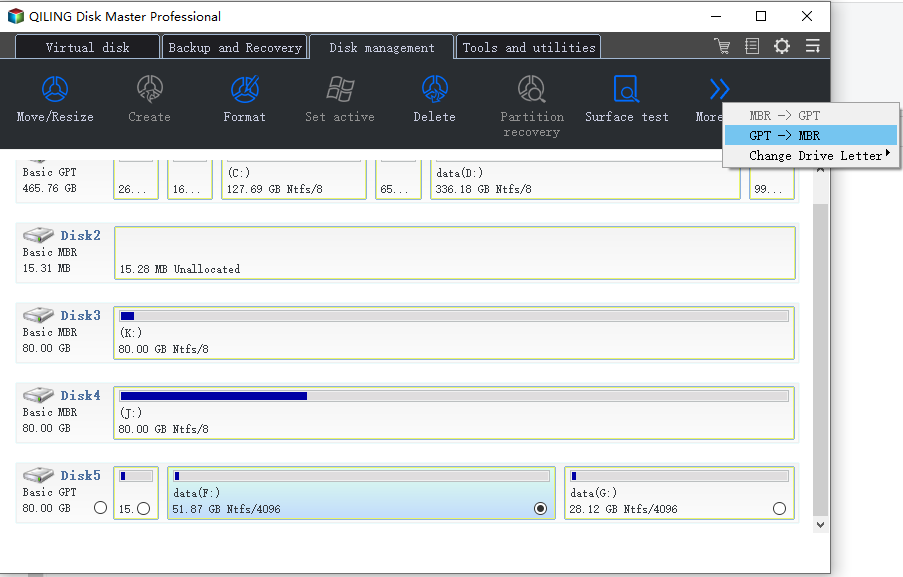
Step 3. The app converts a GPT disk to MBR, ensuring all data remains safe, thanks to the Qiling partition manager software.
Qiling Partition Master is a powerful tool that offers a range of essential features, including partition management, disk formatting, and data recovery. With its user-friendly interface, users can easily resize, move, merge, split, and delete partitions, as well as create, format, and delete disk partitions.
- 1. Resize/Move Partition: The tool can adjust partition size by moving it left or right, or by entering a specific size, all without risking any data loss.
- 2. Create/Format/Delete Partition: This tool helps you format and reuse external storage devices like HDD, SSD, USB memory cards, or SD cards, making them available for deletion of any partition.
- 3. Merge Partitions: Qiling Partition Master can quickly resolve low disk space issues by merging small partitions into a large one.
- 4. Wipe Data: You can completely wipe out all the data from your hard disk to securely save your important and sensitive data.
The tool is a crucial utility that can benefit Windows users in various ways, and it's recommended to download it from its official website to ensure authenticity and security.
#2. Convert GPT to MBR using Disk Management in Windows 11
If you're a Windows 11 user looking to convert your 2nd disk from GPT to MBR for free, you can use the Disk Management method. However, this approach involves deleting partitions and data, so it's essential to back up your important files before proceeding. To do this, follow the exact steps provided.
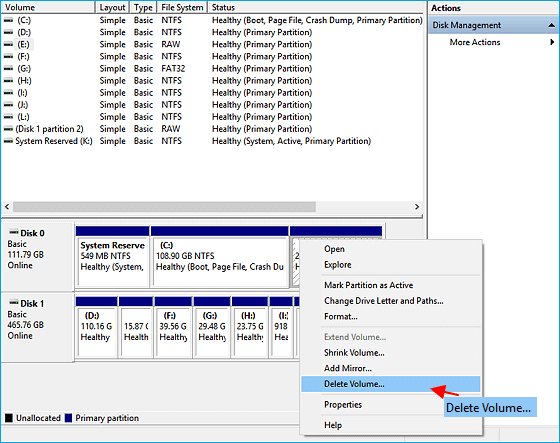
Step 1: Open the Disk Management as an admin by following the navigation to Control Panel > System and security > Administrative Tools. Click Computer Management to open a new window.
Step 2:To convert a disk from GPT to MBR, go to Storage, select Disk Management, and delete every volume by right-clicking on each one and selecting Delete Volume. This must be done for all partitions.
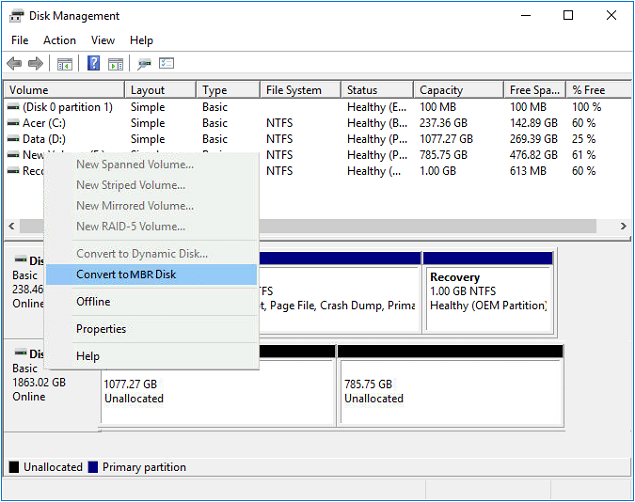
Step 3: To convert a GPT disk to an MBR disk, delete all partitions, click on the disk, and select "Convert to MBR Disk". This allows you to create new partitions on the converted MBR disk if needed.
#3. Convert GPT to MBR via CMD in Windows 11
To convert a GPT disk to MBR in Windows 11, follow these steps: you can do it via the Command Prompt (CMD). Simply open CMD, type the exact command, and follow the prompts to complete the process.
The CMD method involves deleting volumes and data, so it's essential to back up any important data before attempting this method.
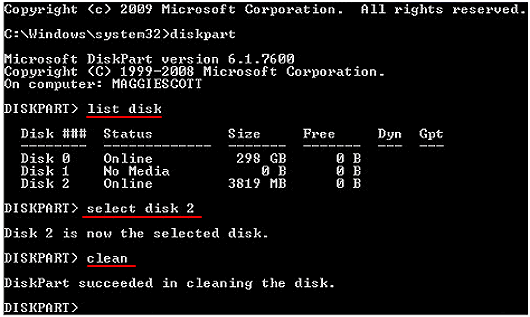
Step 1:To open Command Prompt as an administrator, right-click on the Start button, select "Windows Terminal (Admin)" or "Command Prompt (Admin)", and type 'diskpart'. Then, type 'list disk' and press Enter. Note the disk number representing the GPT disk.
Step 2:Select the disk that contains the GPT partition table (usually disk 1) and press Enter.
Step 3: The command to completely erase all contents of the disk is to type "clean" and press Enter. This will completely remove all data from the disk.
Step 4: Type convert MBR and press Enter.
Step 5: Type exit to close the Command Prompt after it's done.
Bonus Tip: How to Convert GPT to MBR without Operating System
As a Windows user, you can use the Qiling Partition Master tool to convert your 2nd and 3rd data disk or OS drive into MBR without booting into the Operating system.
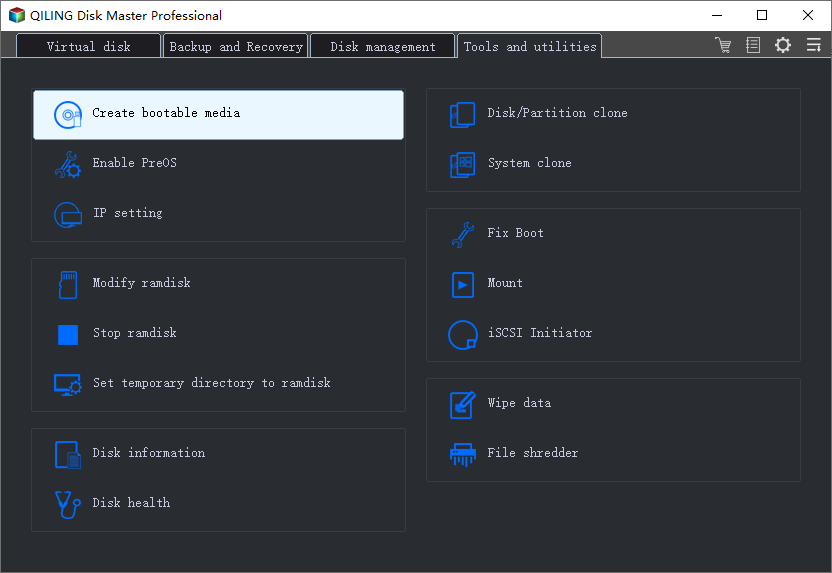
Step 1. To create a bootable USB drive, first prepare a USB drive and connect it to your computer. Then, launch Qiling Partition Master and navigate to the "Create bootable media" feature at the top. Click on it to proceed.
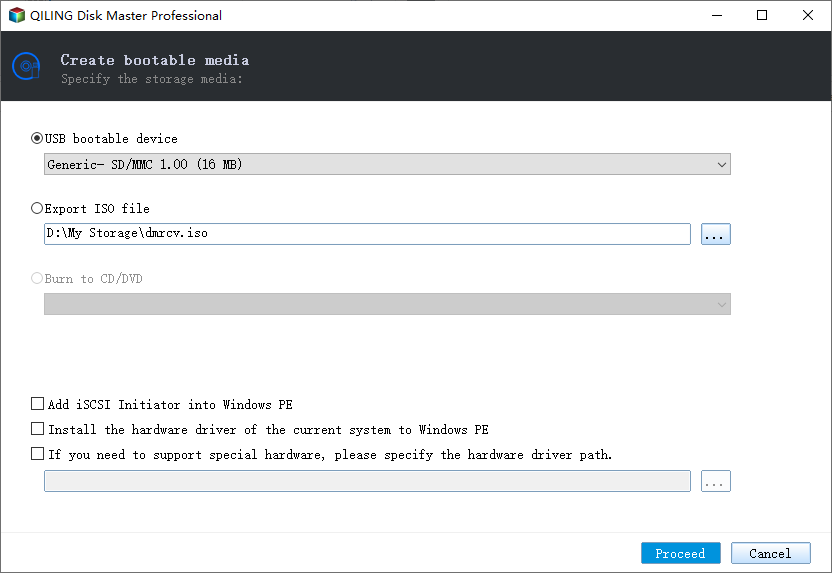
Step 2. Create a bootable USB drive for Qiling Partition Master by selecting the USB drive when it is available, or saving the ISO file to a local drive to burn onto a storage media later. Once the option is chosen, click "Proceed".
You can manage your hard disks and partitions using the Qiling Partition Master WinPE bootable disk, which can be used when the computer does not start properly or the system is not installed.
If your RAID drive or hard disk can't be recognized by the WinPE bootable disk, you're advised to click the "Add Driver" button to install the correct hardware driver.
Step 3.Connect the WinPE bootable disk to the computer, then restart and press F2/Del to enter BIOS. From there, set the PC to boot from the removable device (USB disk) instead of the hard drive, and press F10 to save and exit.
Step 4. To convert a GPT disk to MBR, launch Qiling Partition Master, select the GPT disk you want to convert, click "More...", and then choose "GPT -> MBR".
Step 5.The app converts the GPT disk to MBR, ensuring all data remains safe during the process.
You can either follow the first method, which helps you directly convert GPT to MBR via booting into Windows 11, or convert GPT to MBR without booting the OS via a bootable disk created by the Qiling partition manager software. If you need the exact steps, then follow the method #1 steps.
Conclusion
If you've been following our posts, you're likely familiar with the three methods to convert GPT to MBR in Windows. For those with technical knowledge, methods #2 and #3 offer free alternatives. However, for a more reliable and hassle-free experience, we recommend using method #1, which involves converting GPT to MBR using the Qiling Partition Master tool. This tool provides a straightforward and efficient solution for those who don't want to deal with the complexities of manual conversions.
Related Articles
- How to Apply Wipe Data/Factory Reset on Android
- Guide to Fix Microsoft Compatibility Telemetry High Disk Usage Windows 11/10
- Migrate OS to SSD: How to Migrate OS from HDD to SSD/HDD with Qiling Partition Master
- SD Card Not Detected Windows 11/10 | How to Fix SD Card Not Showing Up on Windows 11/10
- Fixed: Change Block Size From 4K to 64K | 2024 Full Guide
If you want to change your block size from 4K to 64K but don't know how, then this article is for you. Continue reading for a step-by-step guide and understand the background of this tutorial. - Change Windows Password Using Command Prompt - 2 Ways
If you're having trouble changing your Windows password, you can try using the Command Prompt to do so. However, if you're looking for a more straightforward alternative, there are other options available. This page focuses on the step-by-step process of changing your Windows password using the Command Prompt.