DiskPart: Tips and Tricks for Using DiskPart Effectively in Windows
- Microsoft (diskpart)
Diskpart is a built-in tool on Windows 11/10 and older computers that allows users to manage and manipulate disk partitions. It's not necessarily a beginner's tool, but rather a powerful utility for advanced users and IT professionals. Normal Windows users can use Diskpart to perform various tasks, such as creating, deleting, and formatting partitions, as well as assigning drive letters and labels. By following this page, users can learn more about what Diskpart can do and how to use it to manage their computer's disk partitions.
In this article, you'll learn:
- What Is Diskpart
- How Does DiskPart Work
- What Are the Benefits of Using DiskPart? Pros & Cons
- DiskPart Top Used Commands
- How Do You Enable Diskpart
- DiskPart: How to Create, Format, and Manage Partitions [Step-by-Step Guide]
- DiskPart Alternative Tool Free Download
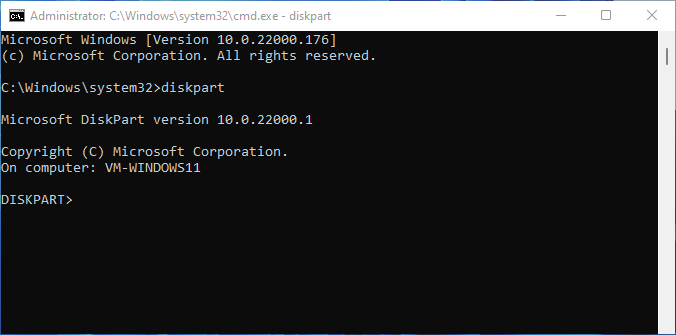
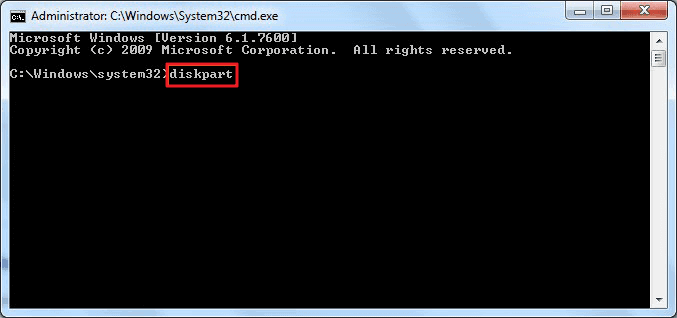
Note: To run DiskPart in Windows 11/10/8/7, older Windows, and Windows Servers, follow these steps: Open Command Prompt as an administrator, type `diskpart`, and press Enter. Alternatively, you can search for DiskPart in the Start menu, right-click on it, and select "Run as administrator".
What Is DiskPart?
DiskPart, a free command-A line utility processes orders to Windows operating systems to execute disk partitioning tasks through diverse command lines.
DiskPart was introduced in Windows 2000 as a successor to fdisk and has since been a disk partitioning tool that assists experienced and professional Windows users in managing various types of storage devices, including OS drives, data disks, external hard drives, USB flash drives, and SD cards.
How Does DiskPart Work?
DiskPart works by conveying command lines to the operating system, which then executes the respective operations. This process allows users to interact with the command-line interface, inputting commands that are then processed by the OS, resulting in specific actions being performed on the computer's disk management.
Microsoft has provided detailed information on how DiskPart interprets commands, enabling Windows users to effectively manage their computer disks and partitions.
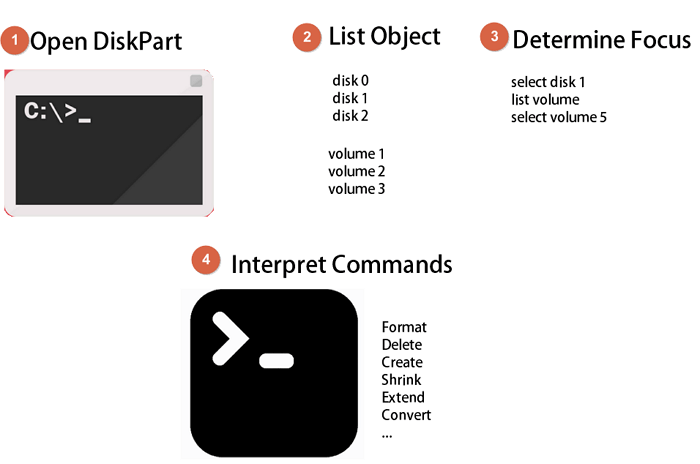
Here is the process:
Step 1. Open DiskPart.
Step 2.The available objects include disk, volume, partition, and vdisk, which provide a comprehensive list of storage-related entities that can be managed and monitored.
- list disk - Display all the disks on the computer.
- volume - Display all the volumes on the computer.
- list partition The command `df -h` is used to display the disk usage and partitions on the disk that has focused on the computer in Linux and Unix-like systems. This command shows the disk usage and partitions on the disk, along with their usage percentages, in a human-readable format.
- list vdisk - Display all the virtual disks on the computer.
Step 3. In photography, determining the focus is crucial to ensure that the subject of the image is clear and sharp. To do this, you need to decide which object to focus on, also known as the "subject" or "main subject." This will help you to isolate the subject from the rest of the scene and make it stand out.
The term "disk" can refer to a physical disk, a volume, a partition, or even a virtual disk. This includes a physical disk, such as a hard drive or solid-state drive, a volume, which is a logical disk created from one or more physical disks, a partition, which is a section of a physical disk, and a virtual disk, which is a disk created in software, such as a virtual machine or a cloud storage container.
- select disk 1
- list volume
- select volume 5
These commands tell the computer to focus on volume 5 on disk 1.
Step 4. Interpret commands to the operating system through Syntax parameters.
Note:To successfully run the DiskPart command, you need to open Command Prompt as an administrator. This provides the necessary permissions to execute the command and complete the disk management process.
What Are the Benefits of Using DiskPart? Pros & Cons
Using DiskPart can provide several benefits, including the ability to manage disk partitions in Windows computers. The pros of running DiskPart command lines include the ability to create, delete, and modify partitions, as well as perform disk-related tasks such as formatting, converting, and checking disk integrity. However, there are also some cons to consider, such as the potential for data loss if not used carefully, and the complexity of the command-line interface which may require technical expertise to navigate.
| Pros of DiskPart | Cons of DiskPart |
|---|---|
|
|
DiskPart is designed for Windows professionals, developers, and experienced administrators, making it a tool for those with advanced technical expertise.
Note: If you're new to DiskPart or a Windows beginner, you may find it helpful to use a DiskPart alternative like Disk Management or other partition manager software, which can be more user-friendly for you to try.
Most Used DiskPart Commands in Managing Disks
Here are the top most frequently used DiskPart commands in managing disk partitions:
| Type | Commands |
|---|---|
| Manage Partitions |
|
| Manage Disks |
|
To use DiskPart to execute tasks on your computer, enable and open DiskPart, and then follow the guides for creating a bootable USB drive and managing disk partitions, using commands such as "list disk", "select disk", "list partition", "select partition", "delete partition override", and "create partition primary".
Guide 1: How Do You Open or Enable DiskPart?
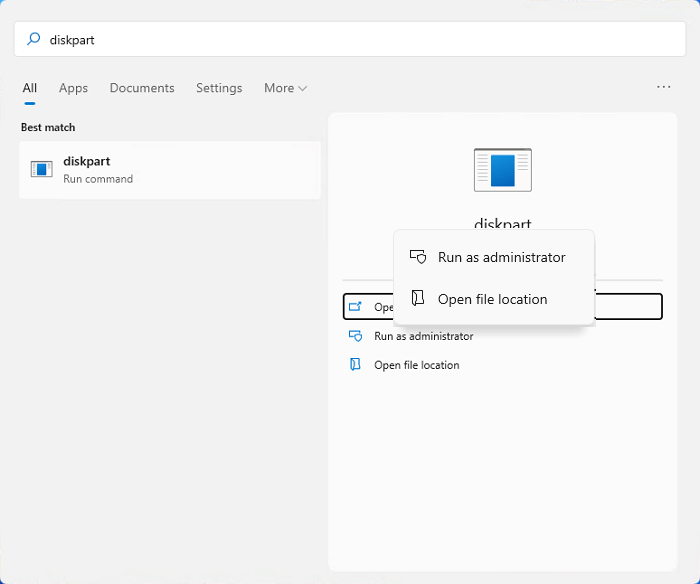
To open and enable DiskPart on your Windows computer, follow the normal steps taken by most users. First, open the Command Prompt as an administrator by searching for "cmd" in the Start menu, right-clicking on the result, and selecting "Run as administrator.
Here are the steps:
#1. Open DiskPart in Windows 11:
- Press Windows + S keys, type diskpart.
- Right-click on it and select "Run as administrator".
#2. Open DiskPart in Windows 10:
- Press Windows + R keys, type cmd.
- Click "OK" to open Command Prompt.
- Type diskpart and hit Enter to open DiskPart.
#3. Open DiskPart in Windows 8:
- Click the start menu, select search, and type cmd in the search box.
- Right-click Command Prompt and select "Run as administrator".
- Type diskpart in Command Prompt and hit Enter.
#4. Open DiskPart in Windows 7:
- Click Start, and type cmd.
- To run Command Prompt as Administrator, find Command Prompt in the search list, right-click on it, and select "Run as Administrator".
- Type diskpart in Command Prompt and hit Enter.
To create, format, or manage disk partitions using DiskPart, first, open the Command Prompt as an administrator. Type 'diskpart' and press Enter to enable DiskPart.
Guide 2: How to Create, Format, and Manage Partitions with DiskPart [Step-by-step guide]
#1. How to Use DiskPart to Manage Partitions in Windows
To manage partitions on your computer, you can use the DiskPart command-line utility. The process starts by opening the Command Prompt as an administrator, then typing "DiskPart" and pressing Enter to launch the DiskPart tool. From there, you can use various DiskPart commands, such as "list disk" to view a list of available disks, "select disk" to choose a specific disk, and "list partition" to view partitions on the selected disk.
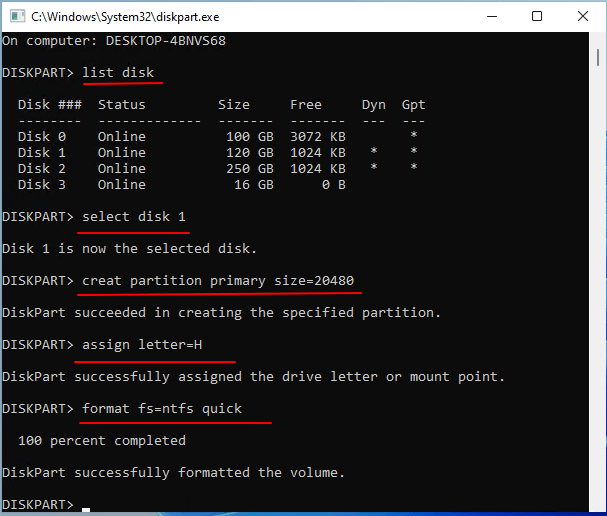
To Create Partition in DiskPart:
- Open DiskPart and type the following command lines to create Partition.
- Remember to hit Enter each time:
- list disk
- select disk * (Replace * with your selected disk.)
- list partition
- create partition primary size=1024 1024 MB is equal to 1 GB. You can replace the command with "create partition extended size =*" and "create partition logical =*".
- assign letter=*
- exit
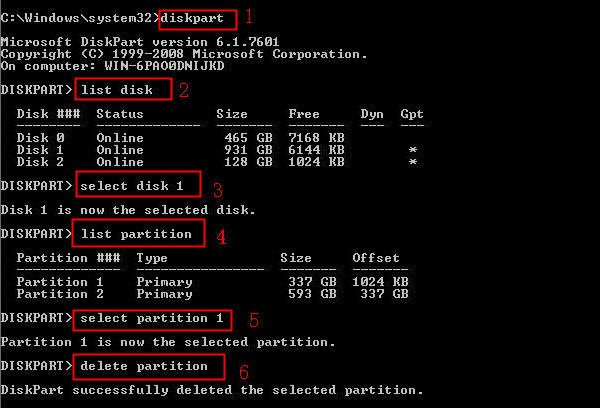
To Delete Volume Using DiskPart:
- Open DiskPart and type the following command lines one by one.
- Hit Enter each time:
- list disk
- select disk * (Replace * with the disk number of your disk)
- list partition
- select Partition * (Replace * with the partition number that you tend to delete)
- delete Partition
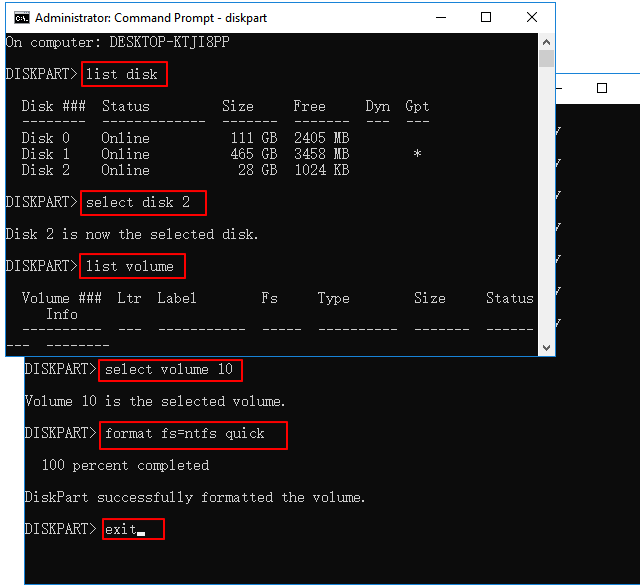
To Format Partition Using DiskPart:
- Open DiskPart in Windows and type the commands one by one.
- Hit Enter each time:
- diskpart
- list disk
- select disk + number (Replace 2 with the number of your USB drive.)
- list volume
- select volume + number (Replace 10 with the volume number of your USB flash drive.)
- format fs=ntfs quick (You can also replace NTFS with FAT32 or exFAT.)
- exit
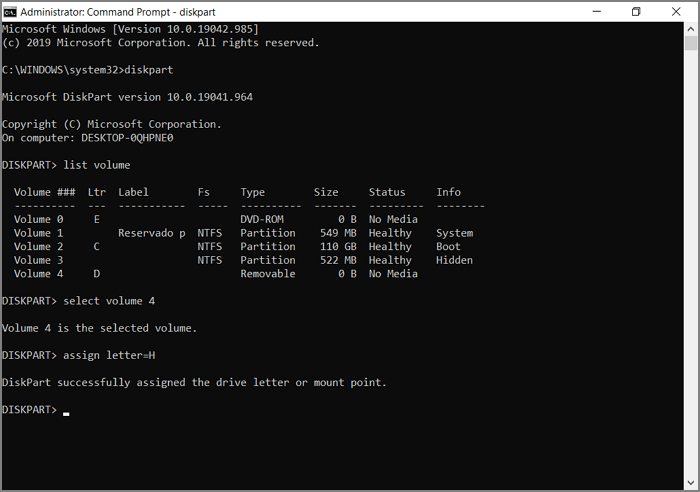
To Assign Drive Letter Using DiskPart:
- Open DiskPart, and type the following command lines one by one.
- Hit Enter each time:
- list volume
- select volume * (Replace * with the target volume number.)
- assign letter=* ( Replace * with the drive letter that you want to assign to the target volume.)
To Extend Partition via DiskPart:
- Open DiskPart and type the following command lines one by one.
- Hit Enter each time:
- list volume
- select volume * (replace * with the volume number that you need to extend.)
- extend or extend size=* (replace * with the partition size that you want to add to the target volume.)
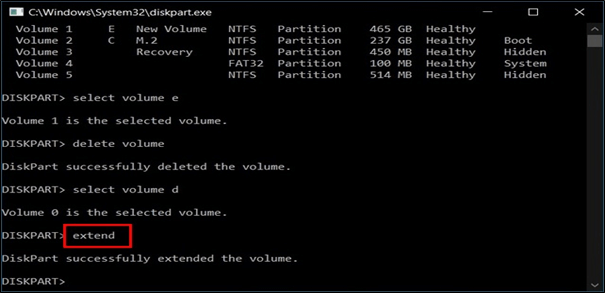
This operation requires unallocated space behind the target volume, so you'll need to shrink or delete a neighbor volume if there's no space left.
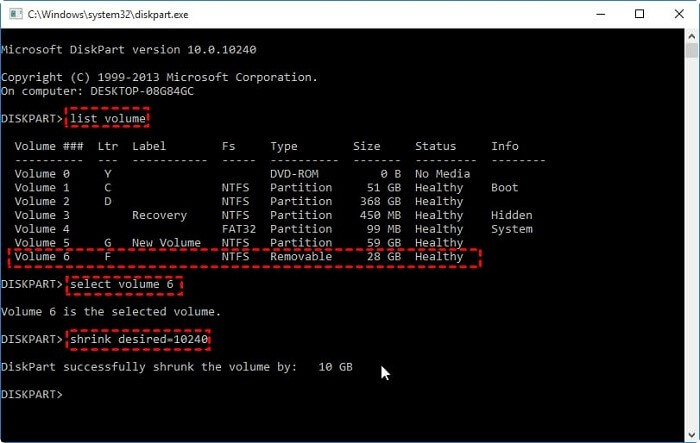
To Shrink Partition with DiskPart:
- Open DiskPart in Windows and type the following commands one by one.
- Hit Enter each time:
- list volume
- select volume * (Replace * with the volume number that you need to shrink.)
- shrink desired=* (Replace * with the volume size that you want to shrink and get from the selected volume.)
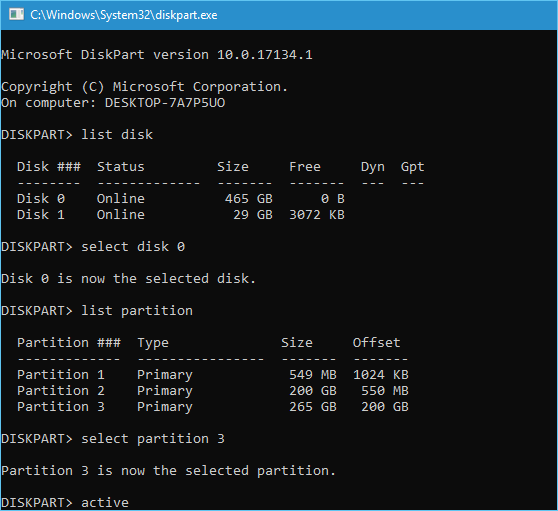
To Mark Partition as Active with DiskPart:
- Open DiskPart and type the following command one by one.
- Hit Enter each time:
- list disk
- select disk *
- list partition
- select partition *
- active
#2. How to Use DiskPart to Manage Disks (HDD/SSD, External) in Windows
DiskPart not only helps users manage partitions, but also allows them to manage disks independently, including cleaning up a drive and converting disk type to MBR or GPT.
Here are the guidelines that you can follow to execute these operations on your computer. To execute these operations, first, ensure that your computer is connected to the internet.
Note: Remember to back up all essential content on your target disk before executing these tasks.
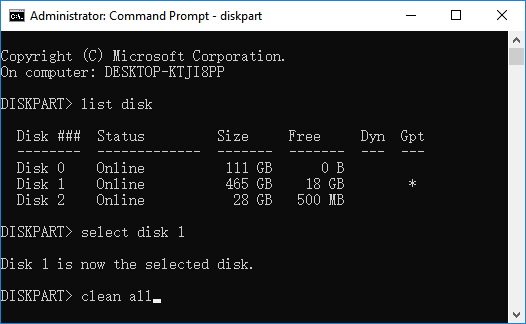
To Clean or Erase Disk with DiskPart:
- Open DiskPart and type the following commands one by one.
- Hit Enter each time:
- diskpart
- list disk
- select disk *
- clean, To clean all data and partitions, use the clean command. To erase the disk, use the clean all command.
- exit
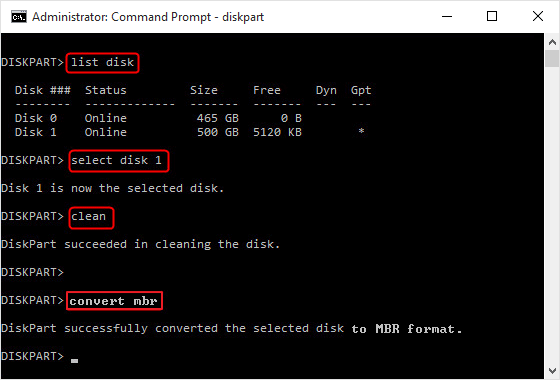
To Convert Disk to MBR or GPT Using DiskPart:
- Open DiskPart and type the following commands one by one.
- Hit Enter each time:
- diskpart
- select disk *
- clean
- convert mbr (or convert gpt)
DiskPart Alternative Tool Free Download (For Windows Beginners)
For many Windows users, DiskPart can be a helpful tool, particularly when Windows is not booting. However, its complexity may be daunting for beginners, making it less accessible to those who need it most.
If you're looking for a qualified tool to replace DiskPart for disk management, consider trying Qiling Partition Master, a professional partition manager that can fulfill your disk management demands.
This tool helps you easily partition and manage hard drive partitions, external HDD/SSDs, or virtual disks with just a few clicks.
See how can Qiling Partition Master help:
#1. Partition Hard Drive
Step 1. Check for free space
To divide a disk partition into multiple ones, ensure there is sufficient free space available for the new partitions.
Step 2. Shrink a disk partition to create unallocated space
To resize a partition, start by clicking on the "Resize/Move" feature, then select a partition with a lot of free space.

To free up space, drag either end of the partition to the right or left, reducing its size as indicated by the red arrow, and observe the "Partition size" area to see how much space has been decreased.

To save the changes, click the "Proceed" button. This will finalize the disk space reduction. After doing so, go back to the main window and look for the unallocated space that has appeared under the same disk where the space was reduced.
Step 3. Create a new partition on unallocated space
The final step is to convert the unallocated space into a usable partition drive with a recognized file system. This is done by right-clicking on the unallocated space and selecting the "Create" option.
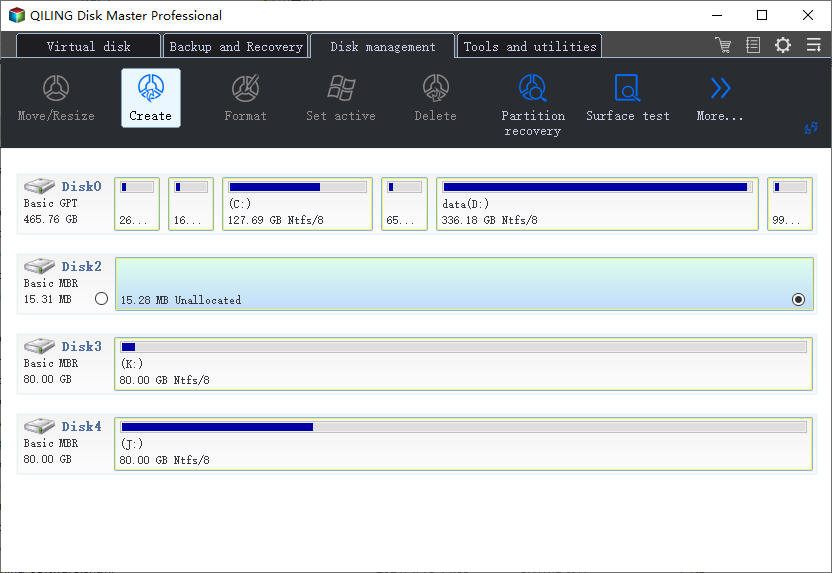
To customize the partition information, you can select a drive letter, partition label, and file system (such as NTFS, FAT32, EXT2/3/4, or exFAT) among other settings in the Advanced Settings.
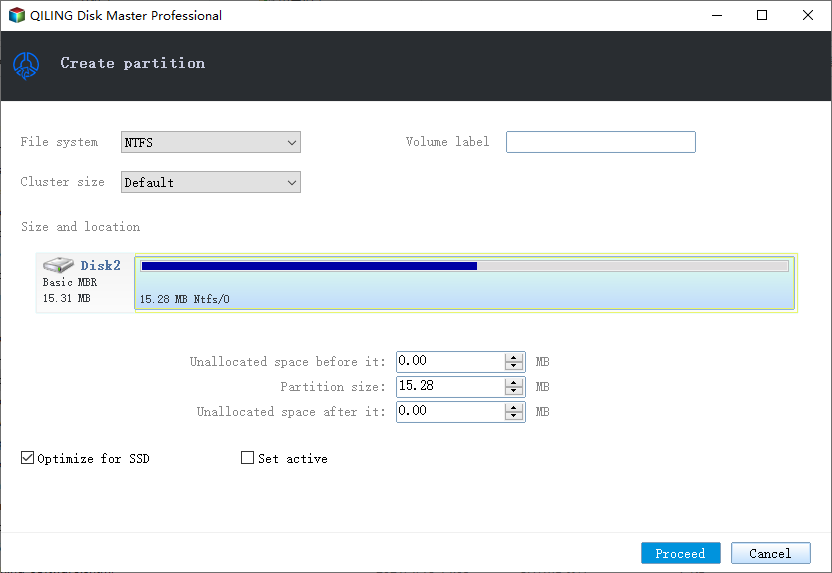
To create a partition on unallocated space, select it, click "New" and set the partition size and file system type. Then, click "Apply" and confirm the operation by clicking "Proceed". Repeat this process to create multiple partitions on a hard drive.
#2. Convert Disk to MBR/GPT
Step 1. Download and launch Qiling Partition Master on your Windows computer.
Step 2. To convert a MBR disk to GPT, select the disk you want to convert, click the "More" button, and choose the "Convert to GPT" option.
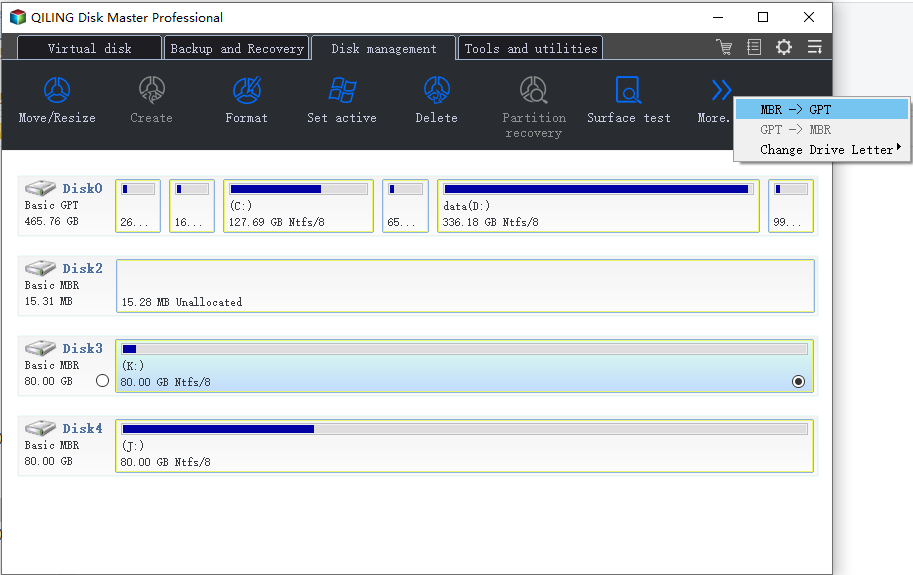
Step 3. After that, waite for finish to conversion.
#3. Migrate OS to HDD/SSD
Here are the benefits of using this software in one paragraph:
- Create, resize, format, merge, split partitions
- Convert NTFS to FAT32, or FAT32 to NTFS
- Check file system error
- Clone OS disk to larger or smaller HDD/SSD
- Partition recovery
- 1-click to partition the new disk
- 4k alignment SSD
Conclusion
DiskPart is a command-line tool in Windows that allows users to manage and manipulate disk partitions. It works by providing a command-line interface for users to interact with the disk management system, enabling them to create, delete, format, and resize partitions.
We also demonstrated how to enable DiskPart and run various commands to accomplish different tasks in Windows 11/10/8/7. Additionally, we introduced a DiskPart alternative tool, Qiling Partition Master, to help Windows beginners.
Qiling partitioning software is a more qualified and efficient alternative to DiskPart, offering a wider range of features and ease of use to effectively manage disk partitions and storage devices. It's a great tool for Windows users to make the most of their disk partitions and storage devices.
Related Articles
- What Is 4k Hard Drive
- Everything to Learn About SD Card Copier Software
- How to Fix External Hard Disk Slow to Respond in Windows 11/10/8/7
- How to Convert Basic Disk to Dynamic or Dynamic Disk to Basic in Windows 10/8/7
- PC Slow Down? How to Remove Bloatware on Windows 10/11
Want to remove bloatware on a new computer by the manufacturer? This post comes to help you trim off this unwanted software pre-installed on Windows 11 and Windows 10. - How to Tell If a Hard Drive Is Dead [Step-by-Step-Guide]
To determine if your unbootable hard drive is dead or temporarily failing, refer to this comprehensive guide. It provides a step-by-step process to quickly check the health state of your hard drive and offers guidance on what to do when it is no longer functional.