4 Easy Solutions to Fix 'Unable to Extend C Drive' in Windows 11
| Workable Solutions | Step-by-step Troubleshooting |
|---|---|
| Option 1. Delete Volume with Disk Management | Step 1: Open the Win+X menu and choose Disk Management by clicking or tapping on it (diskmgmt. msc)...Full steps |
| Option 2. Shrink Volume with Disk Management | Step 1: In the Windows search box, type and search for Computer Management and select Run as administrator...Full steps |
| Option 3. Merge Non-Adjacent Unallocated Space with Qiling Partition Master | Step 1. Right-click the partition that next to the unallocated space, select "Resize/Move"; Step 2. Put the mouse...Full steps |
| Option 4. Allocate Space from Another Disk with Qiling Partition Master | Step 1. Right-click on the D: partition with enough free space and select "Allocate Space"; Step 2. Select the target...Full steps |
Introduction
PCs running on Windows tend to slow down over time, despite having available storage space, due to accumulated data and files, leading to frustrating pop-ups claiming low disk space.
Your computer's performance slows down, apps become sluggish, and you're unable to increase the space of your hard disk, which is a common issue in Windows 11. This problem can be caused by various reasons such as disk space being fully utilized, disk errors, or corrupted system files. To resolve this issue, you can try solutions like deleting unnecessary files, running disk cleanup and disk error checking tools, or using a third-party disk management tool to extend the C drive. These solutions can help you free up space, fix disk errors, and potentially increase the space of your hard disk.
Why Can't I Extend My C Partition?
If you're unable to extend a volume, such as the C drive, You can check the status of your disk partitions using Windows Disk Management. This tool will provide you with information on the condition of your disk and partitions, which may help clarify why you can't extend the volume.
- Windows cannot be enlarged if the partition is formatted in FAT or another type, as it requires a specific file system to function properly.
- There is no free space available to expand the partition. You need to delete some files or free up space on the partition to expand it.
- No unallocated space exists on your computer's hard disk.
The Extend Volume option in Disk Management is only available for partitions formatted as RAW or NTFS, and not for FAT or other file systems.
- The partition capacity has reached its 2TB limit when using a Master Boot Record (MBR) drive. This is because MBR drives have a limitation on the maximum size of a partition, which is 2 terabytes.
- Windows won't allow you to expand the main partition by using unallocated space in an extended partition or vice versa.
You can learn how to check total hard disk space in Windows 10 by visiting the provided link.
Having determined the reason for the greyed-out status of Extend Volume, we must determine how to activate it or raise the partition size in certain cases.
How to Fix "Unable to Extend C Drive"?
To fix the Extend C Drive problem, users need to be aware of two situations: they can either shrink a different drive to free up space or use a third-party tool to extend the C drive. Prior to choosing a method, users must ensure that there is enough free space on the other drive to shrink it, and that the tool they choose is compatible with their system. Once the necessary prerequisites are met, users can proceed with the chosen method to extend their C drive.
- 1. If you're experiencing a "No Unallocated space" issue with your disk, you can try deleting or shrinking the partition using Disk Management, but be aware that this may result in data loss.
- 2. If you have a non-adjacent unallocated space, it's best to use third-party software to merge the unallocated space into a contiguous block. This is because Windows built-in tools may not be able to merge non-adjacent unallocated space.
Option 1. Delete Volume on Disk Management
When a volume or partition is removed from a disk, the previously reserved space becomes available. This unallocated space can then be used to extend another volume or partition on the same disk, effectively adding the unallocated space to the extended volume or partition.
Step 1: To open the Disk Management tool, you can press the Win+X keys on your keyboard, then click or tap on Disk Management in the menu that appears. This will open the Disk Management window, which can be accessed by typing diskmgmt.msc in the Run dialog.
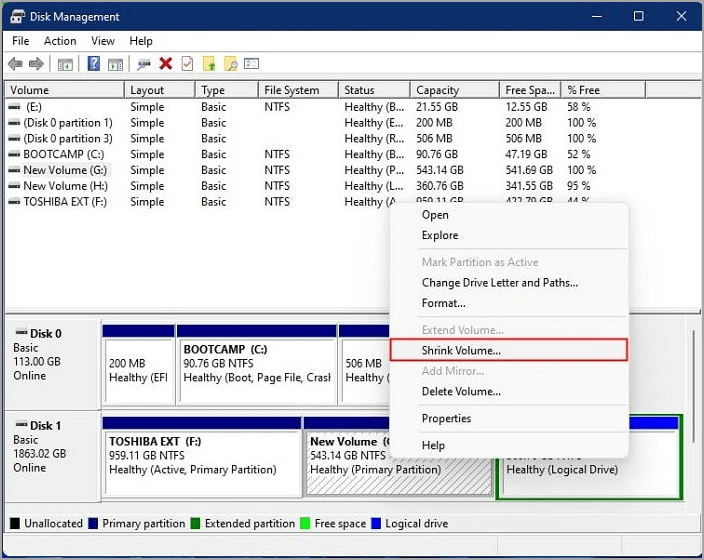
Step 2: When you right-click or press and hold on a partition/volume (for example, "G"), select Delete Volume from the context menu that appears.
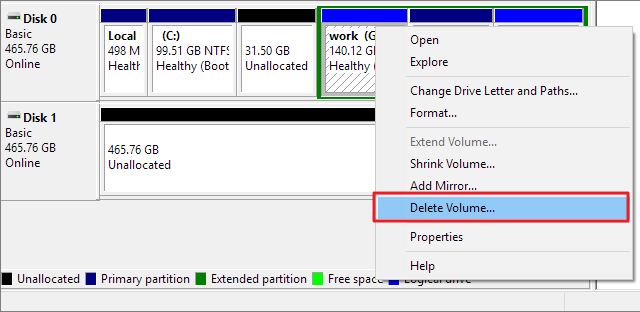
Step 3: To confirm, choose Yes from the drop-down menu.
Note: The volume/partition will now be erased, and the remaining space on the drive will be shown as Unallocated space. The drive will be completely empty, and any data on it will be lost.
Option 2. Shrink Volume with Disk Management
It is possible to create fresh disk space from an existing disk by shrinking the volume, which will result in an unallocated area.
If you need an extra partition but don't have any more drives available, you can create one on your computer by following these steps. You can use a tool like Qiling Partition Master to resize an existing partition and create a new one.
Note: To resize a partition, first, ensure you have a backup of your data. Then, open the disk management tool, select the partition you want to resize, and click on the "Shrink" button. Follow the prompts to confirm the new size.
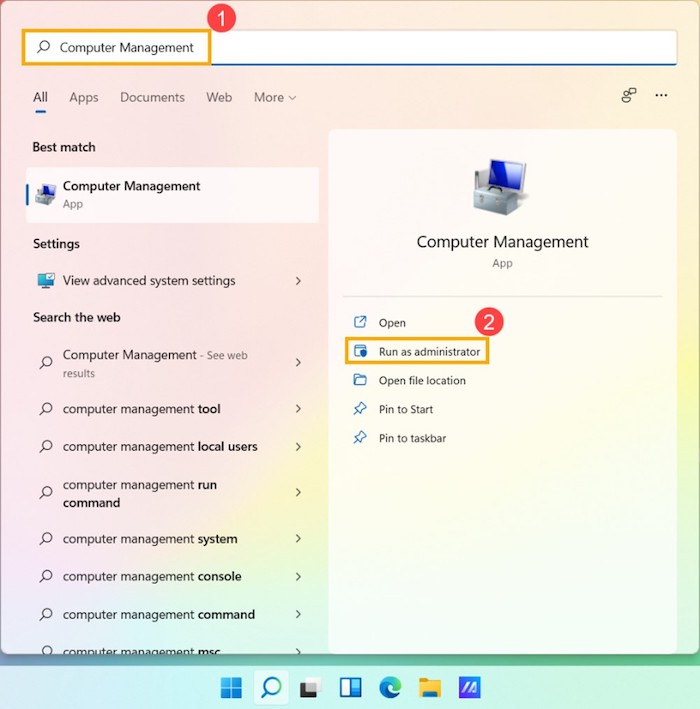
Step 1: To access Computer Management in Windows, type "Computer Management" in the search box and select "Run as administrator" to open it with elevated privileges.
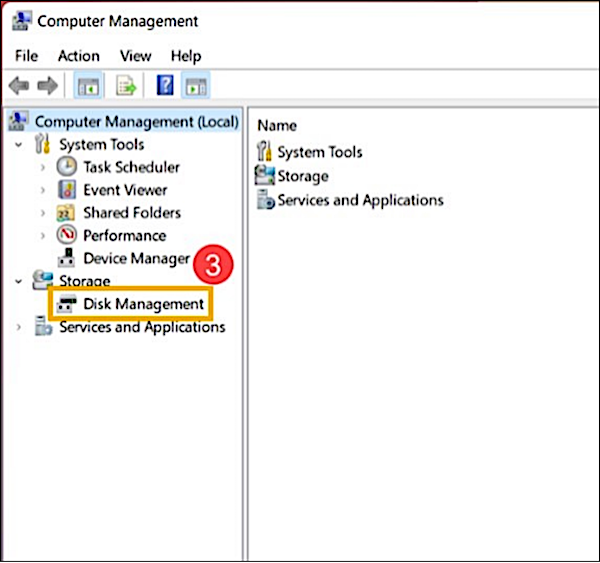
Step 2: Select Disk Management from the Computer Management menu.
Step 3: In Disk Management, right-click the current volume on which you wish to create an extra partition and choose Shrink Volume from the context menu.
Note: The Reduce Volume feature will automatically calculate the maximum amount of space that can be reduced.
Step 4: Enter the size you want to shrink and click the "Shrink" button.
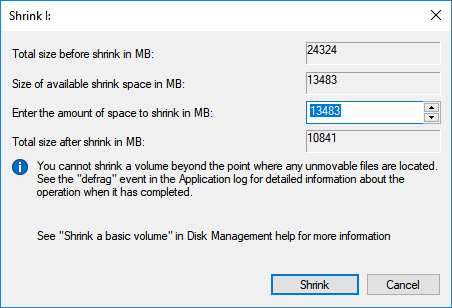
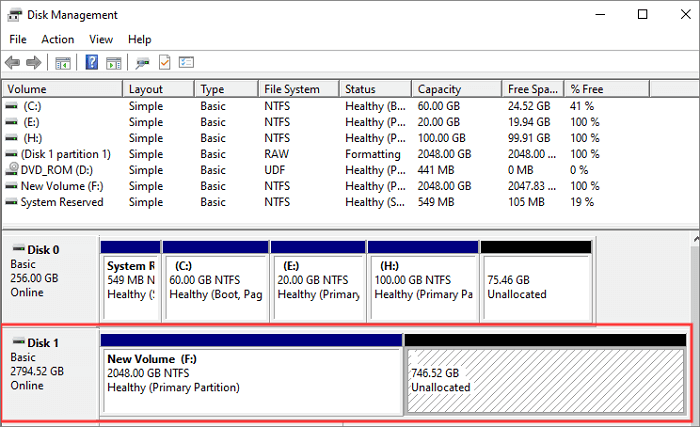
Step 5: After shrinking a disk, an unallocated area will be created in Disk Management, which can then be used to create a new partition.

Option 3. Merge Non-Adjacent Unallocated Space
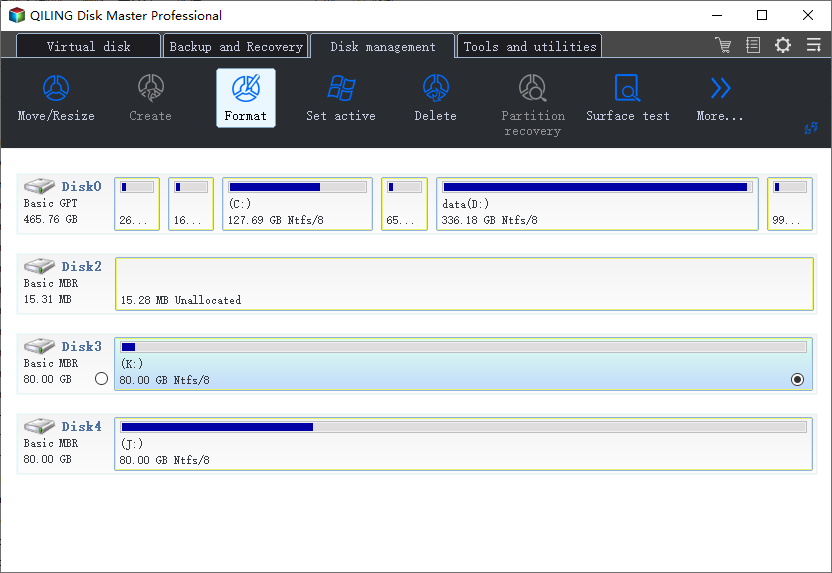
Disk Management is not without its flaws, and third-party software such as Qiling Partition Master is intended to compensate, offering users extra disk management tools compatible with all Windows systems.
The tool stands out as a must-have due to its various features, including the ability to migrate an operating system, resize or move partitions, wipe, hide, and convert between MBR/GPT or Basic/Dynamic. Rather than deleting all connected partitions and assigning the remaining space to a single partition, the tool's "Merge" option allows combining two partitions into one.
Users face three frequent scenarios when attempting to combine non-adjacent partitions. Qiling Partition Master may be used in any situation. Installing and launching the program on your PC is simple. We'll go through each stage in detail one by one as we go along.
Main Features of Qiling Partition Master:
- This online converter converts from Master Boot Record (MBR) to GUID Partition Table (GPT) or vice versa.
- Partitions may be merged without any data being lost.
- Transfer the operating system to a solid-state drive.
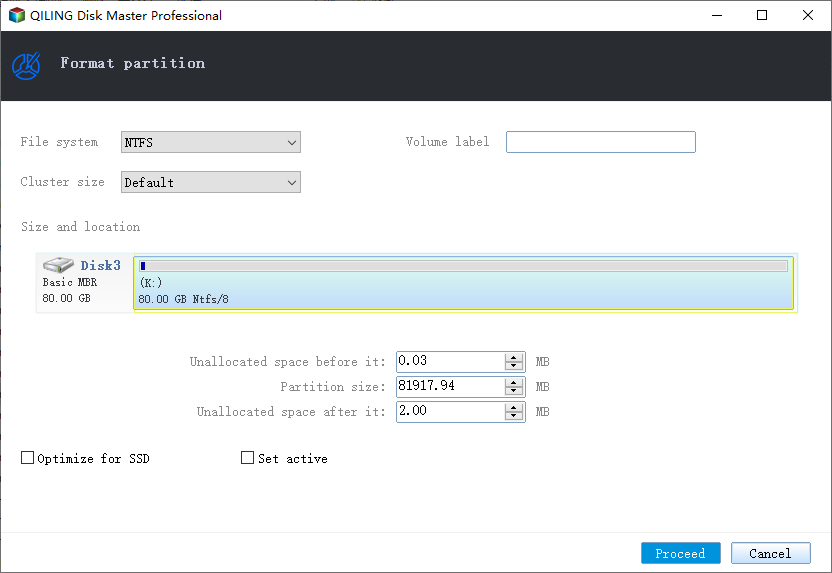
- Partitions may be created, formatted, and deleted.
Steps to Merge:
Step 1. Click the partition that is next to the unallocated space, select "Resize/Move".
Step 2. To move the unallocated space, place the mouse cursor on the partition and drag it to the left or right. This will adjust the size of the partition and create space for the unallocated area.
You can repeat Step 1 and 2 to move the unallocated space to the desired location, which involves creating a new partition and moving the unallocated space to that partition, then deleting the original partition and assigning the unallocated space to the new partition. This process can be repeated until the unallocated space is in the desired location.
Step 3. Click "Proceed" to add the unallocated space to the target partition. This will execute the operations to add the unallocated space into the target partition eventually.
Option 4. Allocate Space from Another Disk
"Allocate Space" is a function in Qiling Partition Master that allows you to allocate unused disk space, assigning it to another disk on the same hard drive without deleting the space from the chosen partition.
Steps to Allocate Space:
Step 1. To free up space on the D: partition, click on it and select the "Resize/Move" option.
Step 2. To free up space from the D: drive to the C: drive, drag the D: partition panel to the left to shrink it, then click "Proceed" to confirm the change.
Step 3. Select the target partition - C: drive and select "Resize/Move".
Step 4. To move free space from the D: drive to the C: drive, drag the partition panel to the right, adding the free space to C:. Then, click "Proceed" to initiate the process.
Conclusion
If you can't expand your C drive in Windows 10/11 Disk Management due to lack of unallocated space, you can delete a partition to free up space, but this process can be time-consuming. Alternatively, you can try one of the suggested remedies to resolve the issue.
If there's unallocated space, you can either use it to install a new OS or extend an existing one. If there's no available space, you can opt to install the OS on a different drive or transfer the existing system to a larger disk. This way, you can upgrade the disk without reinstalling Windows or other applications.
Related Articles
- Difference Between SFC, CHKDSK, and DISM Windows 11
- How to Extend Windows Server Partition [Server Guide]
- How to Wipe or Erase Hard Drive in Windows Server - Qiling
- ASUS Laptop Slow in Windows 11/10? 7 Effective Fixes!
- How to Format Bootable USB Flash Drive to Normal in Windows 7?
This article illustrates how to format bootable USB stick to normal flash drive with NTFS or FAT32-based file system using reliable bootable USB drive format tool in Windows 7, 8, 10, 11. - How to Format C Drive Using Command Prompt in Windows 11, 10, 8, 7?
Learn how to How to Format C Drive Using Command Prompt in Windows 11, 10, 8, 7?. This guide explains the causes, steps, and practical tips for format c drive command prompt, format c drive cmd, format c drive using command prompt on Windows with Qiling Disk Master.