How to Format Laptop or PC Windows 7 Without CD (Full Guides)
Microsoft has announced Windows 11, but many users are still on Windows 7, which reached its end-of-life in 2020, making it a security risk. To upgrade, you'll need to format Windows 7, and since you don't have a CD, we'll explore how to do this without one.
Why Do You Need to Format Windows 7
There are several reasons why you might need to format your Windows 7, including a corrupted system, a virus or malware infection, a failed Windows update, or a desire to start with a clean slate. In these scenarios, formatting your Windows 7 can be a necessary step to restore your computer to its original state and ensure it runs smoothly and efficiently.
You Are Preparing to Upgrade Your PC
When upgrading to Windows 10 or another operating system, it's often not necessary to format your Windows 7 disk, as the new OS can handle the installation process itself. In most cases, you can simply install the new operating system without needing to format the disk.
The installation media can handle the file selection and deletion, and a disk format is done before copying the new OS files.
You Want to Sell off Your PC
Selling a PC can be a good reason to format Windows 7, ensuring your privacy and preventing your files from being accessed by the new owner.
Formatting a PC beyond recovery is essential to ensure complete data erasure. This is because powerful data recovery software can easily recover data from a PC that has not been properly formatted, posing a threat to your privacy. To guarantee that all data has been wiped off, it's advisable to format the PC and overwrite the data several times, making it virtually impossible to recover any sensitive information.
Use Your PC as a Backup or Storage Device
Formatting your Windows 7 PC can be useful for various reasons, including using it as a storage or backup device.
To properly remove the old drive and install another operating system, you should first disconnect the old drive and install a new operating system. Once the new OS is installed, you can reconnect the old drive and then format it from within the Windows interface. However, keep in mind that using Windows 7 as the OS to format the drive is not possible.
There are several ways to format Windows 7, but three commonly used methods include follow the steps below.
1. How to Format Windows 7 Without a CD by Using a Partition Manager
You can format Windows 7 without a CD using Qiling Partition Master, which offers a powerful data erase feature that ensures a complete data format, making it unrecoverable in the future.
To utilize the Qiling Partition Master tool, first create a bootable USB drive with Qiling, and then use the WinPE environment to format Windows 7.
Create a Bootable USB Drive
Step 1. To create a bootable disk of Qiling Partition Master, prepare a storage media such as a USB drive or CD/DVD disc, and connect it to your computer.
Step 2. Launch Qiling Partition Master, find the "WinPE Creator" feature on the top, and click on it.
Step 3. You can select the USB or CD/DVD option when the drive is available. If you don't have a storage device, you can save the ISO file to your local drive and burn it later. Once you've made your selection, click "Proceed" to start the process.
When the process completes, you have created a Qiling Partition Master WinPE bootable disk, allowing you to manage hard disks and partitions through a bootable drive in case of a computer boot failure.
To load the RAID driver under WinPE, click on the "Add Driver" option from the menu bar, which will allow you to add the driver for your device, including RAID drives, that may not be recognized under WinPE without the necessary drivers installed. This step is crucial for devices that require specific drivers to function properly, such as RAID or certain hard disk configurations.
Once the process is completed, your bootable USB drive has been successfully created, and you can use it for formatting your devices.
Format Windows 7 Without CD with Qiling Partition Master Bootable USB
After creating the bootable drive, the next steps to format your Windows 7 are straightforward and easy using Qiling partition manager.
- Connect your USB drive to the PC and format and erase it as needed.
- To boot your Windows 7 system from a bootable drive, go into your system's BIOS, set it to boot from "Removable Devices," and then restart your PC to let it boot from the drive.
- When the bootable drive loads, you can choose your preferred option. You can either wipe disk data completely or format the drive with Qiling partition management software.
Step 1. Run Qiling Partition Master, select the partition you want to format, and choose the "Format" option.
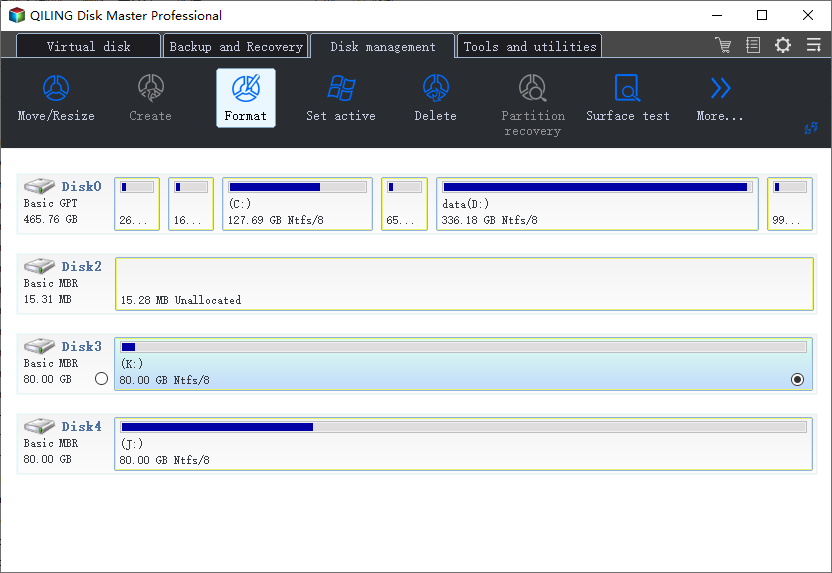
Step 2. Set the partition label, file system, and cluster size in the new window, then click "Proceed" to format the partition.
Step 3. To start formatting the partition on your hard drive, you will see a warning window after selecting the partition. Click "OK" in it to proceed.
2. Use Windows 10 Installation Media to Format Windows 7 Without CD for an Upgrade
You don't need to format Windows 7 separately when upgrading to Windows 10 or Windows 11. The new operating system installation media will automatically handle the previous system files.
Download the Windows 10 installation media and insert it into your system. You can create this on a USB flash drive or any other external media, such as a CD/DVD.
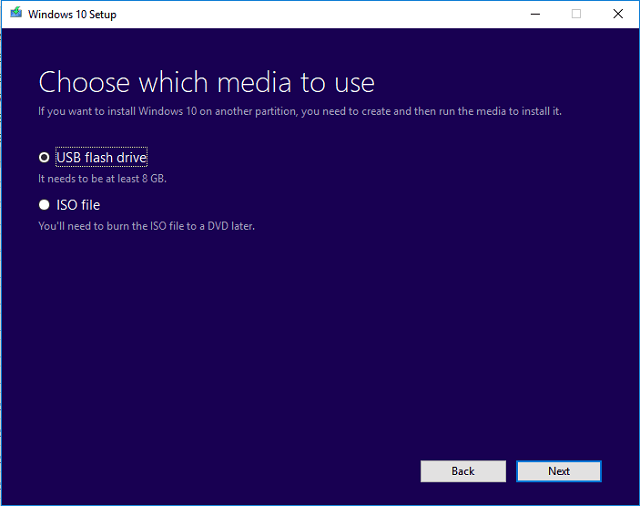
To change the boot options from BIOS, navigate to the BIOS settings for your computer and modify the boot order. Select the appropriate boot order, either the CD/DVD-ROM drive or USB, based on how you created your bootable drive.
Insert the media into your computer, power it on, and follow the instructions to install Windows 10, choosing whether to keep specific files or delete them.
3. Format Windows 7 Without CD to Use It as a Storage Drive
Upgrading to an SSD drive and installing the operating system on it makes it easy to use the old hard drive as storage media.
The steps involved in how to do it would include:
Step 1. Disconnect the old hard drive from your PC.
Step 2. Connect a new disk to the computer.
Step 3. To get started with your new disk, install Windows 10 or any other operating system you prefer on it. This will allow you to start using your computer with a fresh and updated operating system.
Step 4. Re-attach the old drive to your computer.
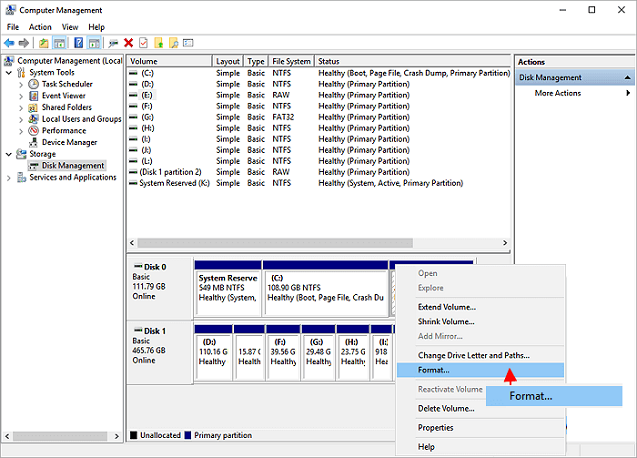
Step 5. Boot the device from the Windows 10 hard drive, and then use the Windows Disk Management utility to format the older drive. This will erase all data on the older drive, so make sure to back up any important files first.
Right-To format a drive, click the Windows button, select the Disk Management utility, right-click the drive you want to format, and then choose the "Format" option.
The Concluding Thoughts
Formatting a Windows 7 device is a relatively straightforward process, with various options available to achieve this. The three major methods outlined here should provide a good understanding of the concept and help you access the best possible functionality.
If you're selling your computer, consider using Qiling Partition Master for a safe and private experience. It offers a high level of security to protect your personal data.
Related Articles
- SSD Health Check Software Free Download in 2022
- Why Does Computer Keep Crashing? 10 Instant Ways to Fix Computer Keeps Crashing
- How to Create Qiling Partition Master Bootable USB
- How to Increase/Extend C Drive Space in Windows 11(Fixed)
- How Do I Format a Disk in Windows 10? Follow and Learn How To [Beginners' Guide]
Formatting a disk on Windows 10 and other modern operating systems can be done efficiently with reliable solutions. Whether you're a beginner or experienced, this page will guide you through the process, providing you with a straightforward and successful disk formatting experience. - How to Decrypt and Format Encrypted SD Card [2022 Updated]
When your SD card gets encrypted, you cannot directly format encrypted SD card. You'll have to decrypt the SD card first and then format it. On this page, you'll learn the full process of decrypting SD card even without a password and format the encrypted SD card to a normal state again.