How to Use SSD and HDD Together at the Same Time
Can I Use SSD and HDD at the Same Time
You can easily use both SSD (Solid-State Drive) and HDD (Hard Disk Drive) together in a single system, combining the benefits of both. Historically, HDDs were the go-to choice for storing large amounts of data, but with technological advancements, SSDs have emerged as a popular alternative, offering faster performance and lower power consumption. Now, you can seamlessly integrate both storage types to create a hybrid setup that balances storage capacity and speed.
The high cost of large-capacity SSDs makes them unaffordable for many users, who can only opt for smaller storage options. However, this doesn't mean you have to choose between the two - you can use both an SSD and an HDD simultaneously on the same PC, taking advantage of the fast speed of the SSD while still having ample storage space with the HDD.
Is It Better to Have Both SSD and HDD
Having both an SSD and an HDD at the same time is a good option, as the SSD provides benefits such as low power consumption and fast loading speed, making it a popular choice to install alongside an existing HDD.
Using both SSD and HDD together can combine the benefits of each, allowing for fast performance from the SSD and ample storage from the HDD.
Using a combination of SSD (Solid-State Drive) and HDD (Hard Disk Drive) together can provide several benefits, including improved performance, increased storage capacity, and enhanced data management capabilities. The SSD can serve as a fast and efficient primary drive for the operating system and applications, while the HDD can be used for storing large files and data archives, allowing for a balance between speed and storage capacity.
- Increased storage space
- Multiple drives and redundancy
- Reducing costs One Gig at a time
How to Use SSD and HDD Together in Laptop/PC Windows 10
Here’s a one-paragraph summary: To use an SSD and HDD together, you can set up a dual-drive configuration on your computer. This involves installing both a solid-state drive (SSD) and a hard disk drive (HDD) in your system. The SSD can serve as the primary drive for your operating system and programs, while the HDD can be used for storing larger files, such as videos and photos.
To use an SSD and HDD together on a laptop or PC, you can follow these simple steps: install the SSD as the primary drive for your operating system and programs, and the HDD as a secondary drive for storage. This can be done by connecting the SSD to the motherboard and the HDD to a separate SATA port, then configuring the BIOS or UEFI settings to prioritize the SSD. You can also use a software-based solution, such as a RAID or virtualization software, to combine the two drives.
1. Use SSD As a Boot Drive
To use both SSD and HDD together, consider using the SSD as the boot drive, keeping the Windows Operating System on it. This will speed up launching programs, booting up, and shutting down your PC, as the OS will be on the faster SSD.
To install Windows on an SSD, you can either do a fresh install or OS migration. A fresh install involves completely wiping the SSD and then installing Windows from scratch, while an OS migration transfers the existing Windows installation from a traditional hard drive to the SSD, preserving all installed programs, settings, and data.
Install OS on SSD by Fresh Install
A traditional method to install an OS on an SSD is a Fresh Install or Clean Install. This process involves using the Windows Media Creation Tool to install the entire OS on the SSD, rather than migrating the OS from the original drive.
To fresh install an operating system (OS) on a solid-state drive (SSD), you first need to back up any important data from the drive. Then, you'll need to connect the SSD to your computer and enter the BIOS settings to set it as the primary boot device.
Preparations:
- Empty USB (8GB min)
- Download Windows Media Creation Tool
- An empty SSD
- Windows product key (activate after the installation)
Step-by-Step Guide:
To clean install or fresh install an operating system (OS) on a solid-state drive (SSD), follow these steps: Connect the SSD to your computer, boot from a USB drive or CD/DVD with the OS installation media, select the correct language and country or region, and agree to the license terms. Choose the type of installation, such as a custom or upgrade installation, and select the SSD as the installation location.
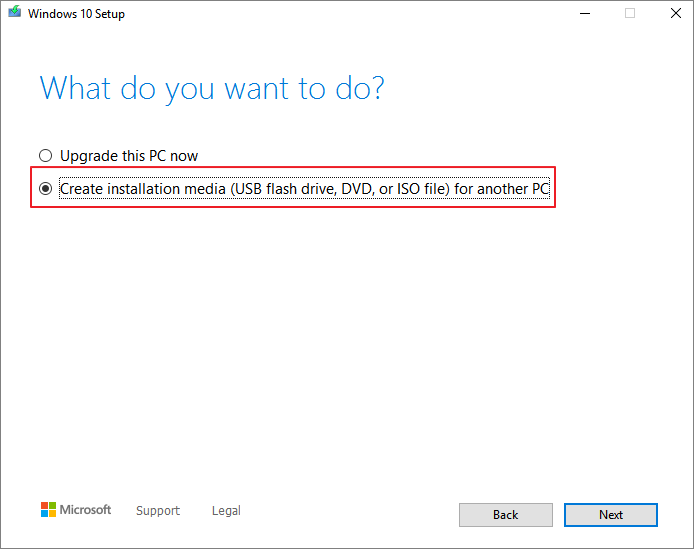
Step 1.Install and run the Windows Media Creation Tool on your PC, accept the license terms and conditions, and select "Create Installation Media" from the main interface, then hit the "Next" button.
Step 2.Insert the installation disc into your PC, shut it down, and then open its case. Remove the old hard drive and replace it with a new SSD in the drive bay.
Step 3.To boot your PC from a USB installation disc, turn it on and press the key that takes you to the BIOS settings, which is usually F2, F12, or Del, depending on your device. Once in the BIOS, navigate to the Boot Order or Boot Priority settings, and change the order so that the USB drive is prioritized over the hard drive.
Step 4. Once the loading is completed, verify the settings for "Language to Install," "Time and Currency format," and "Keyboard and input method" and then click on "Next" followed by "Install Now".
Step 5. To activate Windows, you'll need to enter the Windows Product Key and follow the on-screen instructions to complete the activation process after the installation is finished.
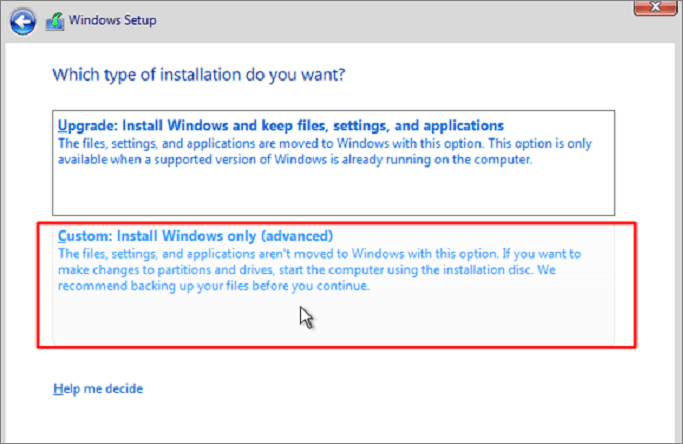
Step 6.A screen will appear asking which type of installation you want. Select the "Custom: Install Windows only (advanced)" option.
Step 7.After selecting the SSD where you want to install Windows 10, click the "Next" button to initiate the Windows installation process automatically.
Install OS on SSD by OS Migration
Another method to install an OS on an SSD is by OS Migration, which saves a lot of time and is much faster than the traditional method.
Qiling Partition Master is a perfect option for installing OS by OS Migration, allowing you to migrate Windows OS to SSD without re-downloading or re-installing. This free tool performs excellently in managing disks, making it easy to merge partitions or delete them quickly.
Qiling Partition Master is a tool that enables OS migration, allowing users to transfer their operating system to a new hard drive or solid-state drive (SSD) without reinstalling the OS. This process involves creating a bootable USB drive or CD/DVD, booting from it, and then migrating the OS to the new drive.
Preparations:
- A SATA Cable
- An SSD
- An OS migration tool - Qiling Partition Master
Step-by-Step Guide:
Using the Qiling Partition Master Tool is easy and quick! Simply follow the steps below to install an OS on an SSD using its OS migration feature.
Note: When migrating your operating system to a new SSD or HDD, be aware that the process will erase all existing partitions and data on the target disk if it doesn't have enough unallocated space. This means any important data on the target disk will be lost, so make sure to back it up to an external hard drive before proceeding.
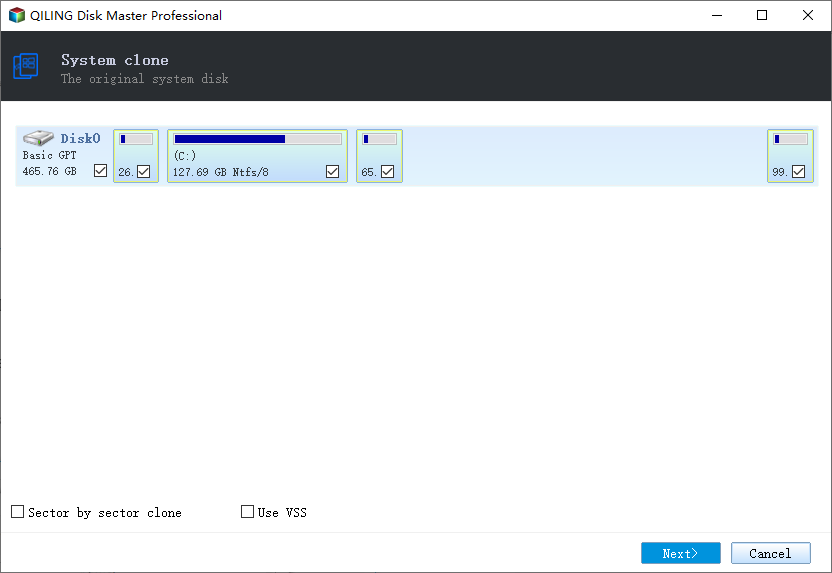
Step 1. Select "System clone" from the tools page.

Step 2.The system partition will be selected automatically, and then click "Next".
Step 3.To proceed, select the destination disk, which can be either an SSD (solid-state drive) or HDD (hard disk drive), and click the "Next" button.

Step 4. Preview the layout of your target disk, customize it if needed, and then click "Proceed" to start migrating your OS to a new disk.

Step 5. Be sure to back up your important data before proceeding, as the process will delete data and partitions on the target disk. Click "OK" to confirm, acknowledging the potential data loss.
If the SSD is large, you can install important software on it to improve your user experience.
2. Store Personal Data on HDD
If you've bought an SSD with a low capacity due to its high price, you can consider storing infrequently used data like videos, music, movies, and photos on a separate HDD to free up space on your SSD. This way, your SSD can work more efficiently.
To ensure smooth operation, regularly clean and optimize the HDD after storing personal data on it to prevent technical issues from arising.
Bonus Tip: How to Optimize SSD or HDD on Windows 10
If you're not aware of how to keep your hard drive optimized, it's time to look into Qiling partition management software again! This tool not only helps with migrating OS to SSD but is also ideal for optimizing your HDD. With Qiling Partition Master, you can perform various functions such as resizing partitions, merging partitions, deleting partitions, erasing/wiping hard disk, formatting partition, and more.
To resize and move a partition on your HDD or SSD, follow these steps: you can use the built-in Disk Management tool in Windows to resize and move partitions, or use third-party software like Qiling Partition Master or MiniTool Partition Wizard. First, launch the Disk Management tool, right-click on the partition you want to resize or move, and select "Extend" or "Shrink" to adjust its size.
Step 1: Locate the drive/partition
To resize a drive or partition, select the one you want to adjust its size and click on it to choose "Resize/Move".

Step 2: Resize or move the partition
1.To shrink the partition, simply drag one of its ends to free up unallocated space. Once done, click "Proceed".

2. To extend the partition, ensure there is unallocated space available. If not, create some by following the previous steps. Then, drag your mouse into the unallocated space and click "Proceed".
3. To move a partition, you need to have unallocated space next to the target partition. If there isn't enough, free up some space first.
To resize a partition, click on the target partition, select the "Resize/Move" option, and then drag the partition left or right to adjust its position. Finally, click "Proceed" to confirm the changes.
As you've learned how to use SSD and HDD together, it's essential to know some common tips to make effective use of both. Let's learn these tips in the next section of this article!
Tips to Use SSD and HDD Together Windows 10
To get the most out of using an SSD and HDD together in Windows 10, consider the following tips: 1) Use the SSD as the primary drive for your operating system and programs, and the HDD for storage. 2) Consider using the SSD for frequently used files and programs, and the HDD for less frequently used files and programs.
Tip 1. Install System and Apps on SSD
Most users recommend using a Solid-State Drive (SSD) due to its speed, which is significantly faster than traditional Hard Disk Drives (HDDs) in reading data. To maximize this speed, it's suggested to place frequently used files and programs on the SSD, and to install the operating system and frequently used applications on the SSD as well, allowing for faster PC performance.
Tip 2. Don't Defrag SSD
To get the most out of using both SSD and HDD together, only defragment the HDD. This is because HDDs store data in multiple locations on the drive, making it slower to access files. Defragmenting the HDD helps to organize its data, making it faster to read and write. On the other hand, SSDs should not be defragmented, as this can accelerate wear and tear on the drive, reducing its lifespan. By defragmenting the HDD and leaving the SSD alone, you can enjoy improved performance and longevity for both drives.
Tip 3. Store Data Files on HDD
It's recommended to store large files like music, movies, and data files on a Hard Disk Drive (HDD) rather than an SSD, as SSDs can't be filled up completely and repetitive writing can damage the blocks, leading to slower performance.
Tip 4. Enable TRIM Feature
The TRIM feature in SSDs allows them to work more quickly than HDDs. When a file is deleted, TRIM commands the drive to clean the sectors no longer required, making it faster for new data to be written. To make the most of SSDs, enable the TRIM feature on your computer system.
Conclusion
Using SSD and HDD together can provide a range of benefits, but to make the most out of them, it's essential to keep certain tips in mind. By doing so, you can optimize the performance of your storage setup and ensure that your SSD and HDD work together seamlessly. This includes understanding how to use the SSD as the primary drive for your operating system and applications, while using the HDD for mass storage and data archiving.
Qiling Partition Manager is an excellent tool for disk management, offering features that make the process hassle-free and time-saving.
Related Articles
- How to Convert FAT32 to NTFS Windows 10 Without Losing Data in 3 Ways
- How to Wipe or Erase Hard Drive in Windows Server - Qiling
- How Do I Run Fdisk on Windows 10/11: A Beginner's Guide
- Free Download SD Card Formatter: All Memory Card Format Software Free Download
- Qiling Partition Recovery Software Free Download Full Version Windows 10/11
Need to perform partition recovery full version free download? Qiling partition recovery full version enables you to recover data from lost partition, RAW partition, and formatted partition with FAT, EXT, and NTFS file system. Free download this lost partition recovery software to restore data from partition on Windows 11/10/8/7. - Is Your PC Slow to Shut Down? Try These Tips!
If your PC is slow to shut down, you're not alone. Many Windows users have reported that their computers are taking forever to shut down. Fortunately, there are a few steps that users can take to troubleshoot the problem and hopefully reduce the amount of time it takes for their PC to turn off.