How Do I Install APK on Windows 11, Sideload Android Apps Successfully [2023 Guide]
- Complex Level: Medium
- Applies to: To install APKs on Windows 11, both Public and Preview Insider users can do so.
Timeline for Windows 11 Supporting Android Apps:
- 1. Microsoft introduced Android apps on Windows 11 to Windows Insiders on October 21st, 2021.
- 2. Windows Subsystem for Android was available for public preview on February 15th, 2022.
At The Beginning:
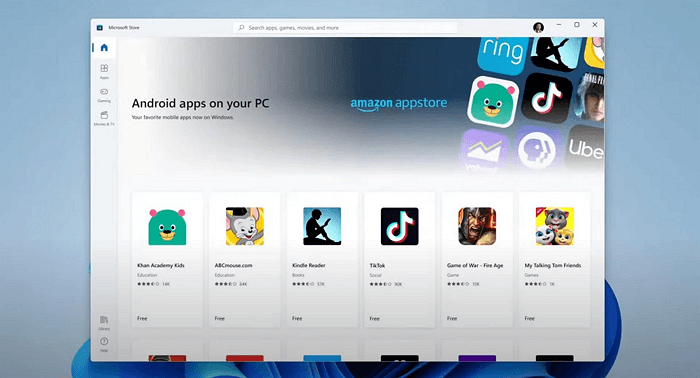
Windows System for Android allows Windows 11 devices to install APKs and run Android apps from the Amazon Appstore. This feature is available for both Windows 11 Public and Preview Insider users, and can be obtained by following a full guide to get the latest Windows 11 system and sideload Android apps successfully on their computers.
If you're one of the users who want to run Android apps on their computers, there are various solutions available. You can follow the respective guides here to install and run Android apps on your computers, depending on your specific needs and preferences.
In this article, you'll learn:
- Check your Windows 11 PC's system requirements to run Android apps.
- #2. Prepare Windows 11 PC Ready for Installing APK
- #3. How to Install APK on Windows 11 Insider OS
Can I Install APK on Windows 11 and Run Android App
Microsoft's announcement in October 2021 revealed that Windows 11 would support running Android apps through an Android Subsystem, but since then, users have been eager to know when and how to install APKs on Windows 11.
You can run Android Apps on Windows 11, and here's everything you need to know about the Windows Subsystem for Android Apps and how to install APKs on your Windows 11 computer. Let's get started!
Which OS Can Install Android APK and Run Android Apps
Windows 11 users in the U.S. can now sideload and run Android apps using the Amazon Appstore, thanks to the KB5010414 update released on February 15th, 2022, making it a reality to install APK files on Windows 11.
Windows users outside the US can also download the Windows Subsystem for Android App on their computers, even if they are not in the US, as long as they are Windows 11 Preview Insiders.
Windows 11 users can now install Android apps on their devices, regardless of whether they are in the US or part of the global preview insider program.
To write a great essay, start by brainstorming ideas and creating an outline to organize your thoughts. Next, develop a clear and concise thesis statement that will guide your writing. Then, create an introduction that grabs the reader's attention and sets the stage for the rest of the essay.
- #1. Check If Windows 11 On Your PC Meets The System Requirements for Android Apps
- #2. Prepare Windows 11 PC Ready for Installing APK
- #3. How to Install APK on Windows 11 Insider/Window 11 Public
#1. Check If Your Windows 11 PC Meets the System Requirements for Android Apps
Not all computers installed with Windows 11 can get the latest Windows Subsystem for Android Apps, as the system has some basic requirements on computer hardware.
- RAM: 8 GB or 16 GB (recommended)
- Storage Type: Solid State Drive (SSD)
- Processor: The recommended system requirements for the game are a minimum of an Intel Core i3 8th generation processor or above, an AMD Ryzen 3000 series processor or above, or a Qualcomm Snapdragon 8c processor or above.
- Processor architecture: x64 or ARM64
- Virtual Machine Platform: Virtualization must be enabled on Windows 11
Here are the steps to check if your computer meets the system requirement specification:
Check if your Windows 11 PC Meets the System Requirements to Install APK:
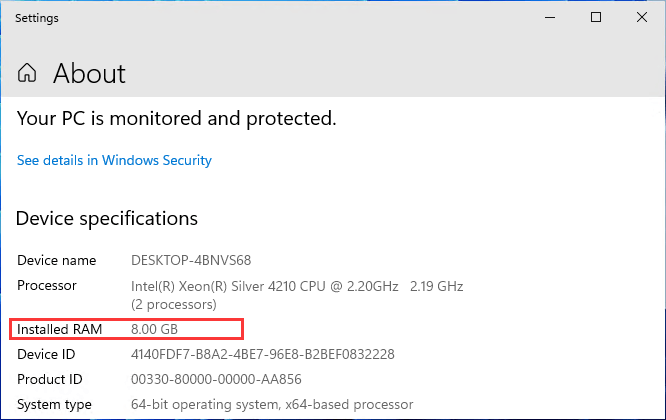
Step 1. Press Windows + I keys to open Settings.
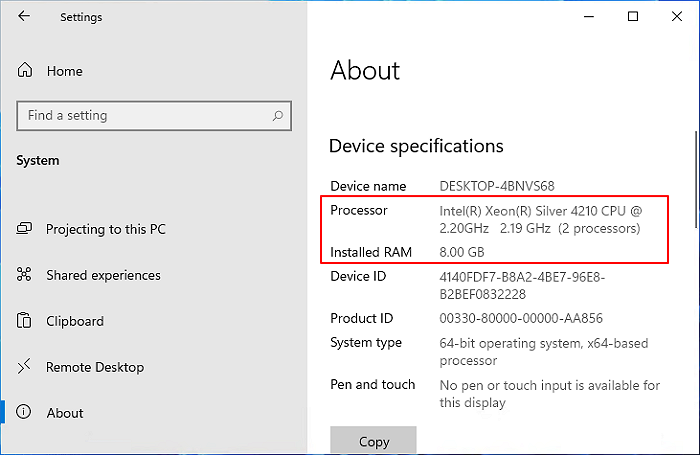
Step 2. To access the system settings window, click on the "Systems" option, then click on the "About" option within that window.

Step 3. Check if your computer meets the system requirements for installing APK on Windows 11, which typically include a 64-bit processor, 4 GB of RAM, and a 64 GB of free disk space. Ensure that your Windows 11 is updated to the latest version and that the Google Play Store is installed.
- Confirm the system requirements for the device, specifically the RAM and CPU specifications, as stated in the Device specifications section.
- Confirm if your Windows 11 is equal to or higher than 22000.257 in the Windows specifications section.
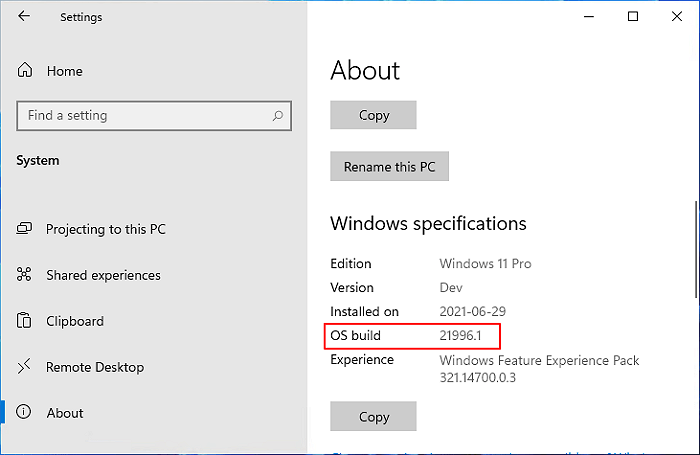
You need to update your computer to the latest Windows 11 before you can install the newer version of your operating system.
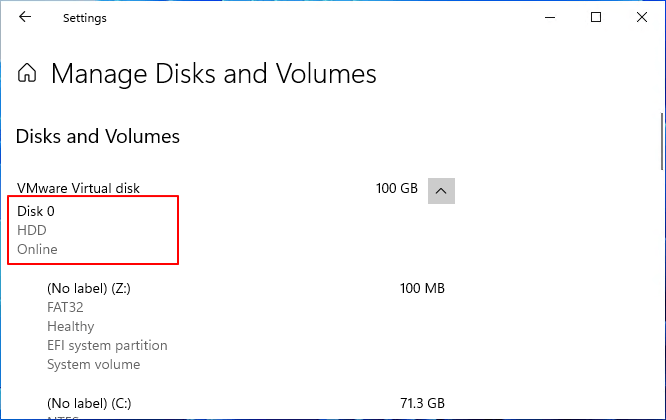
- To check if the main drive is an SSD, go to System > Storage, then click on Advanced storage settings and select Disks & volumes to view the media type of the main drive.
If it's HDD, you can't install APK on Windows 11.
If your computer meets all the requirements, you can skip the preparation steps and proceed with installing APK on Windows 11.
If your computer doesn't meet all the requirements, follow the 2nd part to configure and get the computer ready for installing and running Android apps.
#2. Prepare Windows 11 PC Ready for Installing APK
To get your Windows 11 PC ready for installing APK Android apps, you'll need to configure and prepare it in four key areas: RAM, Storage Type, Processor/Processor architecture, and Virtual Machine. This will ensure your device is compatible with APK Android apps and ready for installation.
Let's go.
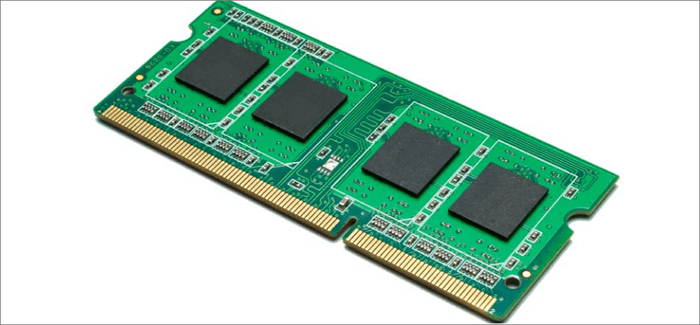
1. Increase RAM If It's Less Than 8GB
If your computer's RAM is less than 8GB, you can buy a new RAM card to increase it to 8GB or 6GB.
Here is how to do so:
Step 1. Check the RAM storage on your PC:
Right-To check the RAM storage on your PC, click on "This PC" and then click "Properties". The RAM storage will be displayed in the "Installed RAM" section.
Step 2. Purchase a RAM card for your PC.
The RAM card needs to have the same storage capacity as the original card installed on your PC.
For example: 4GB - 4GB; 8GB - 8GB; 16GB - 16GB; 32GB - 32GB.
If you upgrade from a 16GB RAM card to a 32GB one, the system will run at the same speed as the original 16GB card, not utilizing the full capacity of the new 32GB card.
Step 3. Install the new RAM card to your PC:
To upgrade your RAM, shut down your PC, open the computer case, and locate the RAM card slot. Insert and securely fasten the new RAM card into the slot, then close the computer case and restart the computer.

After adding the RAM, you'll need to wait for the computer to boot up. The system will automatically detect and display the added RAM storage.
2. Migrate Windows 11 from HDD to SSD
When Windows 11 is installed on a mechanical hard drive, the Subsystem for Windows on ARM won't install, as it requires an SSD to work properly.
You can transfer and migrate Windows 11 from a hard disk drive (HDD) to a new solid-state drive (SSD) using a reliable partition manager software called Qiling Partition Master.
To migrate a Windows 11 system from a hard disk drive (HDD) to a solid-state drive (SSD) without reinstalling the operating system, you can use the built-in Windows feature called "Clone" or third-party software like Qiling Disk Master.
1st. Purchase and Install a New SSD to Windows 11
Here are two tips for selecting and adding a new SSD for Windows 11 OS migration:
- The new SSD should have a capacity of at least as large as the used space of the Windows 11 system partition.
- To install a new SSD, you'll need to physically add it to your computer's internal storage system. This typically involves opening your computer's case, locating the appropriate slot or bay for the SSD, and then physically inserting the drive into the slot or bay.
Here is how to do so:
Step 1. To upgrade your system drive to a new SSD, purchase a new SSD that has an equal or bigger storage capacity than the system drive. For example, if your system drive is 120GB, you should get a 120GB or larger SSD, such as 256GB or 512GB.
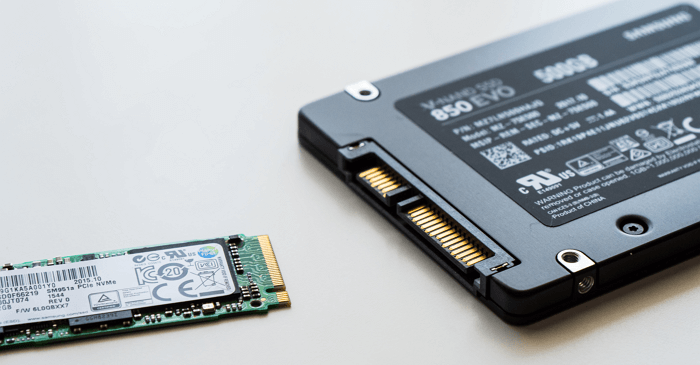
Step 2. Check the new SSD type: is it a SATA SSD or an M.2/NVMe SSD.
Step 3. To replace the old SSD with a new one, start by shutting down the computer. Then, open the computer case by removing the screws that hold it together.
- If it's a SATA SSD, connect the SSD to the computer via a SATA cable and a power cable.
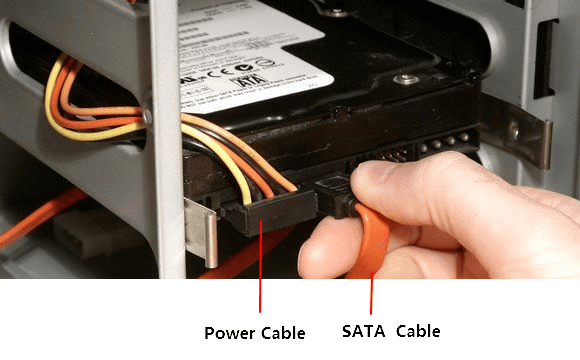
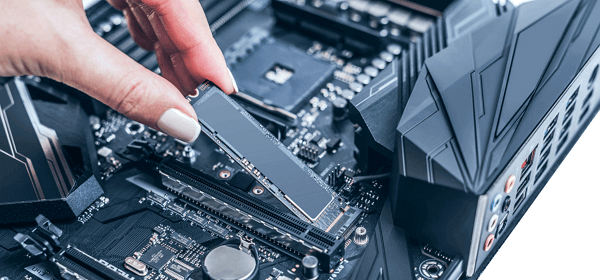
- To install an M.2 or NVMe SSD, locate the M.2 slot on your motherboard, insert the SSD into the slot, and secure it using the provided screw or clip.
Step 3. Once done, reboot your computer.
2nd. Initialize New SSD on Windows 11
To make the new SSD readable on Windows 11, initialize the disk to share the same disk type as your current OS drive by right-clicking on the new SSD in Disk Management, selecting "Initialize," and choosing the same disk type (e.g., GPT) as your current OS drive.
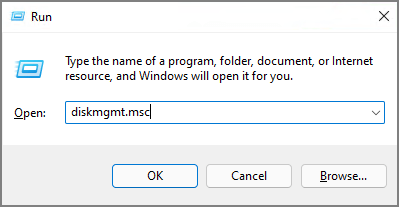
Step 1. To open disk management, press the Windows key + R keys, type diskmgmt.msc in the Run dialog, and click "OK".
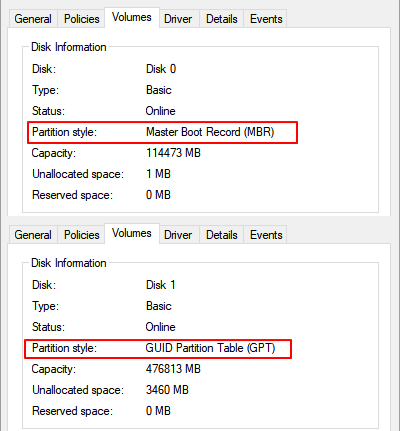
Step 2. To check the partition style of the OS disk, right-click the disk, select "Properties", navigate to the Volumes tab, and verify the partition style.
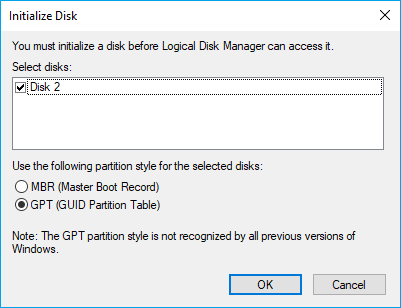
Step 3. To initialize the SSD, right-click on it and select "Initialize Disk", then choose "GPT" as the type.
Windows 11 requires a GPT (GUID Partition Table) formatted disk as its boot type, as it needs to be in UEFI and Secure Boot modes.
3rd. Migrate Windows 11 to SSD Without Reinstallation
Once you set up the SSD, you can transfer Windows 11 to the SSD using OS migration software like Qiling Partition Master, making the process relatively smooth.
Note: If you're migrating your OS to an SSD or HDD, be aware that it will erase all data and partitions on the target disk if there's not enough unallocated space. Make sure to back up any important data on the target disk to an external drive before proceeding.
Step 1. The "Tools and utilities" page should be selected, followed by choosing the "System clone" option and clicking "Next" to proceed.
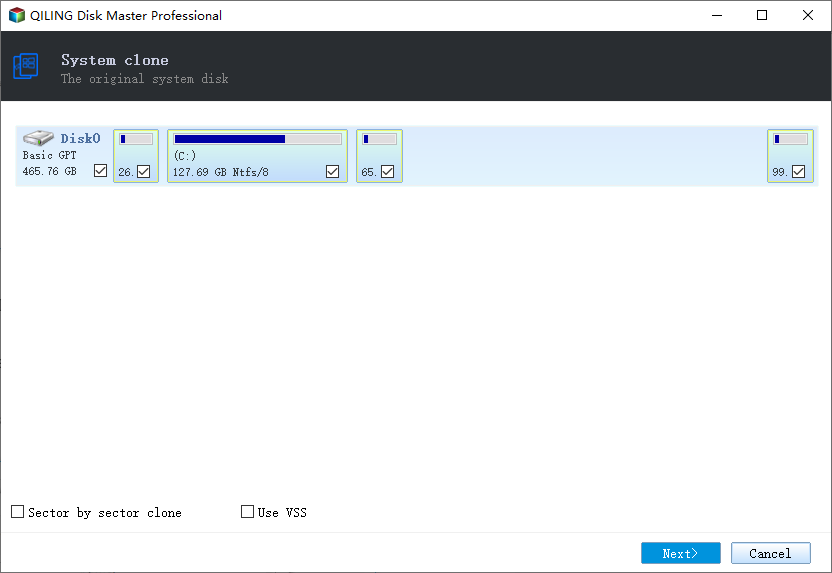
Step 2. Select the target disk you want to clone. Click "Next".
Step 3. Be cautious when clicking "Yes" on the warning message. This action will delete data and partitions on the target disk. Ensure you have backed up important data before proceeding. If not, do it now to avoid potential loss.

Step 4. Preview the layout of your target disk, and customize it if needed. Then, click "Start" to initiate the OS migration to the new disk.

3. Upgrade Processor/Processor Architecture
If your computer processor or processor architecture is older (Intel Core i3 8th, AMD Ryzen 3000, Qualcomm Snapdragon 8c, etc.), you have two options: use a cloud gaming service or upgrade your hardware. Cloud gaming services, such as Google Stadia or Microsoft xCloud, allow you to play high-end games on lower-end hardware by streaming them from the cloud.
- If you're looking to upgrade your computer's performance, one option is to manually replace and upgrade the CPU processor on your own. This involves purchasing a new CPU and physically installing it in your computer, which can be a complex and potentially risky process if you're not familiar with computer hardware. However, if you're comfortable with DIY projects and have experience with computer hardware, this can be a cost-effective and efficient way to breathe new life into your aging computer.
Here is a checklist of Windows 11 supported Processors: https://docs.microsoft.com/en-us/windows-hardware/design/minimum/supported/windows-11-supported-intel-processors
See details for upgrading CPU.
- Consider replacing your old computer with a newer one, which can provide improved performance, increased storage capacity, and enhanced security features. This can be a cost-effective option in the long run, as it may reduce the need for frequent repairs and upgrades. Additionally, a newer computer can be more energy-efficient, which can lead to lower electricity bills. Furthermore, a newer computer can also come with the latest operating system and software, which can provide better compatibility and support for your applications and programs.
For nun-For tech-savvy users, replacing the CPU processor can be a viable option, but it's essential to be cautious to avoid damaging your computer. However, if you're not comfortable with DIY repairs, it's often simpler and less stressful to replace your old PC with a brand new one.
To install APK files on Windows 11, you'll need a 64-bit computer, as 32-bit computers are not compatible with this feature.
4. Enable Virtualization on Windows 11
To emulate the Subsystem for Android on Windows 11, you'll need to enable virtualization on your PC, which allows access to a larger library of apps, including APK apps, to use and install.
Here is how to do so:
First. Enger BIOS Settings
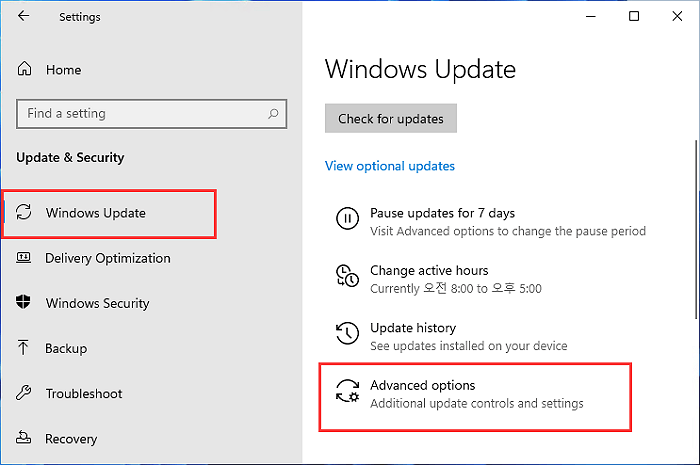
- Press the Windows key + S, type settings in the search box, and open Settings.
- To access the Advanced options, click on "Windows Update" in the left pane and select it.
- To restart your computer in the Windows Recovery Environment, click on "Recovery" in the Start menu, then select "Restart now" next to the Advanced startup section.
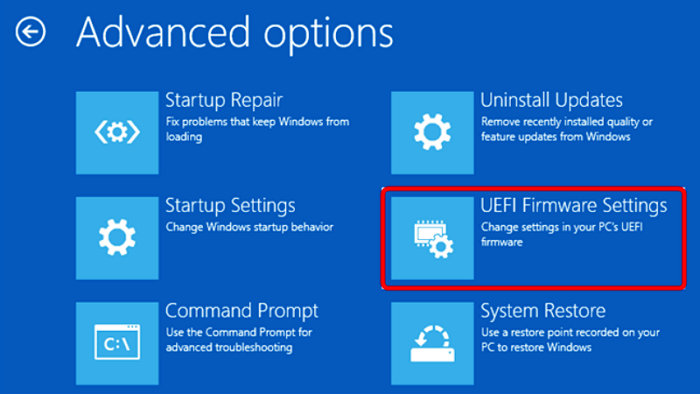
- Click "Troubleshoot" > "Advanced Options" > "UEFI Firmware Settings".
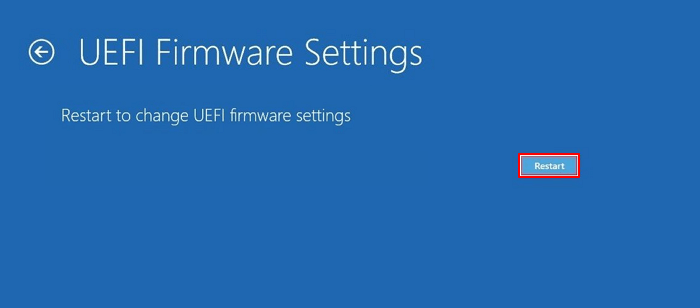
- Click "Restart" on the UEFI Firmware Settings window so that you can enter the BIOS settings.
Second. Enable Virtualization in BIOS
To enable virtualization on Intel CPUs, you'll need to enter your BIOS settings and look for the Virtualization Technology (VT-x) option. This option is usually found under the "Advanced" or "Security" tab. Once you've found it, make sure it's enabled.
Enable Virtulization for Intel CPU:
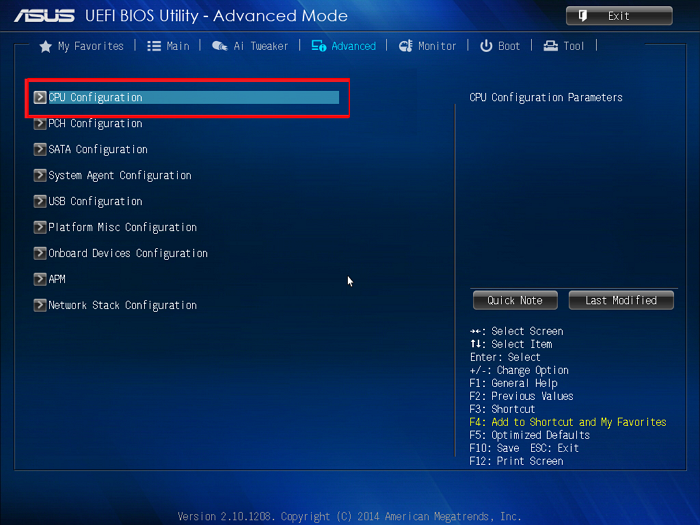
- On BIOS settings, press F7 or click "Advanced Mode".
- Click "Advanced" > Select "CPU configuration".
- Click "Intel Virtualization Technology", select "Enabled".
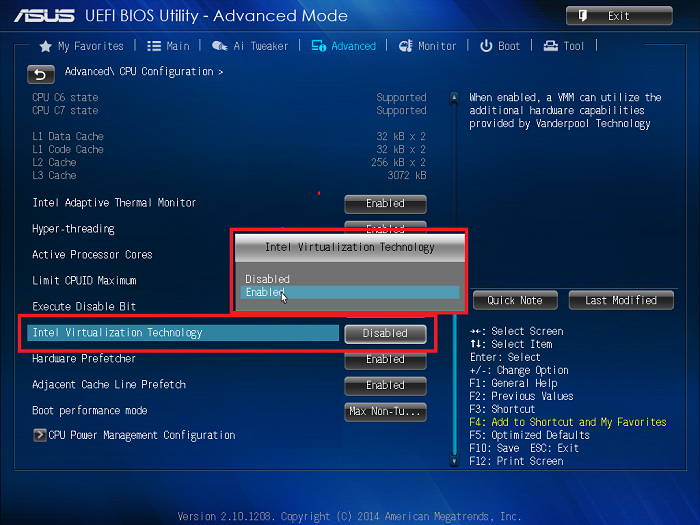
- To save and exit, press the F10 key. Alternatively, click on the "Exit" button and confirm that you want to save the changes you've made.
Enable Virtualization for AMD CPU:
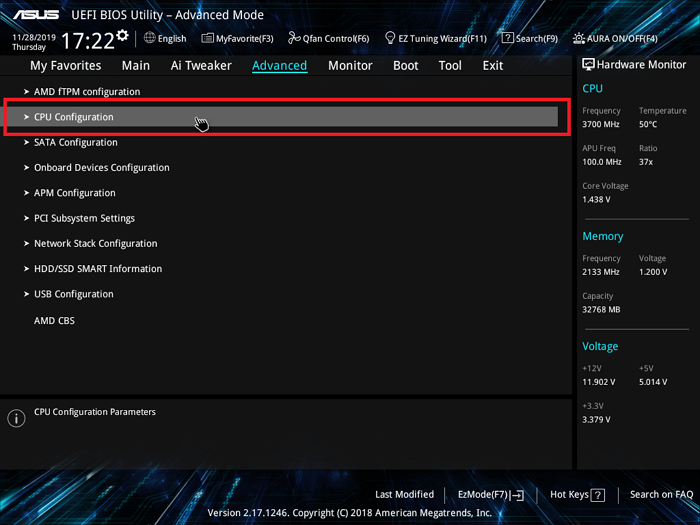
- On BIOS settings, press F7 or click "Advanced Mode".
- Click "Advanced" > "CPU Configuration".
- Select "SVM Mode" and click "Enabled".
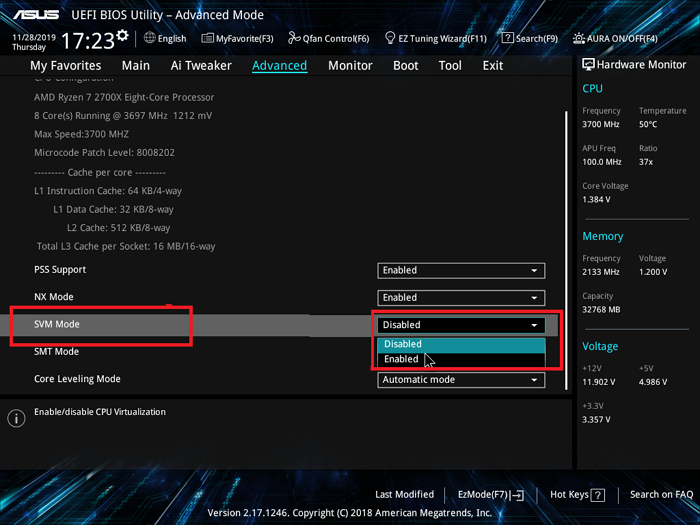
- Click "Exit" and click "OK" to save the changes and restart the computer.
After completing the previous steps, you can proceed to install Android APK on Windows 11. To do this, first confirm your current running version of Windows 11, as the installation methods differ. Once you've confirmed your version, follow the corresponding guide to install the desired APK application on your PC.
#3. How to Install APK on Windows 11 Insider OS
For Windows Insiders, To ensure you have the latest version of Windows 11, follow these steps:
To check for updates on Windows, go to Settings, click on "Windows Update", and then click on "Check for updates".
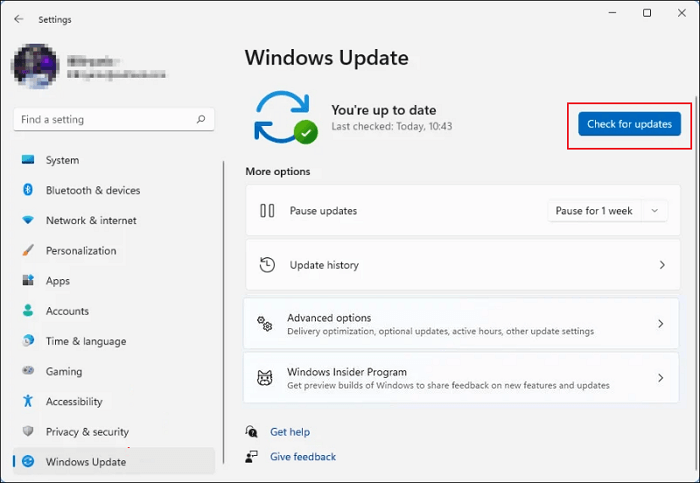
Wait until the update process is complete, then restart your computer to finish the installation of the new updates.
First. Check for Microsoft Store Update
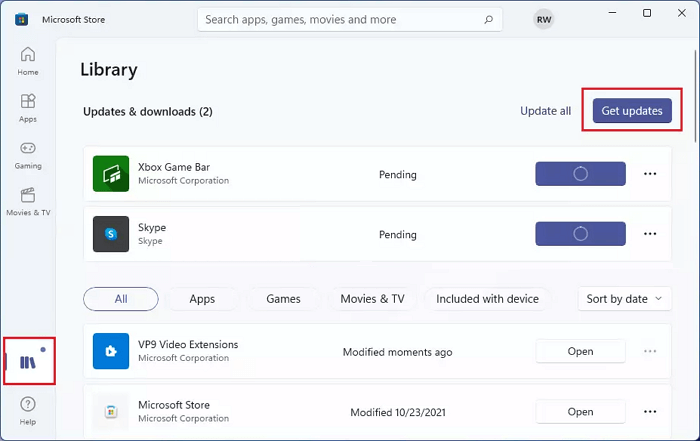
To install APK apps on Windows 11, both Insider and Public users need to update the Microsoft Store. This will allow them to install APK apps on their Windows 11 devices.
Step 1. Open Microsoft Store, click "Library," and click "Get updates".
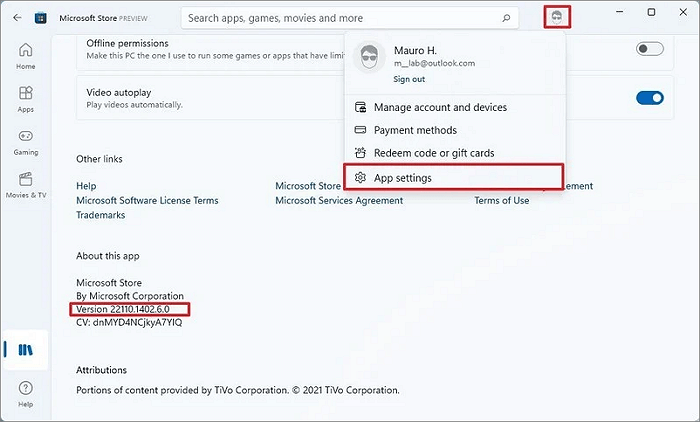
Step 2. To check if Microsoft Store is updated, click the Profile menu, select "App settings" and confirm if the version is 22110.1402.6.0 or higher.
If your Windows 10 PC is not recognizing the Microsoft Store app, you can try to resolve the issue by upgrading the Store app to the latest version. This can be done by going to the Store app, clicking on the three dots at the top right corner, and selecting the "Settings" option.
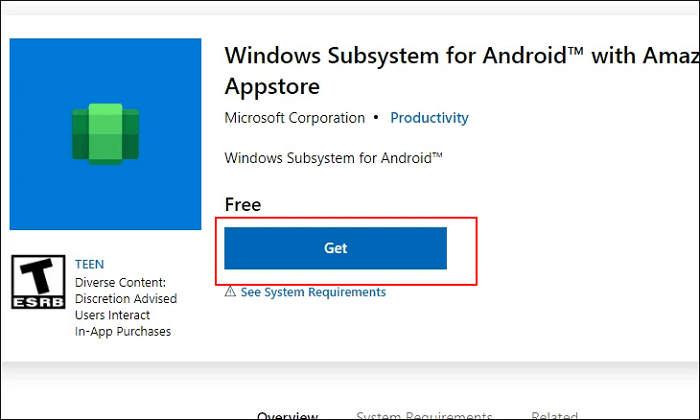
Second. Install Windows Subsystem for Android with Amazon App Store on Windows 11
Step 1. To enable the Windows Subsystem for Android, open the Microsoft Store app, search for "Windows Subsystem for Android", and click on the "Get" button to download and install it.
Step 2. Click "Get" or "Install" on the Microsoft Store app.
Wait for the process to complete.
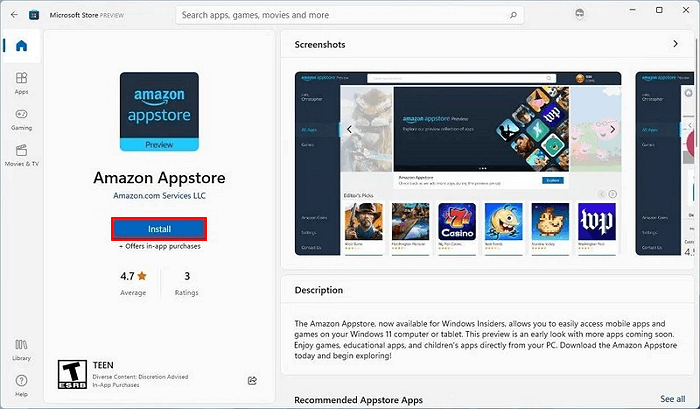
Step 3. Search to open Amazon Appstore in Microsoft Store, click "Install".
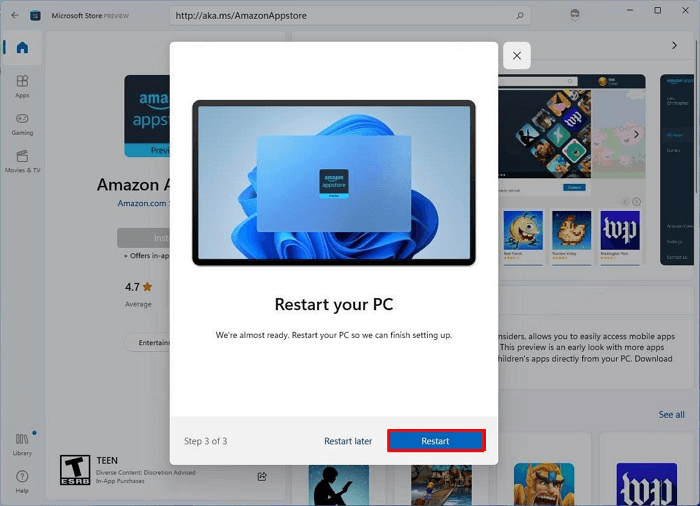
Step 4. Click "Set up" and click "Download" > "Next" > "Restart".
To install Android APK applications on Windows 11, you need to have an Android emulator like BlueStacks or NoxPlayer installed on your computer. Once you have the emulator installed, you can download and install APK files from the Google Play Store or other sources directly to your Windows computer, just like you would on an Android device.
Last. Install Android Apps on Windows 11 from Amazon Appstore
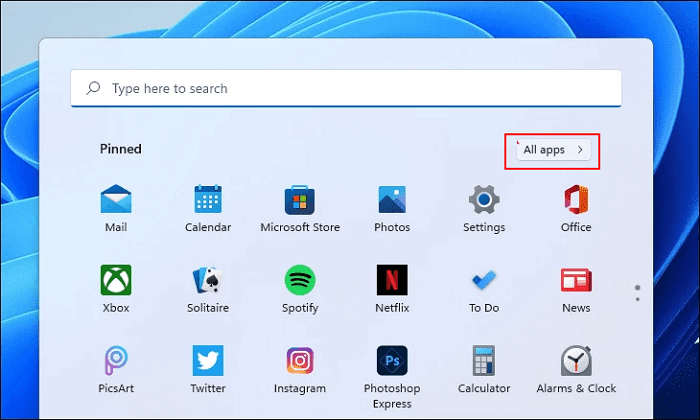
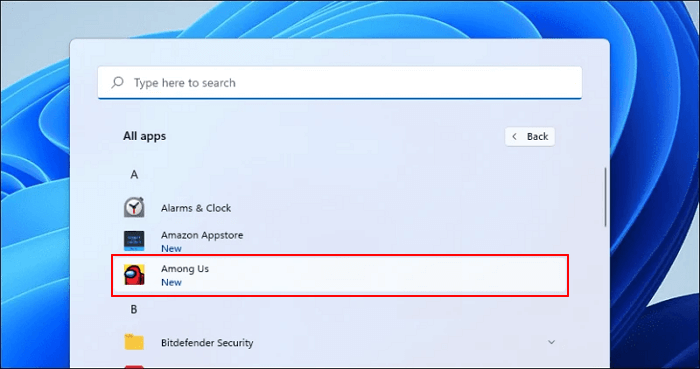
Step 1. To access the "All apps" menu on Windows 11, start by opening the Start menu, which can be done by clicking the Windows logo in the bottom left corner of the screen. Once the Start menu is open, click on the "All apps" button, usually located at the bottom of the menu, to view a list of all installed applications on your computer.
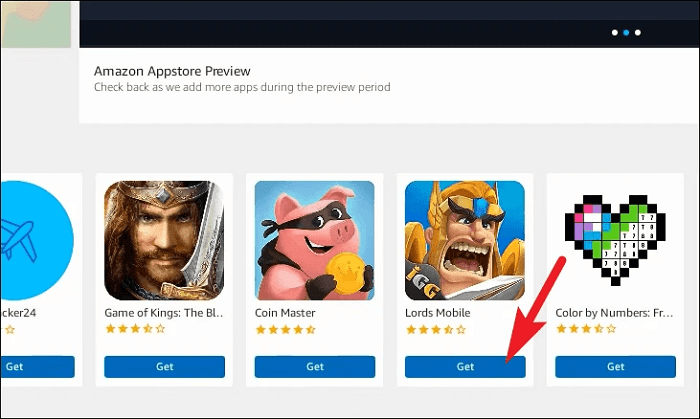
Step 2. Sign in with your Amazon account, and then you can select and install Android applications by clicking "Get".
Bonus Tip: How to Install APK on Windows 11 to Sideload Android Apps
To sideload apps on Windows 11 via APK files, you can use the Amazon Appstore or other third-party apps like ApkInstaller or 1-Click Installer, which allow you to install APK files directly from your device. Alternatively, you can also use the Windows Subsystem for Android (WSA) to install Android apps on Windows 11, which can also be sideloaded via APK files. However, it's worth noting that sideloading apps can potentially pose security risks, so it's essential to only install apps from trusted sources and to be cautious when installing apps from unknown developers.
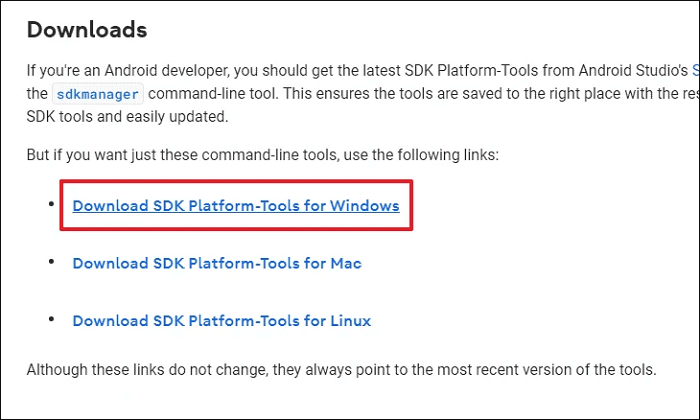
Step 1. Go to Android developer website: https://developer.android.com/studio/releases/platform-tools
Step 2. Go to the Downloads section and click "Download SDK Platform-Tools for Windows".
Step 3. To download the Android ADK Platform-Tools for Windows, check the box indicating that you have read and agree with the terms and conditions, and then click the "Download" button.
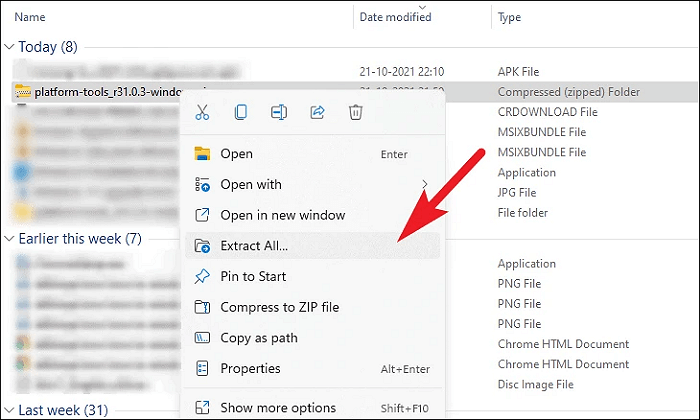
Step 4. Once done, go to the download directory, right-click the zipped folder, and select "Extract All" to unzip the folder.
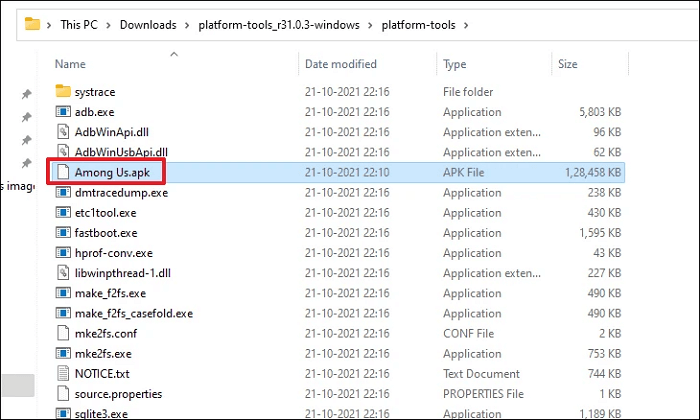
Step 5. Once the zipped folder opens, download and copy the APK file for a desired app to the folder.
Step 6. To access the Windows Subsystem for Android on Windows 11, open it from the menu bar and enable Developer mode by switching to the "On" size on the WSA window.

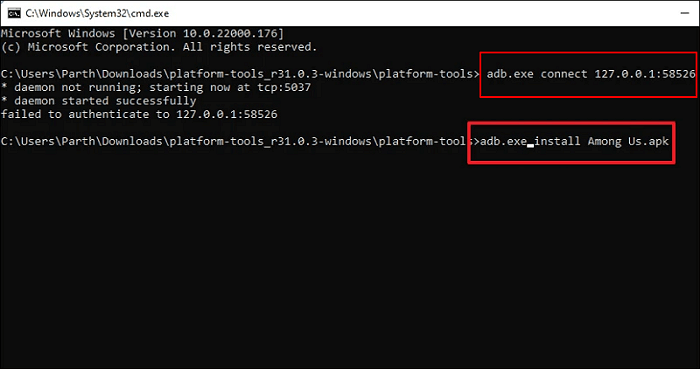
Step 7. Open Command Prompt, type the following command lines, and hit Enter each time:
- adb.exe connect ip address
- adb.exe install file name.apk
To install an APK file on Windows 11, you need to download an Android emulator and then install the APK file using the emulator. You can use an emulator like BlueStacks or NoxPlayer to run the APK file. Once you've downloaded the emulator, follow these steps: Open the emulator and go to the Google Play Store.
After sideloading Android apps on Windows 11, you can access and use them by going to the App section on the start menu.
Conclusion
To install Android APK or apps on Windows 11 successfully, make sure to follow these key points: ensure you have the necessary permissions, download the latest version of the Android emulator, and install the APK file using the emulator's built-in method or a third-party tool like BlueStacks or Nox Player. Additionally, check the system requirements and hardware compatibility of the emulator and the app you want to install, and ensure that your Windows 11 is updated to the latest version. By following these guidelines, you should be able to install Android APK or apps on Windows 11 without any issues.
- As a Windows 11 user with the latest version 22000.527 or higher, you have access to a range of features and improvements. Notably, you can take advantage of the new Windows Spotlight theme, which showcases visually striking images and backgrounds.
- Your computer meets Windows 11 requirements for installing Android apps if it has at least 8GB of RAM, an SSD OS disk, virtualization enabled, a compatible processor, and an up-to-date processor architecture.
If you're unsure if your computer meets the requirements or don't know what to do, you can refer to the second part to get Windows 11 ready for this.
For the complete process of installing Android apps on Windows 11, go to the #3 part and get a complete guide. I hope this page indeed works for you.
Related Articles
- [New] How to Add Unallocated Space to C Drive in Windows 11/10
- 2022 Tutorial: How to Resize C Drive in Windows 10/8/7
- The Local Device Name Is Already in Use
- Unable to Change Letter or Assign Drive Letter to D/E/F/G
- How to Stop Disk Checking and Stock CHKDSK on Startup in Windows 11
It is a very time-consuming process when chkdsk runs automatically every time startup of Windows 11 - looking for solutions on how to stop disk checking in Windows 11. Here is a detailed guide for you to stop chkdsk on startup. - How to Fix System and Compressed Memory 100 Disk Usage (7 Fixes)
If you receive a 100 disk usage problem caused by the System and compressed memory, you can solve this high CPU issue now. We provide you with 9 fixes to fix the System and compressed memory high disk usage in Windows 11/10/8/7. Read on and solve your problems now.