How to Fix System and Compressed Memory 100 Disk Usage (7 Fixes)
System and Compressed Memory High Disk Usage on Windows 11/10
The System process using 1.2GB of RAM is likely due to the System and Compressed Memory process, which is a normal part of Windows. However, if it's consistently using a high amount of memory, it could be a sign of a larger issue. You can try restarting your computer in Safe Mode to see if the issue persists. If it does, it may indicate a malware or driver issue. You can also try running a System File Checker (SFC) scan to ensure all system files are intact. Additionally, checking for updates and running a disk cleanup may also help. If the issue continues, consider consulting a professional for further assistance.
System and compressed memory are responsible for compressing files and folders and managing RAM. If you changed the virtual memory settings, like setting a specific paging file size, it can cause System and compressed memory to take up 100% of the affected disk, leading to performance issues.
Windows 11/10 users have reported seeing the System and Compressed Memory service occupying large amounts of memory, disk, and CPU usage in Task Manager. However, there's no cause for concern. If this usage is bothersome, users can take steps to address it and free up system resources.
- Fix 1. End System and Compressed Memory Task in Task Manager
- Fix 2. Scan for Possible Virus/Malware
- Fix 3. Restart Your PC
- Fix 4. Disable the System and Compressed Memory
- Fix 5. Stop the Superfetch Service
- Fix 6. Check and Repair Corrupt System Files
- Fix 7. Reset Virtual Memory and Increase the Ram
Fix 1. End System and Compressed Memory Task in Task Manager
When faced with a memory compression high disk usage problem, try ending the task in Task Manager first. To do this, press Ctrl+Shift+Esc to open Task Manager, click on the "Processes" tab, find the task consuming high resources, right-click on it, and select "End task". This simple step may resolve the issue without further action.
Step 1. Press Ctrl + Alt + Del and select Task Manager.
Step 2. Select System and compressed Memory that is taking high CPU or Disk usage.
Step 3. Click "End Task" to finish the process.
Fix 2. Scan for Possible Virus/Malware
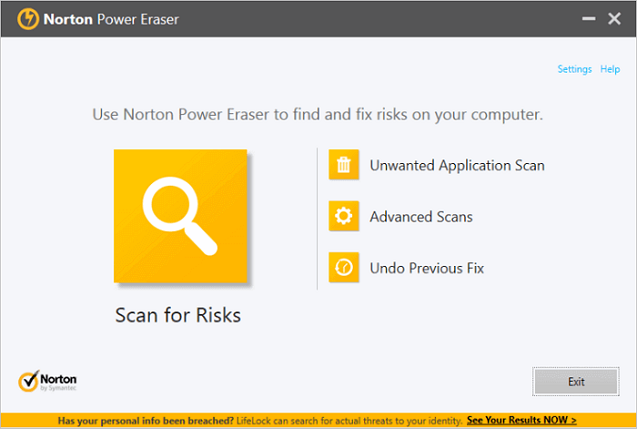
High disk usage due to viruses and malware can be resolved by utilizing Windows Defender or reputable third-party antivirus software, such as Norton, to scan and remove the malicious programs causing the issue.
Step 1. Download and run Norton Power Eraser.
If a new version of Norton Power Eraser is available, it will check and download it.
Step 2. In the "Norton Power Eraser" window, click the "Scan for Risks" icon.
Step 3. Wait patiently during the process.
Step 4. After successfully removing the risk, click "Finish".
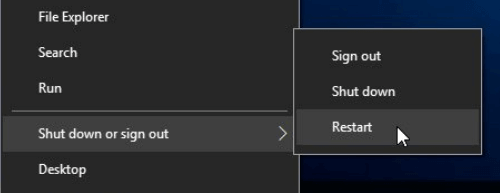
Fix 3. Restart Your PC to Fix System and Compressed Memory High Disk Usage
A restart is often the solution to most weird cases, including System and compressed memory high CPU issues. To perform a restart, you can simply shut down your computer and turn it back on. This simple step can resolve the problem in most instances.
Step 1. Click the "Start" icon.
Step 2. Go to "Shut down or sign out" > "Restart".
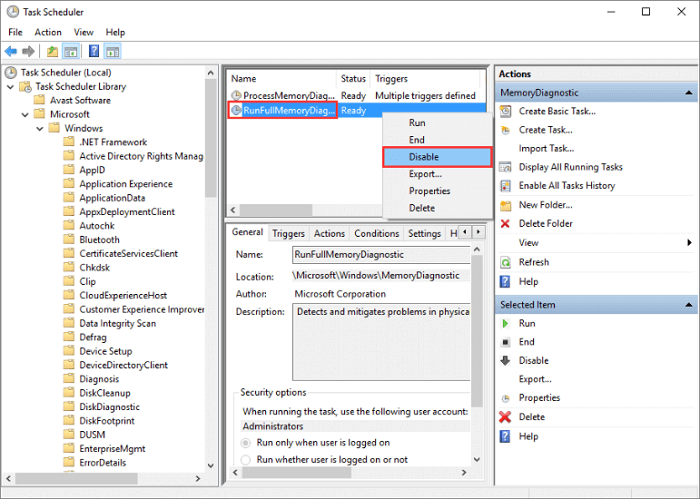
Fix 4. Disable the System and Compressed Memory
If the solutions above don't work well, you can simply try this solution to get System and compressed memory high disk usage problem fixed with ease. Here are the details:
Step 1. To open the Task Scheduler, press the Windows key + R at the same time to open the Run box, then type taskschd.msc and press Enter.
Step 2. Double-click on "Task Scheduler Library" > "Microsoft" > "Windows".
Step 3. To access the Task Scheduler window, follow this path: "Task Schedule Library > Microsoft > Windows > MemoryDiagnostic".
Step 4. To disable the RunFullMemoryDiagnosticEntry, right-click on it in the right pane and select Disable from the contextual menu.
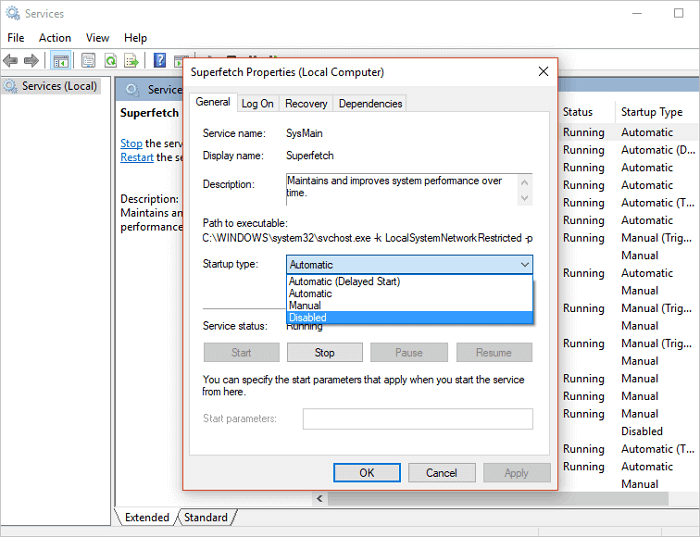
Fix 5. Stop the Superfetch Service to Fix 100 Disk Usage
Superfetch, a Windows service, aims to improve system performance over time, but it can sometimes cause high CPU usage issues. To resolve Windows System and compressed memory 100 disk usage errors, you can stop this service.
Step 1. To open the Services window in Windows 10, press the Windows key + R to open the Run dialog, or type "Run" in the Windows search box. Then, type "services.msc" into the "Open" box and click the "OK" button. This will open the Services window, where you can view and manage the various system services running on your computer.
Step 2. Now find "Superfetch". Right-click it > select "Properties" > click "Stop" on the pop-up windows > click "Disabled" from the 'startup type' drop-down menu.
Fix 6. Check and Repair Corrupt System Files
When the System and compressed memory cause high disk usage, check your partition for system errors and fix them promptly to resolve the issue.
You can try a free but professional partition management tool, Qiling Partition Master Free, which allows you to effortlessly check and fix system errors with ease. You can download and follow the steps to fix system error now.
Step 1. Open Qiling Partition Master, locate the disk, right-click the partition, and choose "Advanced" > "Check File System" to check the partition.
Step 2. In the Check File System window, select the "Fix the error on the disk" option and click "Proceed".
Step 3. The software will start scanning your partition file system on your disk, and once it's done, click "Finish".
Fix 7. Reset Virtual Memory and Increase the Ram
The System and compressed memory disk usage issue is often caused by failed or failing RAM, which can be checked and reset to fix the problem. This can help resolve the high CPU error.
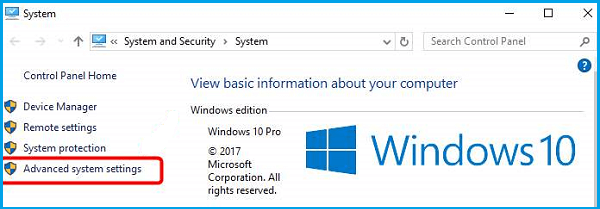
Step 1. To access the Advanced System Settings, press the Windows key + Pause/Break key simultaneously, and then select Advanced System Settings from the left panel.
Step 2. Go to the "Advanced" tab, then click "Settings".
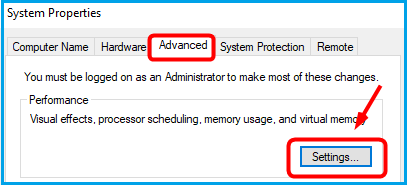
Step 3. To adjust the virtual memory settings, go to the "Advanced" tab and click on "Change" in the Virtual memory section.

Step 4. Make sure that the Automatically manage paging file size for all drives checkbox is NOT ticked.
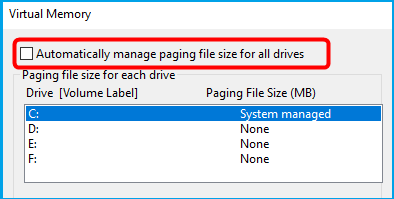
Step 5. To set up virtual memory, select the Windows drive (usually C:) and enter an initial and maximum size for virtual memory in the Virtual Memory window.
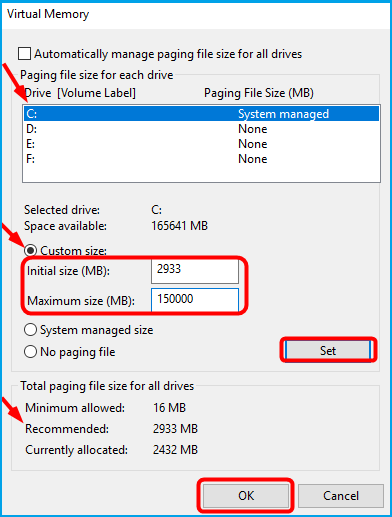
- The initial size varies depending on your computer, so if you're unsure, enter the number in the Recommended category.
- Set the maximum virtual memory size to about 1.5 times the size of your physical RAM, for example, a PC with 4 GB of RAM should have no more than about 6,144 MB virtual memory.
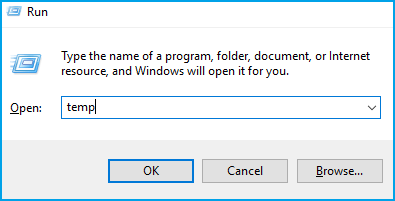
Step 6. After entering your virtual memory values, click Set and then OK to continue. Next, clear all your computer's 'temp' files by pressing the Windows key and R at the same time, then typing "temp" in the Run form and hitting Enter, which will open Windows Explorer with your Temp folder showing all the temp files on your computer.
Step 7. To delete all files in the Temp folder, you can use the following command in the Command Prompt or PowerShell: `del /s /q "C:\Users\[username]\AppData\Local\Temp\*.*"` (replace `[username]` with your actual username).

Conclusion
To resolve the System and compressed memory high disk usage issue, you can choose from the provided solutions. Checking system file errors is also recommended. Alternatively, you can use Qiling partition software to manage your disk, increase C drive space, and even migrate your OS to an SSD.
Related Articles
- [100% Working] How to Increase C Drive in Windows 10/8/7 Without Formatting
- How Do I Make My Partition Bigger Than 2 TB?
- Full Guide to Check and Fix Disk Error in Windows 11
- Effective Fixes for Hard Drive Not Detected in Windows 10 Installation
- WD External Hard Drive Won't Format? How to Fix?
If you're experiencing formatting issues with your WD external hard drive, this article provides practical solutions to resolve the WD External Hard Drive Won't Format error. It offers guidance on addressing file system corruption, removing write protection, and overcoming physical damage, helping you to successfully format your drive. - Quick Fix: WDF_Violation Blue Screen Error
If you're experiencing a WDF_Violation blue screen error on your Windows computer, - this guide can help. In this article, we'll share 5 methods to help you resolve the BSOD issue and get your computer running smoothly again.