10 Ways to Resolve 100% Disk Usage on Windows 10
Quick Navigation: How to Fix Disk 100 in Task Manager (10 Tips)
Many Windows 10/8.1/8/7 users have encountered the issue of their system running slow with a slow response time, often accompanied by a 100% disk usage. To resolve this issue, follow the suggested tips below.
| Workable Solutions | Troubleshooting 100 Disk Usage |
|---|---|
| Ways 1. Restart your computer | Click the "Start" icon. Go to "Shut down or sign out > Restart."...Full steps |
| Ways 2. Check for malware | Your security software should be able to deal with this, whether it's a free app or a paid suite...Full steps |
| Way 3. Update Windows 10 | Click the "Start" icon. Go to "Settings > Update & Security settings > Windows Update"...Full steps |
| Way 4. Fix disk error | Press the Windows key and type cmd. Right-click "Command Prompt" and...Full steps |
| More Effective Fixes | Disable Superfetch service > Clean Up Junk Files > Reset Virtual Memory > Perform a Clean Boot...Full steps |
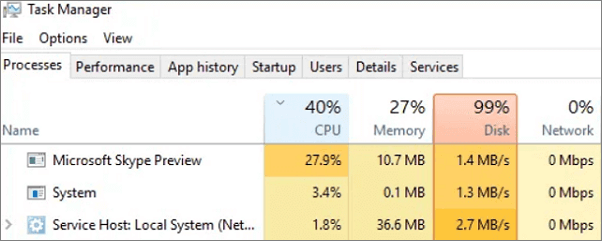
Check What Causes Task Manager Disk 100 Usage in Windows 10
We're going to check the task manager to see our disk usage, which is currently at 100% and causing our computer to slow down.
Step 1. Type task manager in the Windows search bar and select "Task Manager."
Step 2. In the Processes tab, look at the "Disk" process to see what is causing your hard disk 100% usage.
Here are the top 10 methods that have helped other users fix their Windows 10 100% disk usage problem. Simply follow the operation procedures to resolve disk usage 100 in Task Manager.
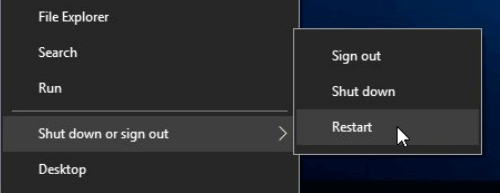
Way 1. Restart Your Computer to Fix 100 Disk Usage
Restarting your computer or laptop is a simple yet effective solution to resolve various issues, including a frozen screen or crashed Outlook. In the case of a Windows 10 computer experiencing 100% disk usage, a restart can also be a sufficient way to tackle the problem. By restarting your PC, you may be able to resolve the issue without needing to take further action.
Step 1. Click the "Start" icon.
Step 2. Go to "Shut down or sign out > Restart."
If the restart doesn't fix the problem, you may need to check the disk for errors or run a disk check. This can be done through the built-in Disk Utility in Windows or through a third-party tool. If the disk check finds errors, you may need to repair or replace the disk.
Way 2. Check For Malware in Windows 10
100% disk usage can be caused by malware, and your security software, such as BitDefender, Avast, or AVG, should be able to detect and remove the issue, although it may take some time due to the high disk load.
Way 3. Update Windows to Solve 100 Disk Usage
To keep your Windows 10 running smoothly and securely, make sure you have the latest updates installed on your PC. You can choose when and how to get these updates, and to manage your options, follow these steps.
Step 1. Click the "Start" icon.
Step 2. Go to "Settings > Update & Security settings > Windows Update".
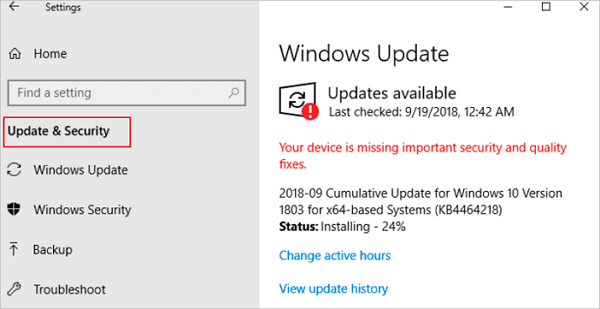
You can check for new updates and install them if they are available. This solution may do good to the overall performance of your system, including that of your hard drive.
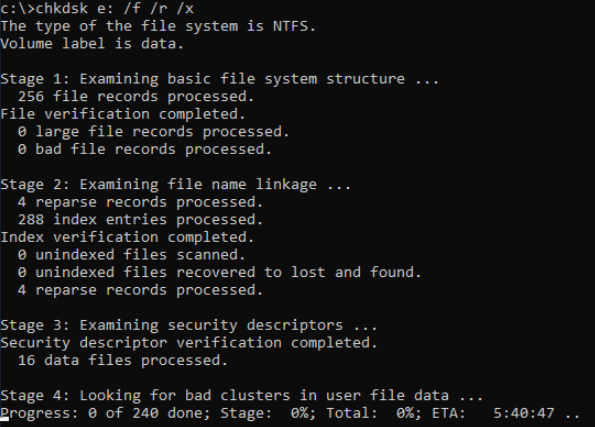
Way 4. Fix Disk Error If 100 Disk Usage Still Exists
If none of the above troubleshooting steps resolve the issue, it's possible that the problem lies with your hard drive, which may be failing or have physical damage.
If your hard drive is performing poorly or Windows is asking you to repair drive errors, running CHKDSK can often resolve the issue. This utility checks the hard drive for errors and fixes them if possible.
Step 1. Press the Windows key and type cmd.
Step 2. Right-click "Command Prompt" and choose "Run as administrator."
Step 3. Enter the following command: chkdsk E: /f /r /x
The command to run the chkdsk utility on a specific partition is: `chkdsk E:`
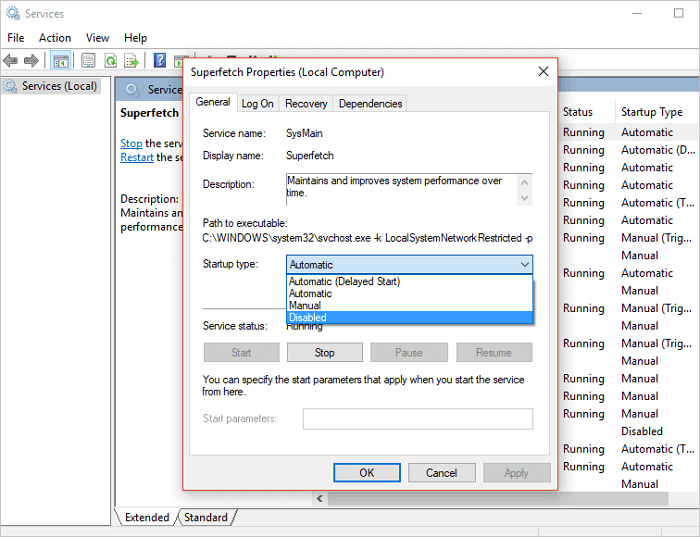
Way 5. Stop the Superfetch Service
Superfetch is a feature that copies commonly used files to RAM, allowing programs to boot faster. However, it can cause high disk usage on older systems, which can be a problem. Stopping the Service Host Superfetch service can help resolve Windows 100 disk usage errors, but it's worth noting that high disk usage due to this service isn't always a cause for concern.
Step 1. Press Windows + R, type services.msc, and click OK to open the Services window in Windows 10.
Step 2. To disable Superfetch, right-click the "Superfetch" service, select "Properties", click "Stop" in the pop-up window, and then select "Disabled" from the "startup type" dropdown menu.
Way 6. Reset Virtual Memory and Increase the Ram
Virtual memory is a combination of RAM and a portion of your hard drive, which allows Windows to temporarily store files in virtual memory and swap them back to RAM when required, helping to perform tasks when RAM isn't enough.
Some computers' operating systems have a limit on the amount of RAM that can be used, such as 32-bit Windows only supporting up to 4 GB of RAM. If your computer's RAM limit is reached, increasing the RAM is unnecessary, and you can instead reset the virtual memory. If your computer supports more RAM, you can click here to increase it. If not, resetting the virtual memory is the alternative.
Steps to reset virtual memory:
Step 1. Press Windows key + Pause/ Break key at the same time. Then choose Advanced System Settings on the left panel.
Step 2. Go to the "Advanced" tab, then click "Settings".
Step 3. Go to the "Advanced" tab again, and choose Change in the Virtual memory section.
Step 4. Make sure that the Automatically manage paging file size for all drives checkbox is NOT ticked.
Step 5. To set up virtual memory on your Windows computer, select the drive where Windows is installed (usually C:) and specify an initial and maximum size for your virtual memory. This allows Windows to use a portion of your hard drive as virtual memory when your physical RAM is full, helping to prevent crashes and errors.
- Initial size: This value varies, depending on your computer.
- Set the maximum virtual memory size to about 1.5 times the size of your physical RAM, so a PC with 4 GB of RAM should have no more than about 6,144 MB virtual memory.
Once you've entered your virtual memory values, click Set, then click "OK" to continue.
Step 6. To clear all your computer's 'temp' files, press the Windows key and R at the same time, then type 'temp' in the Run form and hit Enter. This will open the Temp folder in Windows Explorer, showing you all the temp files on your computer.
Step 7. Select all the files in the Temp folder and delete them.
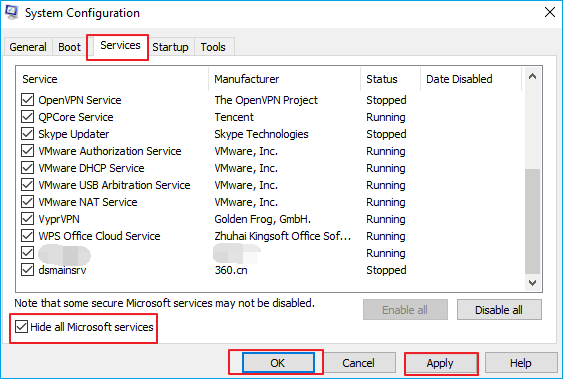
Way 7. Perform a Clean Boot on Windows 10
Clean Boot State is a troubleshooting feature in Windows that starts the operating system with a minimal set of drivers and startup programs, allowing users to diagnose and resolve advanced system issues by identifying potential conflicts with background programs that may be affecting system performance.
Step 1. Type msconfig in start search and hit "Enter" to open "System Configuration."
Step 2. To enable selective startup, go to the "General" tab, click "Selective Startup", uncheck "Load Startup Items", and check "Load System Services" and "Use Original boot configuration".
Step 3. Click the "Services" tab. Select the "Hide all Microsoft services" checkbox. Select the item and then select "Disable all."
Step 4. Click "Apply/OK" and restart the computer. This will put Windows into a Clean Boot State.
Way 8. Upgrade the Hard Drive to a Larger One
A computer's hard drive that has developed too many bad sectors can cause high disk usage, making the computer slow and unresponsive. This can be due to the hard drive's age and wear, even if there is still available space. As a result, the computer may become sluggish and report 100% disk usage.
To upgrade the hard drive using Qiling Partition Master, start by downloading and installing the software, then launch it and select the disk where Windows 10 is installed. From the main interface, click on "Migrate OS to SSD" and follow the prompts to select the new hard drive and configure the settings. The software will then clone the existing drive to the new one, preserving the operating system, programs, and data. Once the cloning process is complete, shut down the computer, swap the old and new hard drives, and restart the computer.
Qiling Partition Master
- Transfer free disk space from one drive to another directly.
- Resize/move, merge, clone partition, and check file system error.
- You can clone a disk, convert it to either Master Boot Record (MBR) or GUID Partition Table (GPT), convert it to dynamic or basic disk, and even wipe all data on it.
- Migrate OS, increase partition space and more
To connect an alternative hard disk to a computer, first ensure it is properly connected to the computer. If the hard disk is new, initialize it to be recognized as a Master Boot Record (MBR) disk, which will allow the computer to detect and access it.
Step 1: Download, install and run Qiling Disk Copy on your PC.
Choose "Disk/Partition clone" to start.

Step 2. Select the smaller hard drive as the source disk. Click "Next" to continue.
If you need to copy as the source, please tick the "Sector by sector clone" option to copy the same layout of partitions on your source disk to the destination disk.
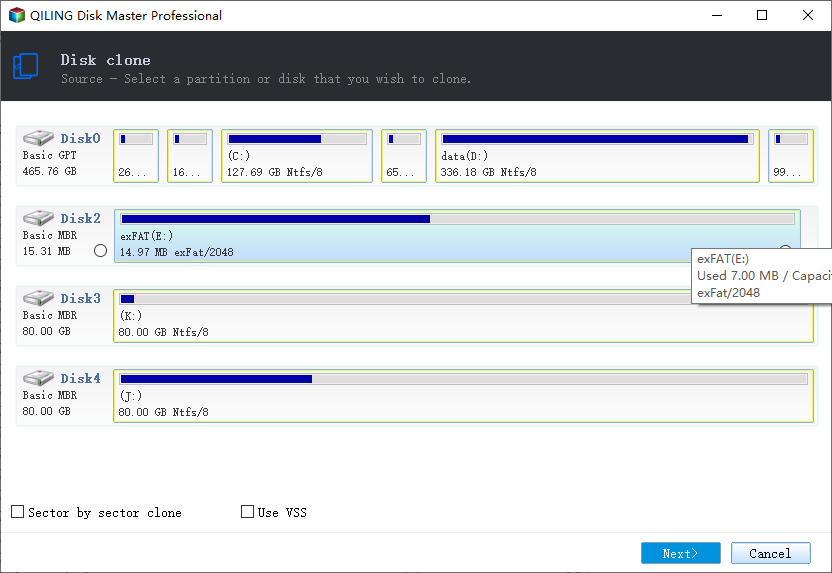
Step 3: Choose the wanted HDD/SSD as your destination and then click "Next".
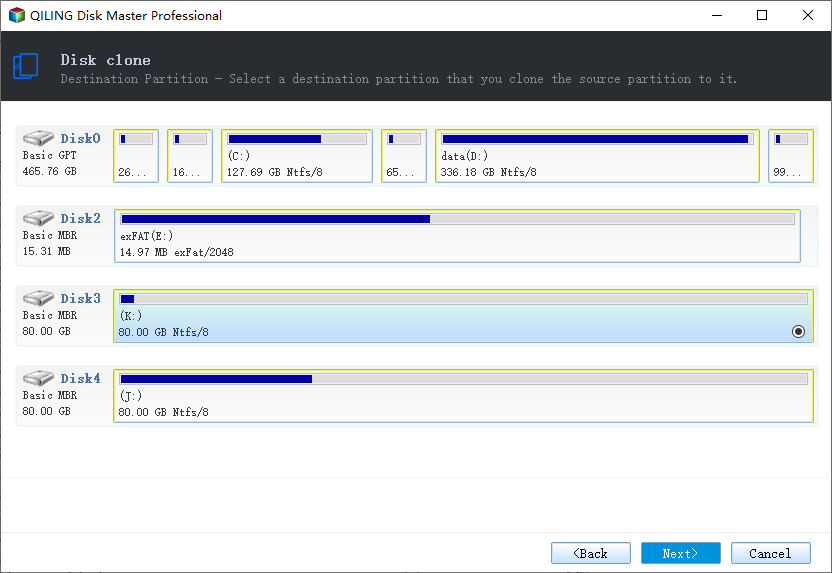
Step 4: Edit the disk layout and then click "Proceed" to continue.
If your destination disk is an SSD drive, make sure to select the "Optimize for SSD" option if the target is SSD.

A warning message informs you that the data on the destination disk will be overwritten. If you don't have important data on the destination disk, clicking "OK" will allow you to proceed.
Bonus Tips: How To Format Partition (Volume) in Windows 10
If you need to format an existing partition or change the volume format to a new file system, try the following steps:
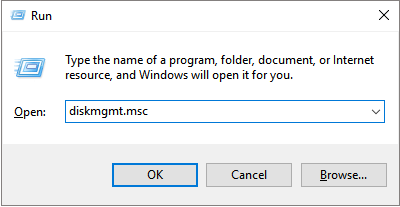
Step 1. Press Windows + R keys to open the Run box, type diskmgmt.msc, and hit Enter.
Step 2. Right-click the volume that you want to format, and then select "Format".
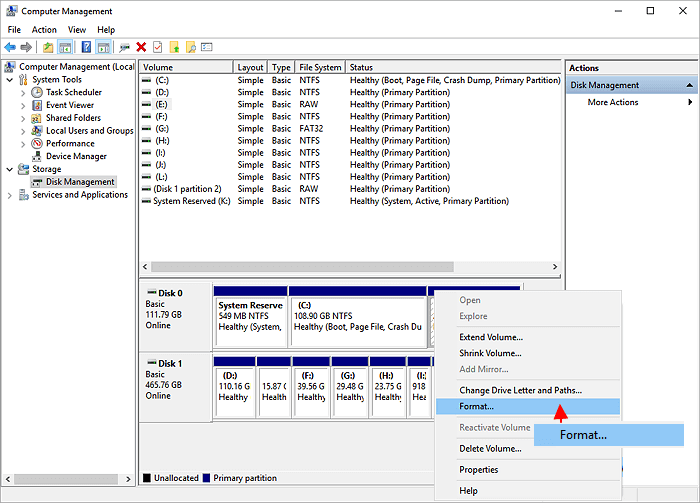
Step 3. To format the volume with the default settings as NTFS, select "OK" in the Format dialog box and then select "OK" again.
Way 9. Turn to Remote Assistance
If your Windows 8.x or Windows 10 computer is experiencing 100% disk usage, it can significantly slow down your system. To address this issue, you can try restarting your computer, checking for disk errors, disabling unnecessary startup programs, and using the built-in Disk Cleanup tool. Additionally, closing unnecessary programs, disabling unnecessary services, and running a full system scan with an antivirus program can also help. If none of these methods resolve the issue, you may want to consider running a full system scan with a dedicated disk cleanup tool or seeking further assistance from a computer expert.
Don't Try These Solutions to Fix Windows 10 100 Disk Usage (Important)
Searching for "Windows 10 100 disk usage" yields numerous results to help resolve the issue, offering solutions to address the problem.
However, I come across a whole bunch of solutions that just don't settle well with 100% disk usage in the task manager. But these operations cause problems later on. The situation is like this example - the whole arm has been anesthetized for a long time because you want to treat your finger. Try to avoid doing anything listed below:
Disabling the BITS Service - Windows Update is a feature that helps keep your PC up-to-date with the latest security patches and features. It's a required part of Windows, and trying to disable it can actually cause more problems than it solves.
Disabling Windows Search Services is not recommended as it's a core Windows service, and disabling it may not solve the problem, but rather cause more issues.
Modifying Page File -You should leave it so that Windows manages the page file, don't try custom values.
Disabling Windows Defender - Don't disable Defender, your computer may be infected with a virus.
Conclusion
To resolve disk 100 usage errors in the task manager, try the actual fixes rather than the four unnecessary solutions previously mentioned. If you're still experiencing issues, feel free to ask for assistance, and we'll be happy to help.
Related Questions About 100% Disk Usage
The issue of 100% disk usage has been a hot topic online, with many seeking answers and solutions to this frustrating problem. If you're one of them, you're in a helpful guide to learn more.
Why is my disk usage at 100 Windows 10?
If your hard drive is consistently at 100% usage, it's likely due to a specific issue that needs to be addressed to prevent slow computer performance. You can check your disk situation in the task manager and follow the steps outlined in the post to resolve the problem.
Is 100 disk usage bad?
Even if you're a chronic overachiever, keep in mind that 100% disk usage is not a good thing. When your disk is working at or near 100%, it can cause your computer to slow down, become laggy, and unresponsive, ultimately affecting its ability to perform tasks properly.
Is it OK to disable SuperFetch?
If your system is running smoothly, it's recommended to leave the feature on, but if you're experiencing issues with high HDD usage, high RAM usage, or degraded performance during RAM-heavy activities, turning it off may help resolve the problem. There is no risk of side effects if you decide to turn it off.
How much RAM do you need for Windows 10?
2GB of RAM is the minimum system requirement for the 64-bit version of Windows 10.
Related Articles
- How to Ghost a Hard Drive in 3 Steps
- Backup Computer to USB Flash Drive in Windows 10/8/7
- How to Secure Erase SSD or HDD for Free
- Free Partition Manager for Windows 7/Windows 10 64 Bit
- [Solved] My Games Take Forever to Load PC
- Repair and Restore Not Working/Failed/Dead SSD
- How to Create Disk Image Windows 10 for Free on Laptops & PCs
This article provides a step-by-step guide on how to create a disk image on Windows 10, using both the Qiling Disk Master software and the built-in Backup and Restore tool on Windows 11/10.