How to Partition SSD Safely in 2022 | Complete Guide
SSD, also known as Solid-Solid State Drive (SSD) uses flash memory to deliver superior performance and durability, outshining traditional Hard Disk Drives (HDDs) in speed and reliability. This makes SSDs increasingly popular among computer manufacturers, who are opting for them over traditional HDDs.
As more PCs are shipped with SSDs, the issue of how to partition them effectively has become a pressing concern. To make the most of an SSD, users need to know how to properly partition it, and the complete guide provided below will address this issue.
Should I Partition SSD for Windows 11/10 or Gaming? Help!
You can partition your SSD to have separate spaces for your Windows boot partition and gaming, but consider the following before doing so: the 250GB partition will be used for Windows, which includes the system files, programs, and the page file, so it might not be the best idea to leave the rest for gaming. Instead, you could consider allocating a smaller partition for Windows and a larger one for gaming. To partition your SSD, you can use the built-in Disk Management tool in Windows or a third-party partition manager like Qiling Disk Master. Simply create a new partition on the unallocated space, and format it as needed. Be sure to back up your data before making any changes.
Partitioning your SSD for Windows 11/10 can be beneficial for gaming, as it allows you to allocate a specific portion of your storage for your games, keeping them separate from your operating system and other files. This can help improve performance and reduce clutter. However, it's worth noting that modern SSDs are designed to handle a large number of files and programs, so partitioning may not be necessary for everyone. If you have a large collection of games or want to keep your games separate from your other files, partitioning your SSD can be a good idea.
Advantages of Partitioning SSD:
Partitioning your SSD provides numerous benefits, making it a recommended step, especially when creating additional partitions. By doing so, you can enjoy improved performance, increased storage capacity, and enhanced organization of your files and data. This process allows you to allocate specific areas of your SSD for different purposes, such as separating your operating system, programs, and personal files, which can lead to a more efficient and streamlined computing experience.
- Easier to Back Up and Restore System
- Better to Manage System and Personal Data
- Protect Data from System Crash or Failure Issue
- More Efficient to Use OS, Files
- Qiling SSD Partition Tips:
- 1. If you have only one disk, it's recommended to create at least two partitions: one for the operating system and another for data storage. This will help maintain a healthy separation between system files and user data, making it easier to manage and maintain your system in case of issues.
- 2. 2 or more disks are recommended. The SSD should be used as the OS disk, while the HDD can be used as a data disk.
To protect your OS and personal data, install Windows and programs on the system partition, and store data like games, documents, pictures, music, and videos on a separate partition.
For most users, partitioning an SSD can be a challenging task. However, to make it easier, follow the next two parts to learn how to make partitions on your SSD now.
Part 1. Check The State of Your SSD
The ways to partition SSD may be different based on the state of your SSD disk. Let's check the state of your SSD first in Disk Management:
Step 1. Install SSD to your computer correctly via the connection cable.
Step 2. Restart PC, right-click "This PC/My Computer" > "Manage".
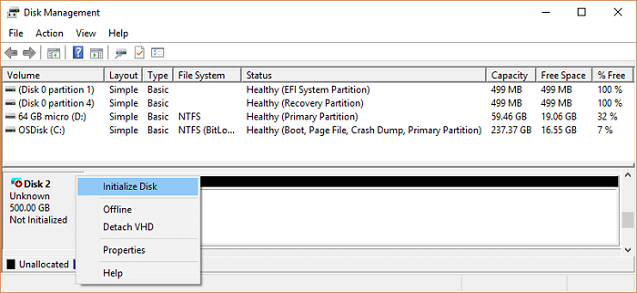
Step 3. Click Disk Management and check the state of your SSD:
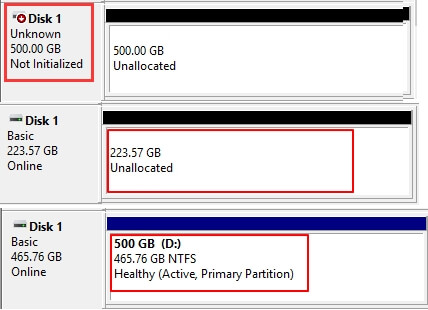
- To resolve the issue, initialize the SSD by right-clicking on it in Disk Management, selecting "Initialize," and then creating a new partition. This will allow the SSD to be recognized and used for storage.
- Unallocated simply means that your SSD is ready to be formatted and used for storing data, similar to an empty USB drive. You can create partitions on it to start using it.
- You have partitions on your SSD and need to resize and repartition it.
To start partitioning your SSD, follow the complete guide in the next part, which will walk you through the process step by step. This will allow you to create and manage partitions on your solid-state drive, giving you more control over how your storage is organized.
Part 2. How to Partition SSD Safely & Easily
Creating and resizing partitions on an SSD can be a hassle, unlike making folders. However, you can easily partition your SSD using partition software or Disk Management, following the respective guides to do so.
- #Guide 1. SSD Shows Not Initialized - Initialize SSD
- #Guide 2. SSD Shows Unallocated - Partition SSD & Create New Volumes
- #Guide 3. SSD Shows Partitioned - Resize and Partition SSD
#Guide 1. SSD Shows Not Initialized - Initialize SSD
If your SSD shows Not Initialized in Disk Management, initialize the disk first, and then follow the guide to create new partitions on it.
Here are the steps to initialize SSD in Disk Management:
Step 1. Right-click"This PC/My Computer", click "Manage" and click "Disk Management".
Step 2. Right-click the not initialized SSD and select "Initialize SSD".
Step 3. Set the Master Boot Record (MBR) or GUID Partition Table (GPT) for your Solid State Drive (SSD), and click "OK" to confirm the change.
If you only need a few partitions, MBR is sufficient, but for multiple partitions or installing Windows 11/10, use GPT. You can learn more about the differences between MBR and GPT by reading about them.
After initializing the SSD, proceed with creating partitions on your SSD by following the steps outlined in #Guide 2.
#Guide 2. SSD Shows Unallocated - One-Click to Partition SSD & Create New Volumes
If your SSD is unallocated in Disk Management, the computer will treat it as a new disk, requiring you to create partitions on the drive to utilize it.
Here, we'd like to show you how to partition unallocated SSD in only one click with the help of Qiling Partition Master. Its New Disk Guide makes partitioning an SSD safe and easy.
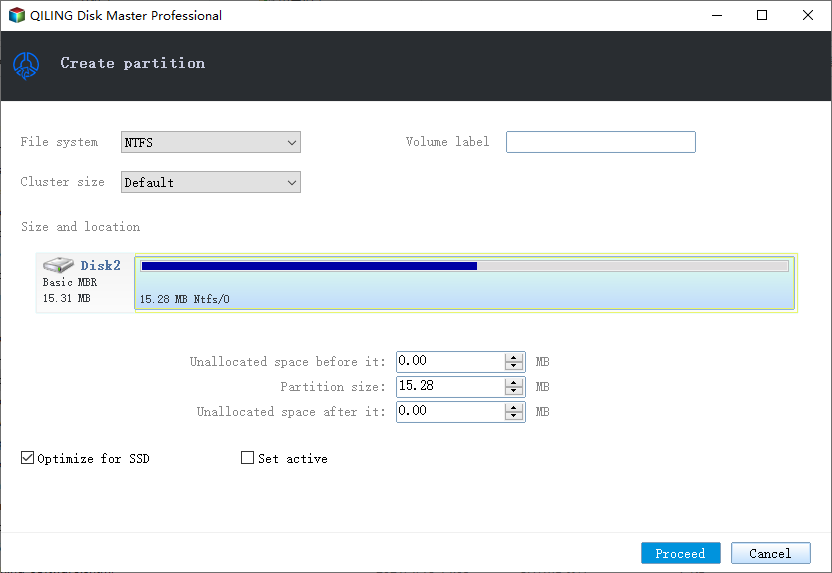
Step 1. Open Qiling Partition Master and select the "Create" button in the "Disk management" page.
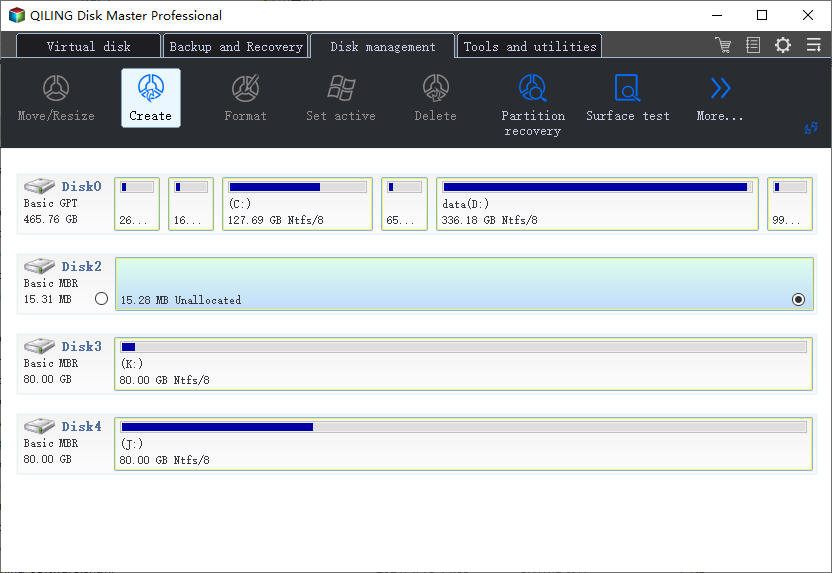
Step 2.You can continue to customize how many partitions you want to create, and set the partition style to either MBR or GPT.
You can either accept the default setting offered by Qiling Partition Master or customize it according to your needs once you're done.
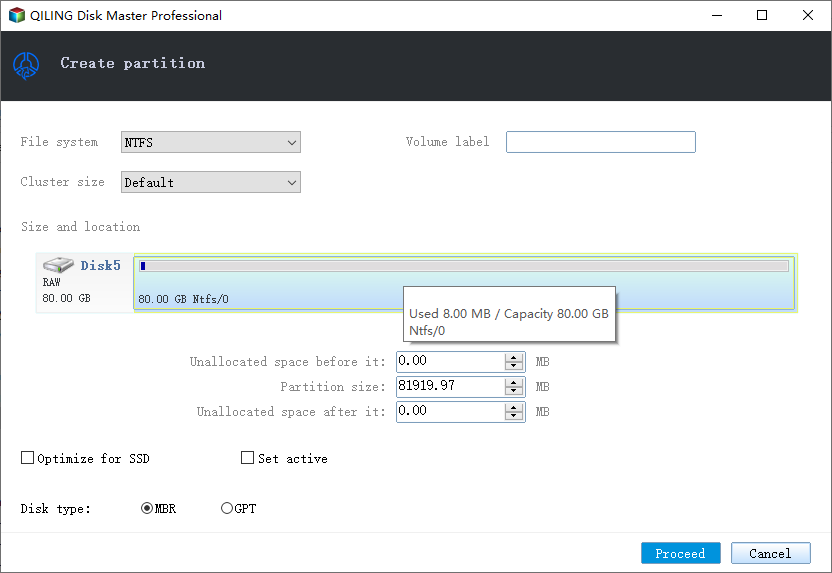
Step 3. Click "Proceed" to finalize partitioning the new HDD/SSD or external disk.
After the initial setup, you can install your operating system, applications, or personal files to the SSD partition, giving you the flexibility to use it as needed.
In addition to disk partitioning, Qiling Partition Master offers other features to utilize your SSD disk, such as disk cloning, disk wiping, and file recovery. These features allow you to make the most of your SSD's capabilities and ensure its longevity.
- Migrate OS to SSD/HDD
- Convert Disk/Partitions
- merge SSD partitions
- Recover lost partitions
- ...
You May Also Like:
How to Partition Hard Drive in Windows 11/10
Data recovery is no longer a daunting task, thanks to Qiling, a reliable data recovery application that allows users to retrieve lost data with ease, all within a few simple steps.
#Guide 3. SSD Shows Partitioned - Resize and Partition SSD
If you've already created partitions on your SSD and want to re-allocate the disk space, you can use Qiling Partition Master or Disk Management to assist with the process.
For a simpler solution, the Qiling partition tool is a better option.
Way 1. Partition SSD with Qiling Partition Tool
You can use Qiling Partition Master to format your SSD to various file systems, partition it to multiple partitions with 4K alignment, and even clone your SSD. To get started, simply download Qiling Partition Master and follow the steps to partition your SSD.
Step-by-Step Guide to Re-Partition SSD
Step 1. Check for free space
To divide a disk partition into multiple ones, you must ensure that there is adequate free space to be allotted.
Step 2. Shrink a disk partition to create unallocated space
To resize a partition, start by clicking on the "Resize/Move" feature, then select a partition with ample free space and click on it to proceed.

To free up unallocated space, drag either end of the partition to the right or left, reducing its size as indicated by the red arrow, and monitor the decrease in partition size in the "Partition size" area.

To conclude, after shrinking the disk, click "Proceed" to save the changes, and the unallocated space should appear under the same disk on the main window.
Step 3. Create a new partition on unallocated space
To turn the unallocated space into a usable partition drive with a recognized file system, click on the unallocated space and choose "Create".
Customize the partition information by choosing a drive letter, partition label, file system (NTFS, FAT32, EXT2/3/4, exFAT) and other settings in the Advanced Settings.
To partition a hard drive in many more partitions, start by clicking on the "New" button in the Disk Management tool. Select the unallocated space and click "Next". Choose the size of the partition you want to create and click "Next" again.
To ensure the best performance of an SSD, Qiling Partition Master offers the 4K alignment feature, which aligns the 4K sectors on your SSD, allowing for optimal optimization.
Way 2. Partition SSD with Disk Management
This method involves shrinking an existing partition to free up space, which can then be used to create a new partition. Alternatively, if the SSD hasn't been partitioned, you can create partitions directly on it.
Step 1. Open Disk Management.
Step 2. Right-click one SSD partition and select "Shrink Volume".
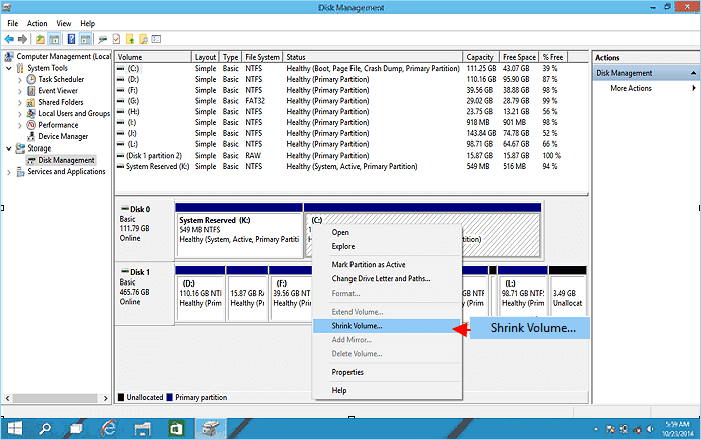
To shrink a partition, enter the amount of space you want to free up, click on the "Shrink" button, and unallocated space will be created.
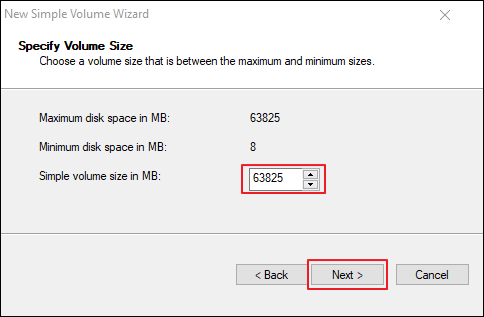
Step 3. Right-click on the unallocated space and select "New Simple Volume".

Step 4.The New Simple Volume Wizard interface should be opened, and the "Next" button should be clicked, followed by another click on "Next" to proceed.
The unallocated space will be added to the new SSD partition.
Step 5. Assign a drive letter or path, then set the file system to NTFS, and click "Finish".
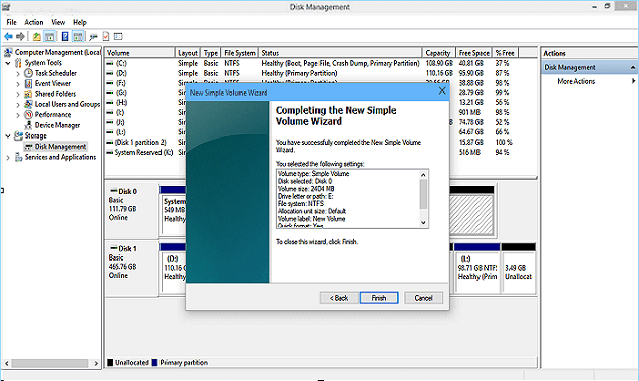
To create a new partition in your SSD, wait for the process to complete, which will create a new partition on your solid-state drive.
Partitioning SSD Is Easy, Take Steps to Make Use of Your SSD Now
Partitioning your SSD (solid-state drive) offers several benefits, including improved performance, better data organization, and enhanced security. To fully partition your SSD in Windows 10/8/7, you can follow a step-by-step guide, which includes backing up data, using the built-in Disk Management tool, or third-party software to create and manage partitions.
To partition an SSD, first check its state in Disk Management, then follow the appropriate solution to partition it easily. Qiling Partition Master is a recommended tool for this process.
To safely and easily partition your SSD, follow this tutorial and take steps to make use of your SSD now.
Related Articles
- (In-depth Tutorial) How to Format SSD in Windows 11
- Fix Diskpart Clean Not Working on Disk/USB/SD Card [5+ Fixes]
- How to Change Dynamic Disk to Basic Disk Safely
- How to Install Windows 11 on Windows 7 (Get In-depth Guide)
- How to Clone Windows to NVMe [2024 Full Guide]
Cloning Windows to an NVMe drive is a simple way to improve your computer's performance without reinstalling Windows. You can clone your existing Windows installation to an NVMe drive, which can significantly improve your computer's write and read performance. - How Do I Clone Windows to SSD for Free? Your Reliable Guide
You can clone your Windows system to a new SSD for free without any boot issues. To do this, follow the steps outlined on this page, which provides a free solution that works to transfer your Windows OS to a new SSD without any complications.