Solutions to Wsappx Takes High Disk and CPU Usage on Windows 11/10
To resolve the issue of wsappx consuming high disk and CPU usage on Windows 11/10, three effective fixes can be applied. These solutions can help completely get rid of wsappx and alleviate system performance issues.
| Workable Solutions | Step-by-step Troubleshooting |
|---|---|
| Fix 1. Disable Windows Store | Go to Local Computer Policy > Computer...Full steps |
| Fix 2. Extend Virtual Memory | Type performance in Search and high Enter...Full steps |
| Fix 3. Check/Clean Disk Internal Error | Download Qiling free partition manager...Full steps |
| More Fixes | Open Registry Editor on your computer...Full steps |
What Is Wsappx
Wsappx is a background process on Windows 10/8 computers that runs as part of the Windows Store and the Universal app platform, allowing for seamless integration of Windows Store apps.
Wsappx includes two separate background services, AppX Deployment Service (AppXSVC) on Windows 10, and Client License Service (ClipSVC) is not present, but AppXSVC is accompanied by WSService (Windows Store Service) on Windows 8.
Wsappx is used for installations, updates, and uninstallation of Store apps, so once you're done installing all updates, you won't need it.
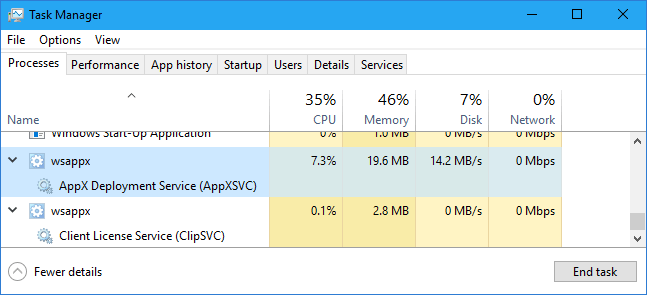
Wsappx High Disk and CPU Usage Issue
The wsappx process is consuming high resources in Task Manager, causing issues with disk, CPU, and memory usage. This can occur when the Windows Store application is running in the background, consuming system resources.

When wsappx consumes high CPU or disk usage on Windows 10, it's usually due to the Windows Store and other background processes. To fix this, restart your PC, disable any unnecessary startup programs, and check for Windows updates. You can also try running the Task Manager to see which process is causing the issue and end it.
Why Is Xappx Using So Much Disk or Space?
To resolve the issue of high disk or CPU usage by wxappx, it's essential to understand why wxappx is consuming so much space. This can be due to various reasons, including but not limited to, cache data, temporary files, and other system resources being used by the application. Understanding the root cause of the issue will help you take the correct steps to resolve it.
- When you're using the Microsoft Store, wsappx will activate and utilize system resources such as CPU and disk usage.
- wsappx uses more resources when you download an app or install an update as it needs them for the install process.
- When installing traditional desktop software, the installation process can be resource-intensive, consuming high CPU and disk usage, which can slow down the system.
- Background app updates can cause wsappx to consume high CPU or disk usage, leading to performance issues.
From what we know, this is a common problem in Windows. We have some effective solutions to help you get out of this situation.
Can I End Wsappx? Fixes for Wsappx High CPU/Disk Usage Available Here
Here are 6 practical resolutions to efficiently get rid of the Wsappx high CPU and high disk usage issue on your computer:
- #1. Disable Windows Store
- #2. Extend Virtual Memory
- #3. Check and Clean Disk Internal Error
- #4. Change Value of AppXSVC in Registry
- #5. Scan Your Computer to Check Virus
- #6. Troubleshoot in Clean Boot State
To fix the error, you can try running the command prompt as an administrator and then running the command again. Alternatively, you can try running the command with the /s flag to specify the source directory. If the issue persists, you can try uninstalling and reinstalling the Visual Studio Code extension.
Solution 1. Disable Windows Store to Fix wsappx High CPU Issue
Windows Store is a common cause of the wsappx high CPU issue, but it can be effectively disabled using either the Local Group Policy or the Registry Editor.
Follow to see how to disable Windows Store on your computer now:
#1. Use Local Group Policy
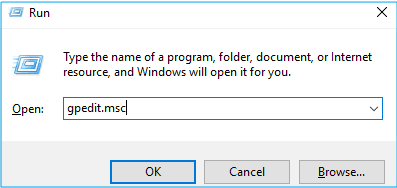
Step 1. Press the Windows logo key + R then type gpedit.mscand click "OK".
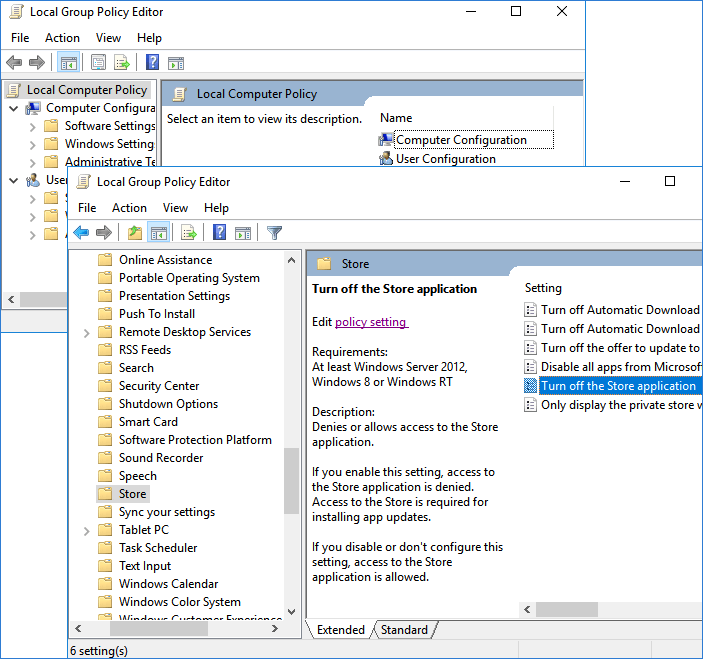
Step 2. Enter Local Computer Policy and go to Computer Configuration.
To access the Store settings, go to the "Administrative Templates" section, expand the "Windows Components" folder, and then double-click on the "Store" option to open it.
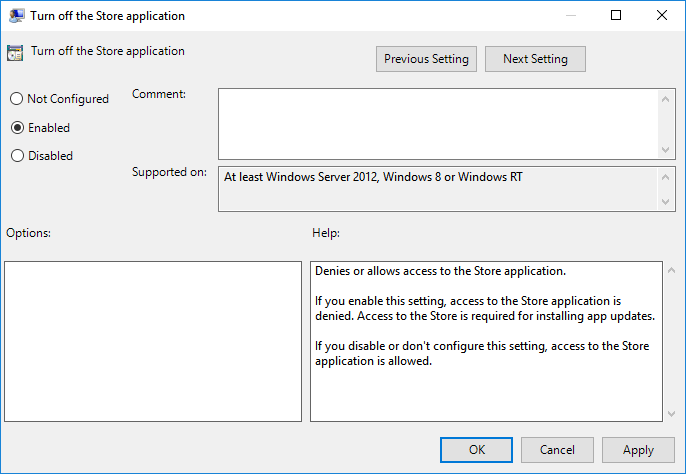
Step 3. Select "Turn off the Store application" and click "Edit policy setting".
Step 4. Change the status to "Enabled". Click "Apply" and "OK" to save and exit.
After following the previous steps, you can restart your PC to see if the issue is resolved. If not, proceed with the next solutions.
#2. Use Registry Editor
The Windows Registry Editor is a tool primarily used by administrators to control and modify settings on a Windows computer, and is not suitable for beginners.
Be extremely cautious when disabling Windows Store to resolve the wsappx high disk usage issue, as any false operation may have serious consequences.
Step 1. Type regedit in Search and hit Enter to bring up Registry Editor. Click "Yes" to open it.

Step 2. Navigate to: HKEY_LOCAL_MACHINE\SOFTWARE\Policies\Microsoft\WindowsStore.
Step 3. Create a new DWORD value within the Widows Store keys and name it as "RemoveWindowsStore", set the value as "1".
Save the changes and exit Registry. Then you can restart the Windows service.
NoteWhen you disable Windows Store, you won't be able to install or update third-party Windows Store apps and programs. To enable installation and updates, you'll need to enable Windows Store by either disabling "Turn off the Store application" or changing the value of RemoveWindowsStore to "0".
Solution 2. Extend Virtual Memory
To extend the virtual memory, follow these steps:
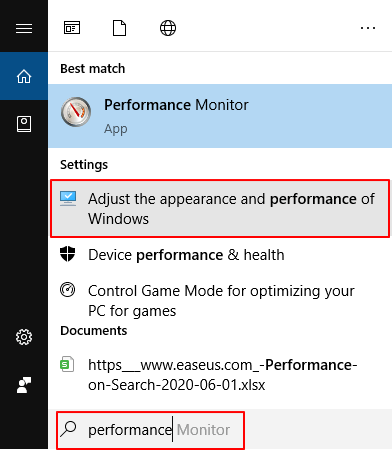
Step 1. Type performance in Search and high Enter, select "Adjust Appearance vs. Performance in Windows".
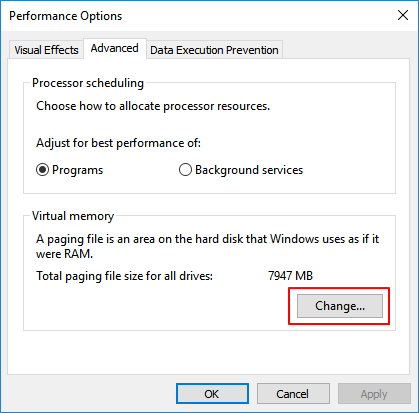
Step 2. Go to the Advanced tab, click "Change" under Virtual Memory section.
Step 3. Uncheck "Automatically manage paging file size for all drives", then select the OS drive and click "Custom size".
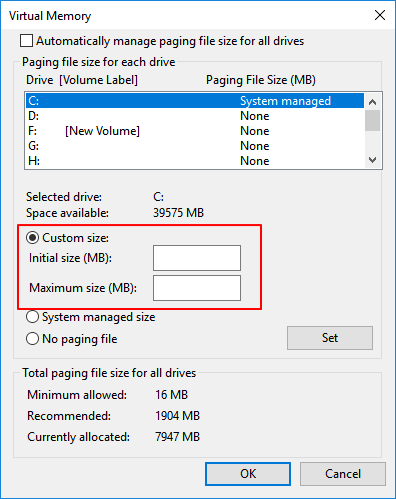
Step 4. The initial size of the virtual memory should be set equal to your RAM size in MB, and the maximum size should be set to double of the initial size.
Step 5. Click "Set" and "OK" to keep all the changes.
If your computer is experiencing a high CPU issue, try closing any unnecessary programs or background applications that might be consuming resources. You can also check for any software updates, as newer versions might have improved performance. If the issue persists, restart your computer to see if it resolves the problem.
Solution 3. Check and Clean Disk Internal Error
For those who recently encountered this issue, performing a disk check might be necessary. Sometimes, a disk can capture internal errors or unknown file system mistakes, leading to high disk usage or CPU errors, causing the computer to malfunction.
To perfectly solve this case, you will need a reliable tool for help - Qiling free partition tool.
This professional tool can help get the work done, and it provides a detailed explanation of the process.
After completing the steps, restart your Windows 10. Then, check the Task Manager to see if the disk usage of wsappx is within normal limits.
Solution 4. Change Value of AppXSVC in Registry
Changing the value of AppxSvs in the Registry may also help resolve the wsappx high CPU or high disk usage error, as suggested by some experienced administrators.
Here are the steps:
Step 1. Open Registry Editor on your computer.
Step 2. Navigate to this path: HKEY_LOCAL_MACHINE\SYSTEM\ControlSet001\Services\AppXSvc.
Step 3. Locate the key and change the Start value on in the right panel to "4".
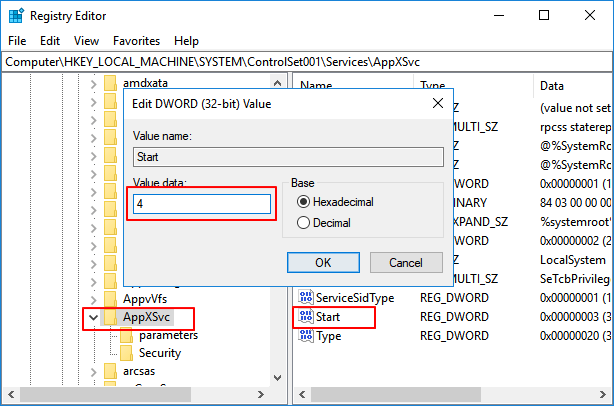
Step 4. Click "OK" to save the changes and exit Registry.
To resolve the issue of your computer freezing or crashing, restart your computer. This will likely resolve the problem, as it clears the system's memory and reloads all programs.
Solution 5. Scan Your Computer to Check Virus
Ignoring this issue can sometimes be due to a virus or malware infection, so it's essential to run a full system scan with an antivirus program to rule out this possibility.
Step 1. Run anti-virus software on your PC and let it scan your whole computer disk.
Step 2. Once the antivirus software finds suspicious files, remove it from your PC.
Step 3. Restart your computer to see if there is any change.
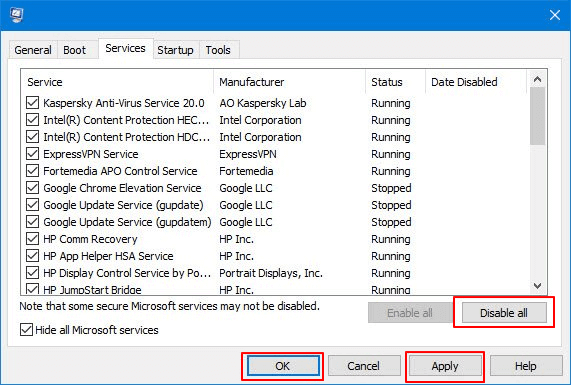
Solution 6. Troubleshoot in Clean Boot State
1 way to resolve the wsappx high CPU usage issue is to perform a Clean Boot, which will make Windows run only on a few essential drivers for settings and startup programs.
To manually resolve the wsappx high CPU or high disk usage issue from startup, follow these steps:
Step 1. Type MSConfig in Search and hit Enter to open System Configuration Utility.
Step 2. Go to the Genergal tab, click "Selective Startup", check "Load system services" and "Use original boot configuration".
Click "OK" to continue.

Step 3. Go to the Services tab, select "Hide All Microsoft Services" and click "Disable all".
Click "Apply" and "OK" to keep all the changes.
After the Clean Boot, restart your computer and Windows will execute a Clean Boot. This will help resolve the issue. You can then repeat the steps, uncheck "Load System Services", save the changes, and restart the computer.
Conclusion
The wsappx process is taking up a significant amount of CPU and disk memory on your computer. This can be caused by various situations, including but not limited to, a malfunctioning Windows Store app, a corrupted system file, or a resource-intensive program running in the background. As a result, it's essential to troubleshoot and resolve the issue to free up system resources and prevent potential performance problems.
If you're struggling to find effective solutions, try the methods presented on this page. Don't hesitate to take matters into your own hands and help yourself out.
Related Articles
- How to Set SSD as Boot Drive [2022 Updated]
- How to Format Hard Drive Windows Server
- [Simple & Easy] Wipe Your HDD/SSD Data Completely
- 8 Fixes: Can't Install Windows on GPT or Windows Cannot Be Installed to This Disk Error
- Guide to Test Disk Speed on Windows Computer [Your Free Guide Is Here]
Is your Windows computer running slow and taking a long time to perform basic tasks? It might mean that the hard disks in your system are working slower than normal. This article will explain how to test disk speed on a Windows computer. - How to Test Western Digital Hard Drive Speed [Full Guide in 2024]
If you want to run Western Digital hard drive speed, This guide may be helpful to you. This guide will tell you how to test Western Digital hard drive speed in two efficient ways, and you will also get bonus tips to speed up your hard drives.