A Starter Guide to the Windows Disk Management
Main Content of This Guide:
About Disk Management? Who Is This Guide for?
I. What Is Disk Management Windows 10/11?
II. How to Open Disk Management in All Windows PC?
To set up a hard drive using Windows Disk Management, follow these steps: Open the Disk Management tool by searching for it in the Start menu. In the Disk Management window, look for the unallocated space or the drive you want to set up. Right-click on it and select "New Simple Volume" from the context menu. Follow the wizard to assign a drive letter, file system, and label to the new drive.
IV. Troubleshooting of Disk Management Windows 10/11 Error
V. Disk Management Software for Windows
People Also Ask about Disk Management
About Disk Management? Who Is This Guide for?
This guide is for those who want to manage disks or partitions using Windows Disk Management. Whether you're a beginner looking for a manual way to partition a device or a user with a basic understanding of disk management in Windows 10/11, this guide is for you. It provides a straightforward overview of the basics of the disk manager utility, avoiding complex terminology and focusing on making it easy for novices to understand and use Windows 10/11 disk management to run and fix errors without hassle.

I. What Is Disk Management Windows 10/11?
Windows Disk Management is a software utility that provides a graphical interface for managing disk drives and partitions in a computer system. Its main goal is to optimize disk space use and improve system performance.
In older Windows versions, disk management was accessed through the Disk Administrator tool, but starting with Windows Vista, it's been integrated into the Computer Management console.
Windows Disk Management Availability:Windows versions from 2000 to 11, including XP, Vista, 7, 8, 10, and all Server versions, are affected.
Disk Management is a built-in Windows utility that allows users to manage and manipulate their hard drives. It provides features such as creating, formatting, and deleting partitions; assigning drive letters; and converting dynamic disks to basic disks. It also offers the ability to extend or shrink partitions, as well as change the drive letter of a partition. However, its capabilities are limited compared to third-party disk management software, and it may not be able to handle complex disk configurations or errors.
Essential Feature 1 of Disk Management - Manage Disks
- Initialize a new disk - After obtaining or replacing a new drive, ensure it's properly initialized before utilizing the disk on your computer. This process prepares the drive for use, making it ready to store data and applications.
- Converting a disk from MBR to GPT or vice versa involves changing the partition style. MBR and GPT are two different partition styles, and understanding the difference between them can be helpful. If you're interested, you can read more about what GPT and MBR are.
- Change or assign a drive letter.
- Change a dynamic disk to a basic disk.
- Manage virtual disk: It enables to create and attach VHD.
- Check disk's properties.
Essential Feature 2 - Manage Basic Volumes with Disk Management
- Create a new simple volume.
- To manage basic volumes, you can extend, shrink, delete, or format a volume. Extension increases the volume size, shrinking reduces it, deletion removes the volume, and formatting prepares the volume for use with a file system.
- Set partition as active.
Benefits and Drawbacks of Disk Management Windows 10/11
What we like about Disk Management is that it's entirely free and requires only basic partition functions, making it a big attraction for users who are tired of downloading third-party software that claims to be free but requires an upgrade for a fee.
The Disk Management tool has some drawbacks, particularly when it comes to extending or shrinking volumes. For a novice, it can be confusing to work with the precise measurements in megabytes required to change disk size, making it difficult to accurately count. Furthermore, users often encounter unexpected errors, such as the "extend volume" option being greyed out or the hard drive not showing up, which can be frustrating and hinder the process.
II. How to Open Disk Management in All Windows PC?
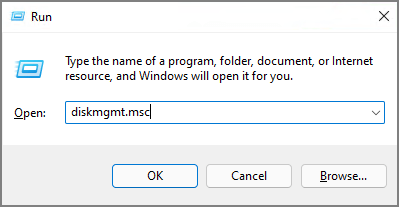
To open Disk Management in Windows, you can run it from the Control Panel or by typing "diskmgmt.msc" in the Run dialog box (Windows key + R). Alternatively, you can search for "Disk Management" in the Start menu.
To Access Disk Management with Shortcut (Disk Management Command)
To open the disk management console on a Windows computer, press the Windows key + R to open the Run dialog box, type "diskmgmt.msc" and press Enter. This will display a window showing all your hard drives and partitions, allowing you to view and manage them.
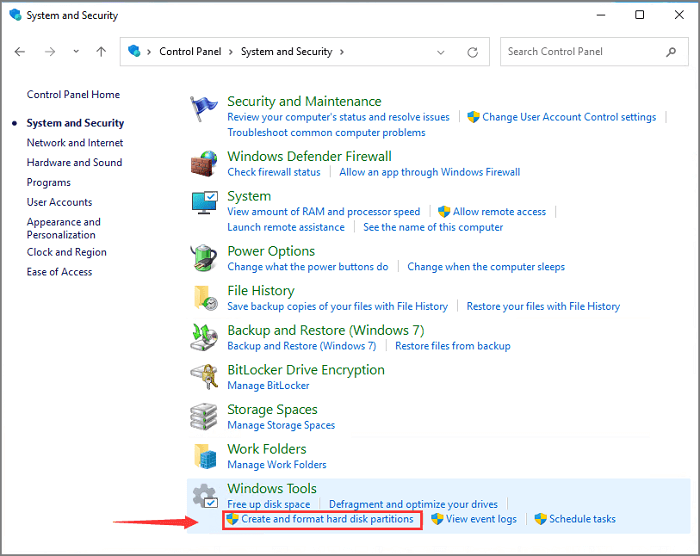
To Get into Windows Disk Management from Control Panel
To access the Disk Management tool in Windows, go to the Start menu and search for Control Panel. Once open, click on "System and Security" and then type "disk management" in the top-right search box.
Get More Opening Options
If you're still curious about other options, you can access the Disk Management tool in Windows 11 through various methods, such as opening it from the quick access menu, a dialog, task manager, and more.
III. How to Use Windows Disk Management to Set Up Hard Drive?
Giving your hard drive a makeover is an ordinary task, as it's a sophisticated device that's still vulnerable to viruses and time. To extend its lifespan, consider setting up your hard drive, managing the disk or partition space, and utilizing unallocated free space. This can be achieved through easy step-by-step tutorials on partitioning your hard drive, allowing you to optimize its performance and longevity.
1. Initialize A New Disk
2. Create A New Volume
3. Extend or Shrink Volume
4. Format Partition
5. Convert MBR to GPT or Vice Versa
6. Change A Drive Letter
7. Convert Basic to Dynamic Disk
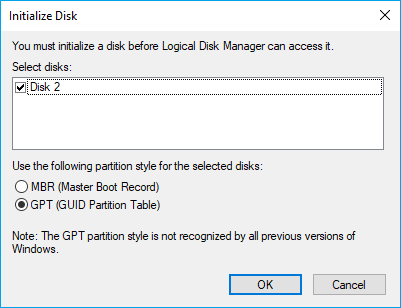
1. Use Windows 10 Disk Management to Initialize A New Disk
Step 1. Install or connect a new hard drive to the computer.
Step 2.To open Disk Management, you can right-click on the Start button, then select Disk Management from the list. Alternatively, you can type "diskmgmt.msc" in the Run dialog box (Windows key + R) and press Enter. If you're using Windows 10, you can also search for "Disk Management" in the Start menu. Once you've opened Disk Management, you can use the options to create, format, and delete partitions on your hard drive.
Step 3.Initialize the hard drive by clicking on the "Initialize Disk" option from the menu.
Step 4.In the Initialize Disk dialog box, select the correct disk to initialize and choose the desired partition style. This will prepare the disk for use with Windows.
Here are some ways to initiate a hard drive:
2. Create A New Volume by Disk Management
Step 1. Launch Disk Management.
Step 2.To create a new partition on your computer, select the unallocated space, right-click on it, and choose "New Simple Volume..." from the context menu. This will open the "Create Simple Volume" wizard, where you can follow the prompts to assign a drive letter, file system, and other settings to the new partition.
Step 3.To begin the process, set the file system, allocation unit size, and volume label, then click Next.
Get More Info
If you're looking for more tips, be sure to check out the complete guide on new simple volume.
3. Extend or Shrink Volume via Windows Disk Management
Step 1. Run Disk Management.
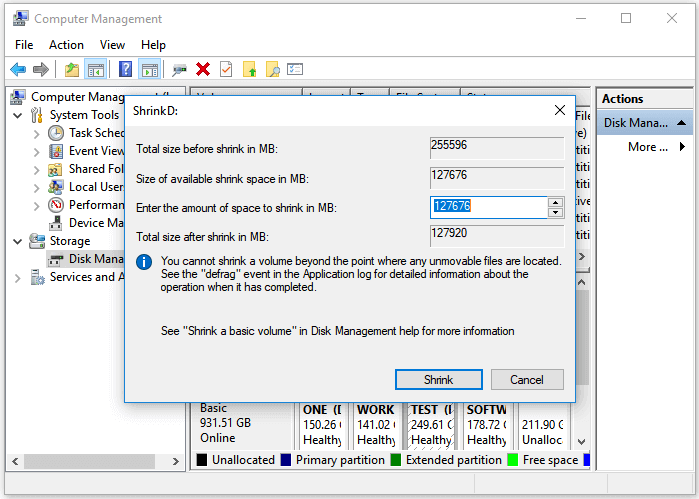
Step 2.To extend or shrink a volume, click on the volume you want to modify, then click on either the "Extend Volume" or "Shrink Volume" option.
Step 3. Adjust the size in MB.
On the "Extend Volume Wizard", adjust the space size and proceed to Next, then Finish.
On the Shrink dialog box, enter the desired amount of space to shrink in MB and click "Shrink".
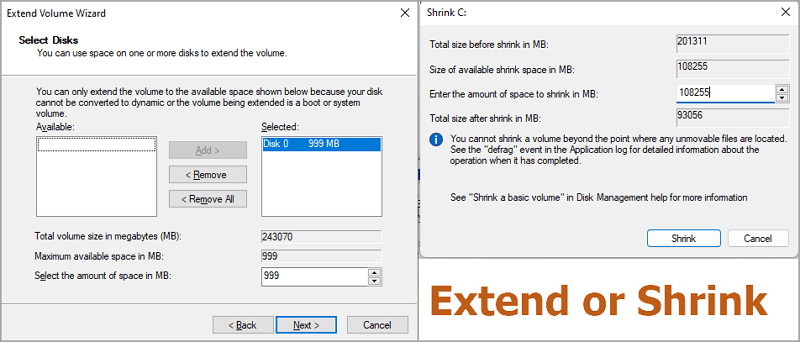
If the extended volume feature is greyed out, it might be due to a software issue or a hardware problem. To troubleshoot, try restarting your device, checking for any software updates, and ensuring that the volume buttons are clean and free from debris.
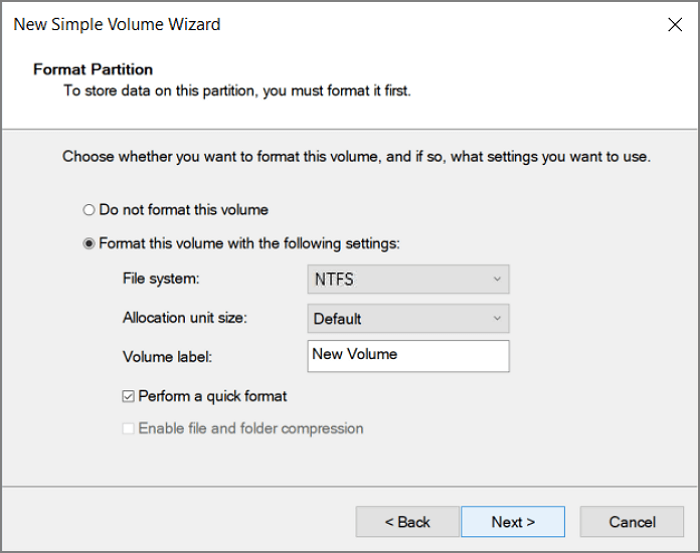
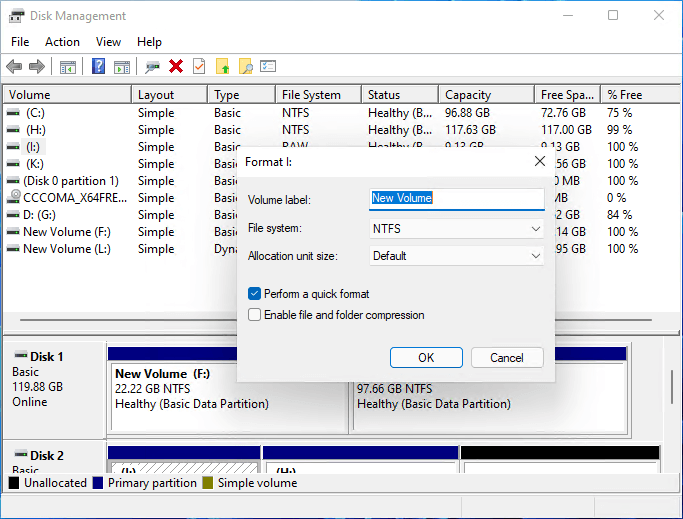
4. Format Partition by Disk Management Windows 10
Note:The format function can lead to data loss, so it's essential to back up all crucial data before proceeding.
- Open Windows partition utility.
- Right-click a volume you want to format and choose "Format...".
- Change the volume label, file system, and allocation unit size, and select "Perform a quick format" to proceed.
- Click OK.
5. Convert MBR to GPT or Vice Versa
Be cautious when changing the partition style from MBR to GPT or vice versa, as it may lead to data loss. If you're considering this conversion, please back up your essential data first to avoid any potential issues.
- Delete all volumes: Launch Disk Management > Right-click the volume on the targeted disk > Click "Delete Volume"> Click "Yes".
- To change the partition style of a disk, right-click on the targeted disk and select the option to convert it to either a GPT (GUID Partition Table) or MBR (Master Boot Record) style, depending on your preference.
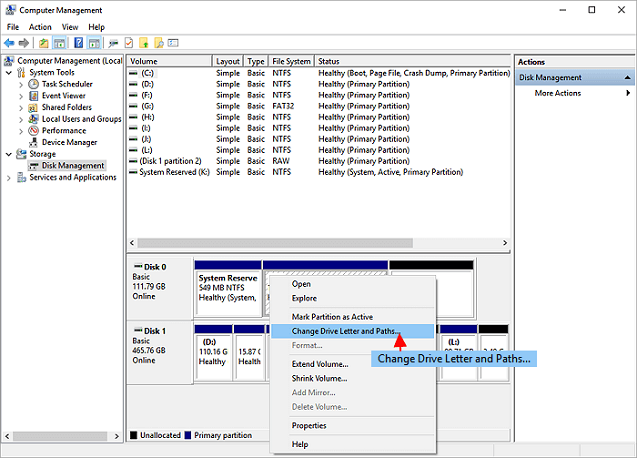
6. Change A Drive Letter with Windows 10 Disk Management
Run Disk Management > Right-To change the drive letter of a partition, click on the partition, then click on "Change Drive Letter and Paths..." in the context menu. Next, select a new drive letter from the list and click "OK".
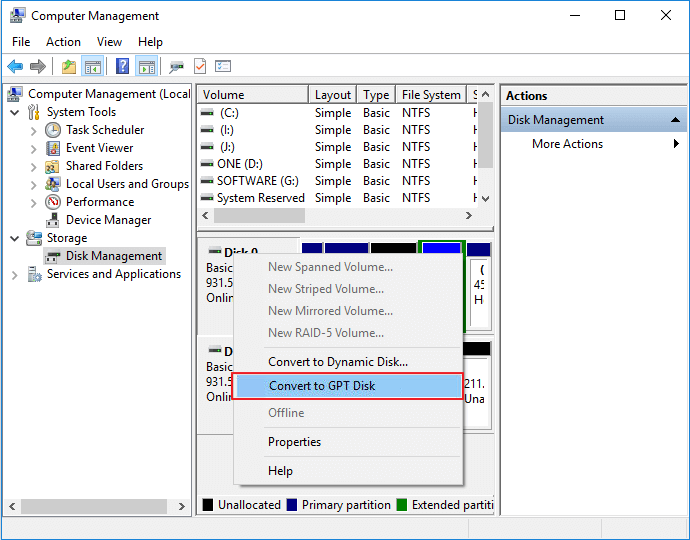
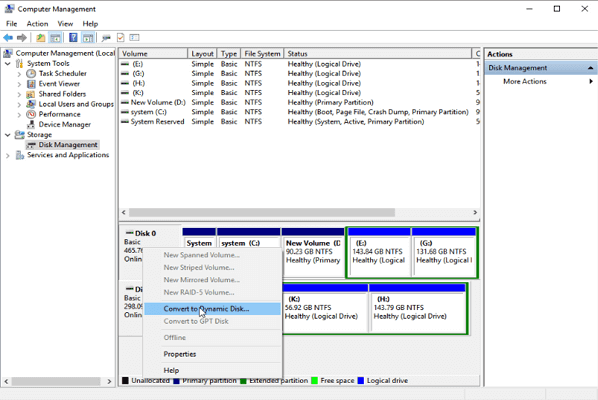
7. Convert Basic to Dynamic Disk
Launch Disk Management > Right-To convert a basic disk to a dynamic disk, click on the "Convert to Dynamic Disk" option in the disk management utility. This will initiate the conversion process, which may take a few minutes to complete, depending on the size of the disk and the system's performance. Once the conversion is complete, the disk will be converted to a dynamic disk, which can then be managed and used as a dynamic disk. Note that converting a basic disk to a dynamic disk is a one-way process, meaning that once a basic disk is converted to a dynamic disk, it cannot be converted back to a basic disk.
In Disk Management, you can also perform other features such as resizing partitions, creating a new partition or volume, deleting a partition or volume, and checking the disk for errors. To do this, open Disk Management, right-click on the disk or partition you want to modify, and select the desired action from the context menu. For example, to resize a partition, select the partition you want to resize, click on the "Resize" option, and enter the new size in the dialog box.
Disk Management may not be the solution for everyone, as it can be limited by greyed-out errors or unresponsive hard drives. If you encounter issues, the Troubleshooting section can provide assistance. If that doesn't resolve the problem, alternative methods for managing disks can be explored.
IV. Troubleshooting of Disk Management Windows 10/11 Error
(X )Error 1. Extend Volume Greyed out
When trying to expand a partition size on a hard drive, the error "Can't extend volume" may occur, with the option to extend volume greyed out. This standard error is often caused by the hard drive being out of space, but it can also happen if there's not enough free space on the disk to make the expansion possible. In such cases, you can try shrinking a volume in Disk Management to create unallocated space.
- To shrink a volume, go to Disk Management, look at the partition next to the volume you want to shrink, select "Shrink Volume" and click OK.
(X )Error 2. New Simple Volume Out
A new simple volume greyed out is a problem that occurs when trying to create a new volume on a disk partitioned with the Master Boot Record (MBR) scheme, especially if the disk has more than four primary partitions. To resolve this, you can either delete one of the existing primary partitions and create a new one in its place, or convert the disk to the GUID Partition Table (GPT) scheme, which supports up to 128 partitions.
Back to change MBR to GPT with Disk Management.
LEARN MORE
Try more solutions to fix New Simple Volume Greyed out
(X )Error 3. Format Volume Greyed Out
The "Disk Management format greyed out" issue occurs when trying to format a storage drive, often due to corruption or bad sectors on the disk. This results in the format option being unavailable, and a third-party tool is usually required to format the drive.
Other Quick Troubleshooting in Disk Management:
V. Disk Management Software for Windows
While managing hard drives can be done manually through Disk Management, users may encounter errors that take up too much time. An alternative free program can be used to complete tasks in seconds, offering a more efficient solution.
Free Partition Manager - Qiling Partition Master
Qiling Partition Master is a free tool that allows users to resize, move, merge, and convert partitions on their hard drive, as well as create, delete, format, and extend partitions, and recover deleted or lost partitions.
Check More Tools
Move to get the other nine free disk manager.
People Also Ask about Disk Management
1. Why does my hard drive not showing up?
- The drive is properly connected to your computer.
- The drive has become corrupted or damaged.
- The drive hasn't been appropriately formatted.
2. How much storage does a dynamic disk require for the disk management database?
When creating a dynamic disk, you must specify how much storage to allocate for the disk management database, which tracks changes and stores layout information, requiring at least 2MB of storage.
3. Which of the following is not a linux/unix file or disk management command?
A. cfdisk
B. xfsdump
C. tar
D. xterm
The Right answer is "xterm".
Related Articles
- Partition Magic Software Free Download with How-To Tutorial [Full Guide]
- Computer Is Running Slow? Causes and Fixes Are Found! [Your Ultimate Guide]
- An Ultimate Guide to the Master Boot Record (MBR)
- What Is UEFI and How Do I Use It on Windows? [Full Guide]
- Diskpart Has Encountered an Error: The Media Is Write Protected
When you meet the Diskpart clean error: Diskpart has encountered an error the media is write protected during cleaning your disk using Diskpart, here you can find the reason and the corresponding solution. - Diskpart: Resize NTFS/FAT Boot Partition in Windows 7,8,10
Here, you can learn how to resize partition using DiskPart, no matter you want to shrink or extend partition size in Windows 7, 8, 10.