Extend Volume Greyed Out in Windows 11
Windows Disk Management normally extends a basic NTFS volume only into compatible unallocated space immediately to its right on the same disk. Space somewhere else on the disk is not enough. First inspect the partition order; the correct fix depends on what is between C: and the free space.
Check the layout and make a backup
Open Disk Management from the Windows quick-link menu. Record disk number, model, partition order, file system, and where the unallocated space lies. Do not confuse another physical disk's free space with space available to C:. Make a verified system image on a separate drive and save the BitLocker recovery key before moving any Windows or recovery partition.
Case 1: Unallocated space is immediately after C:
Step 1. Right-click C: in Disk Management and check whether Extend Volume is enabled. If it is, choose it.
Step 2. In the wizard, confirm the intended disk and amount of space, then finish. Wait for the operation and check the new C: size. If the command remains disabled despite adjacent space, check the file system and disk condition before changing anything else.
Case 2: A partition blocks the space
If the map reads C: | Recovery | Unallocated, do not delete Recovery just to expose the space. Moving that partition is a higher-risk operation. Qiling Disk Master provides Move/Resize, but proceed only after a verified backup and a confirmed disk map. For a dedicated WinRE workflow, see move a recovery partition to extend C:.
Step 1. In Qiling's Disk management view, identify the blocking partition by size and position. Select it and choose Move/Resize.
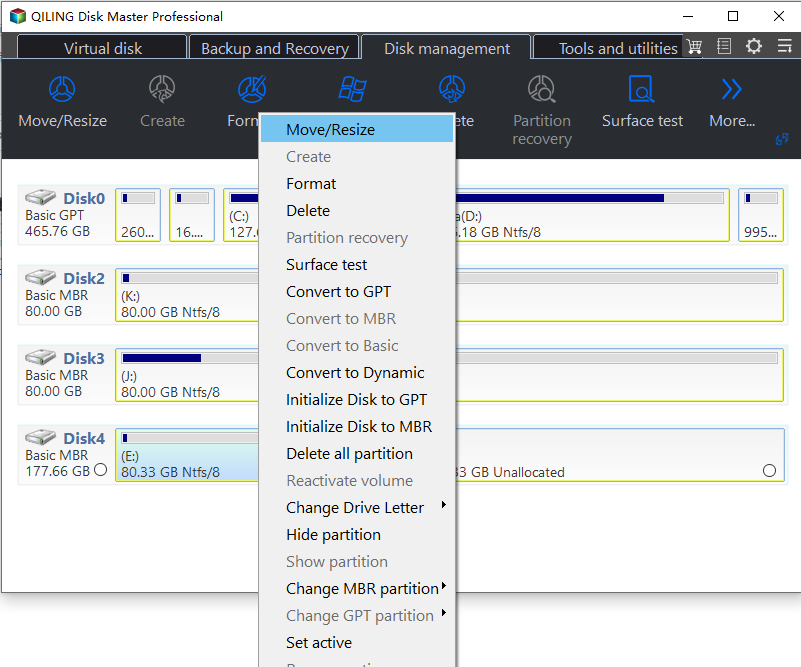
Step 2. Move the partition toward the right-hand unallocated area without shrinking or deleting it. Confirm the proposed map leaves unallocated space immediately after C:. If not, cancel and review the layout.
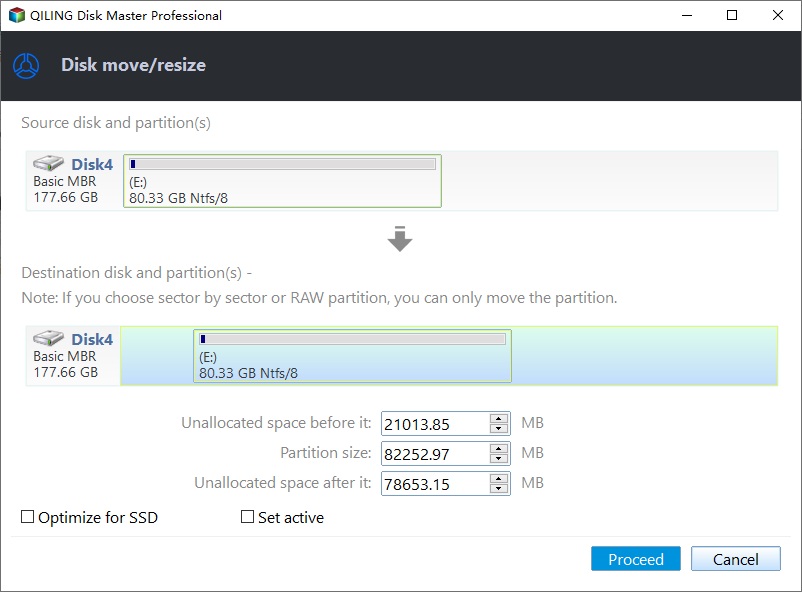
Step 3. Click Proceed in the move dialog and wait for it to complete. Recheck the disk map before starting a second operation.
Step 4. Select C:, choose Move/Resize, and drag its right edge into the newly adjacent unallocated space. Check the new size and click Proceed. Allow any required restart to finish without interruption.
Check Windows and recovery afterward
Confirm that C: has the expected capacity, Windows boots, and the recovery environment remains available. If the free space is on another disk, these steps do not apply; do not convert the system disk to dynamic just to use it. For more Disk Management causes, see the Windows 11 Extend Volume overview.
Related Articles
- Move Recovery Partition to Extend C:
Additional partition-order background.
Products
Articles & Tutorials
- Data Recovery
- Data Backup
- File Recovery
- File Backup
- System Backup and Restore
- Disk and Partition Clone
- Technical articles
- Mobile articles
- Disk Master Help
- Windows Data Recovery Tutorials
- Windows Secure Delete Tutorials
- Windows Partition Management Tutorials
- Windows File Backup and Restore Tutorials
- Windows System Backup and Restore Tutorials
- Windows Disk Backup and Restore Tutorials
- Windows Clone Tutorials