Fix 0x800F0923: Driver or Software Blocks Windows Upgrade
Quick Navigation:
- Why the Compatibility Check Blocks the Upgrade
- Read the Report and Setup Logs
- Update or Remove the Blocker
- Image the System Before the Retry
- Frequently Asked Questions
The download finished, the machine restarted, and Windows answered with 0x800F0923 and a line stating that the following hardware or software is not compatible with Windows 11. Nothing was installed, and the current version still starts, which is the one piece of good news in the report. The code comes from the compatibility check that runs before setup touches the system, and it points at a driver or a program rather than at a missing file or a network fault. Because the check happens early, the fix is early as well: name the blocker, deal with it, and protect the working installation before you try again.
Why the Compatibility Check Blocks the Upgrade
Windows does not copy a new build until it has inventoried what the machine runs. During the compatibility phase, setup reads the installed device drivers, the services that load at boot, and the security products that hook the file system, then compares that inventory with the block list and the requirements of the new build. The result is a short report, and 0x800F0923 is what you see when the report contains at least one blocking item.
That is why the error is not a hardware verdict. A machine that meets every processor, memory, and firmware requirement can still be stopped by a single driver that has no version built for the new model, and a machine with an older processor fails with a different code entirely. The compatibility check exists for one reason: some drivers load before Windows can finish starting, and a driver that fails at that moment leaves a system that cannot boot, repair itself, or be rolled back from inside Windows.
Three groups produce this code most often. Graphics and audio drivers that were written for an older driver model and never updated by the manufacturer are the classic case. Storage drivers are more serious, especially Intel Rapid Storage Technology, because a storage driver sits directly under the system volume and must be able to read it after the upgrade. Third-party antivirus and anti-malware suites are the third group, since they install filter drivers that load with the file system and are frequently flagged until the vendor ships a build certified for the new release.
Other members of the same list are easy to overlook. Vendor utilities that hook the setup process, old VPN clients with virtual network adapters, virtual drive and disk encryption filters, and drivers left behind by hardware that was removed years ago can all be reported. A stale entry is not less of a blocker than an active one, because setup reads the driver store and the service list, not just the devices plugged in today.
Read the Report and Setup Logs
Start with the window that produced the error. Windows Update usually shows a compatibility report before it offers the upgrade, and the Installation Assistant shows the same report with the offending item named. Write the name down exactly as it appears, including the version number if one is listed, because the same hardware can appear under a marketing name, a driver package name, and a device ID.
When the dialog lists nothing useful, the setup logs hold the answer. After a failed attempt, open File Explorer, enable hidden items, and look in C:\$WINDOWS.~BT\Sources\Panther. The file setupact.log records the compatibility pass, and the XML files in the same folder carry the detailed per-device results. Search the log for the words block, incompatible, and the device name you suspect; the lines around a match usually carry the driver provider and the hardware ID.
Windows Update, Event Viewer, Device Manager, and the setup logs are Microsoft tools that ship with Windows. None of them is part of Qiling Disk Master, and this section uses them only to read the state of the machine. Setup creates the Panther folder itself, so the log is written by Windows even when the upgrade never reaches the copy phase.
Device Manager adds one detail the report often hides. Open it, choose Show hidden devices from the View menu, and look for greyed-out entries under Display adapters, Sound, video and game controllers, and Storage controllers. A ghost device with an old driver can keep the block in place long after the hardware was removed, and uninstalling the device with its driver software is the only way to clear it.
Update or Remove the Blocker
Work in one order: update first, remove second, and restart after either. For a graphics or audio device, download the driver from the hardware vendor or the PC manufacturer and install it before retrying the upgrade. The optional driver packages offered by Windows Update are often older than the vendor build, so installing one can satisfy the version check without fixing the underlying incompatibility.
Intel Rapid Storage Technology needs more care. Check the motherboard or laptop vendor page for an RST package that lists the new Windows release as supported, install it, and restart before you retry. Do not change the SATA mode in firmware as a first move. Switching between RAID and AHCI can leave the installed Windows unable to load its own storage driver, which turns a compatibility warning into a machine that needs recovery media.
For a security suite, uninstall the product with the vendor's own removal tool instead of turning off real-time protection. Disabling protection stops the scanner but leaves the filter drivers registered in the boot path, so the compatibility check still sees them. Run the removal tool, restart, and confirm in Programs and Features and in Device Manager that no component of the suite remains.
Then clear the leftovers that keep the block alive. Check the startup entries on the Startup tab of Task Manager and the Run keys in the registry for launchers of programs you no longer use, remove old VPN and virtual drive adapters from Device Manager, and uninstall vendor update utilities that are not built for the new release. Restart, reopen Windows Update, and confirm that the compatibility report no longer names the item. If the same name is still listed, the driver is still present somewhere, usually as a hidden device or an orphaned service.
Image the System Before the Retry
Qiling Disk Master does not repair an incompatible driver and does not edit the compatibility list. What it does is make the next attempt survivable: it writes a complete image of the system disk to a second drive, and that image can be restored from bootable media even when the upgrade leaves Windows unable to start. Take the image after the blocker is removed and immediately before you run the upgrade again.
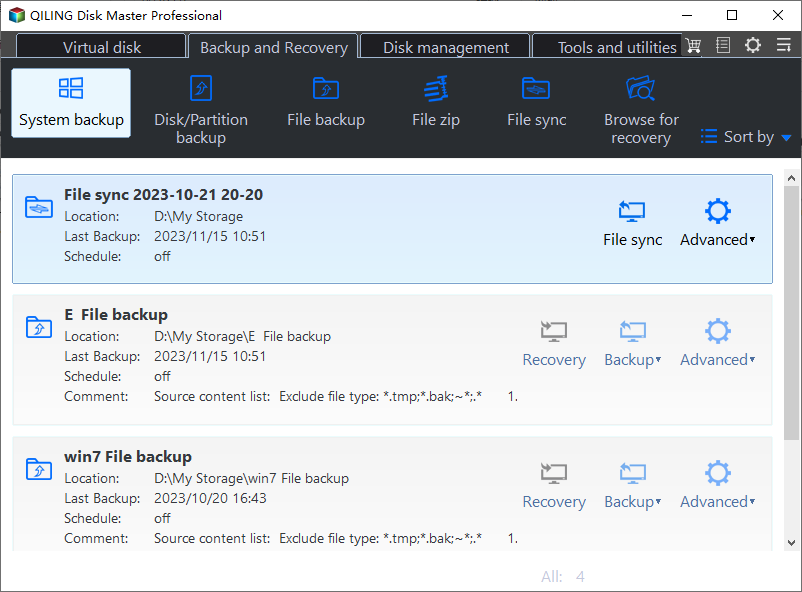
Step 1. Open System Backup and confirm the source partitions. On the Backup and Recovery tab, choose System Backup. The wizard selects the system partition, the EFI or boot partition, and the recovery partition by itself; check that all three are included, because an image without the boot partition cannot start a machine whose boot files were rewritten by setup.
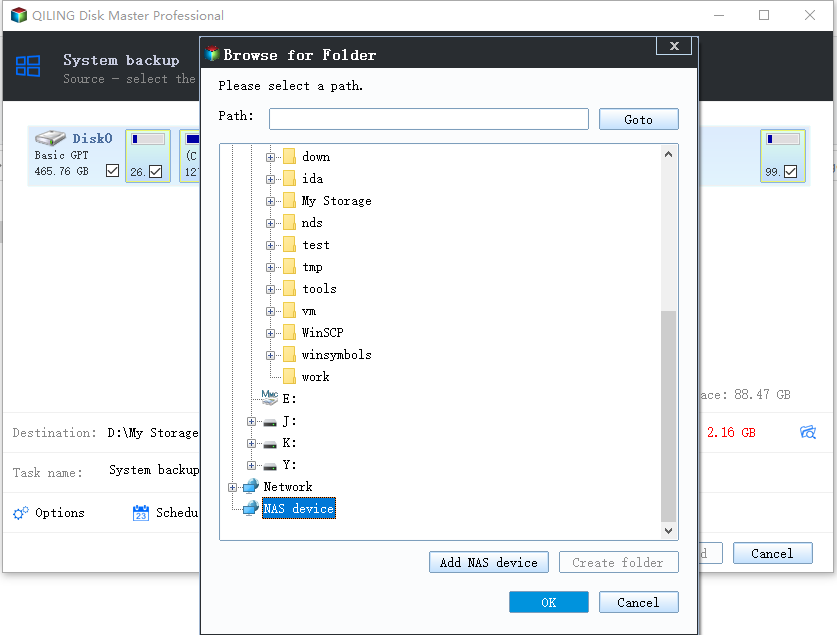
Step 2. Choose a destination on another physical disk. Click the folder icon beside Destination and pick a folder on a disk that the upgrade will not touch. A folder on the same drive protects nothing, because setup writes to that drive. Read the free space under the path and leave room for one more full image.
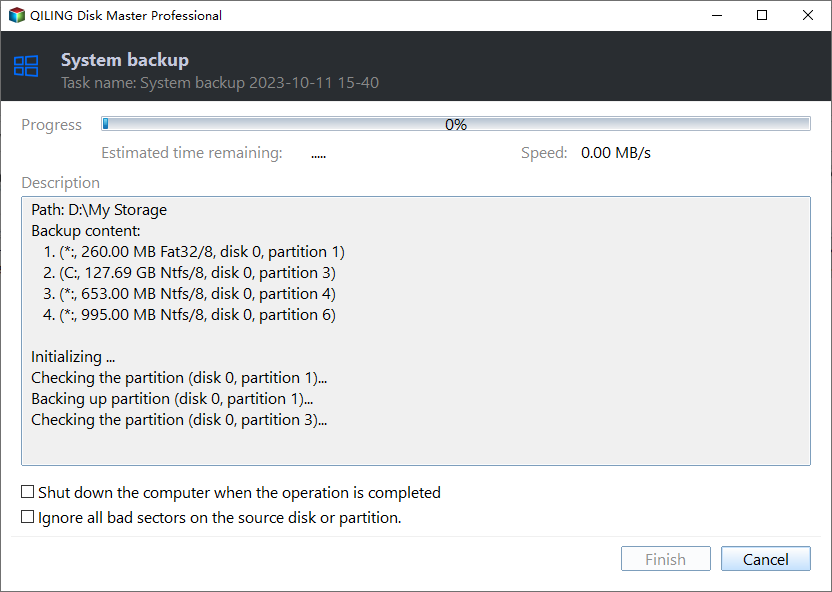
Step 3. Preview the task and click Proceed. Open the preview, confirm the source, the destination, and the compression level, then start the job and wait for the window that reports completion. Open the image afterward and restore one small folder to a spare location; an image you have never opened is an assumption rather than a backup.
With the image finished, run the upgrade again from Windows Update or the Installation Assistant. If the install stops at a different point, or if the machine restarts into a recovery screen, boot from the Qiling media and use System Image Recovery to put the previous build back. Once the new build is running, reinstall the program or driver you removed, using a version that the vendor lists as supported for the new release.
Frequently Asked Questions
Does 0x800F0923 mean the PC is too old for Windows 11?
No. Insufficient hardware is reported by other codes, such as the ones shown by the PC Health Check app. 0x800F0923 names a specific driver or program that the compatibility pass refused, and the machine usually meets the hardware requirements already.
Can I bypass the check and force the upgrade?
Setup has already stopped at the assessment stage, and the workarounds that skip it leave the blocking driver in place. With a storage or filter driver, the result is a system that cannot load its own volume after the restart. Remove the blocker first, then let setup run normally.
Will uninstalling my antivirus leave the PC exposed?
Windows Security takes over as soon as the third-party suite is removed, so the machine is protected during the upgrade. Keep the installer and the licence key on another device, and reinstall the suite after the new build has started and finished its first round of updates.
Related Articles
- Windows 11 26H2 Upgrade Error 0x8007001F: Device Failure
- Windows 11 24H2 Install Error 0x800F0991: Missing Package
- Windows 11 26H2 Setup Error 0x8007000D: Install Files Damaged
- System Image Recovery in Windows 11 and Windows 10
- Windows 10 Will Not Update: Causes and Fixes
Products
Articles & Tutorials
- Data Recovery
- Data Backup
- File Recovery
- File Backup
- System Backup and Restore
- Disk and Partition Clone
- Technical articles
- Mobile articles
- Disk Master Help
- Windows Data Recovery Tutorials
- Windows Secure Delete Tutorials
- Windows Partition Management Tutorials
- Windows File Backup and Restore Tutorials
- Windows System Backup and Restore Tutorials
- Windows Disk Backup and Restore Tutorials
- Windows Clone Tutorials