Windows 11 24H2 Install Error 0x800F0991: Missing Package
Quick Navigation:
- Why 0x800F0991 Stops the Upgrade
- Back Up Before the Next Attempt
- Read the State With Built-in Tools
- Prepare the Disk With Qiling Disk Master
- Frequently Asked Questions
The Windows 11 24H2 or 26H2 upgrade runs for a while, reaches the servicing stage, and then rolls back with 0x800F0991 and a line about a missing update package. The download was fine, the network is fine, and the same error returns on the next attempt. This code comes from the component store: the upgrade expects a servicing package that is no longer present, or the store itself no longer matches what the new build needs. Most machines reach this point with their files intact, so the first job is to protect the current system rather than to repair it in place.
Why 0x800F0991 Stops the Upgrade
A feature update is applied in stages. Windows first stages the new build, then hands the work to the servicing stack, which combines packages from the component store with the staged image. 0x800F0991 reports that this combination failed because a package the plan expects could not be found. The failure appears late, after a long copy, because that is the first moment the package list is checked against the store.
The missing package is usually removed by something other than the user. Cleanup tools that strip "unneeded" components, debloat scripts, and some system optimizers delete servicing packages that the current build no longer uses but the next build requires. An interrupted earlier upgrade can leave the store half merged, and a language pack installed or removed out of order can do the same. A drive with unreadable sectors in the component folder produces the same message, because the package is present but cannot be read.
Space and time matter as well. The upgrade needs room to stage the new build and to keep the old one for rollback, and a system partition that is nearly full fails in ways that look like package errors. So does a machine that sleeps or loses power during the servicing stage. Check free space and stability before you assume the store is corrupt, because those two causes are easier to fix and just as common.
Back Up Before the Next Attempt
Take a full image of the system disk before you try again. The upgrade writes to the system partition, changes the boot configuration, and keeps a rollback copy that is removed after a set period. An image taken now is the only clean route back if the second attempt fails in a different place or leaves the machine unable to start. A file backup is not enough here, because the boot files and the partition layout are part of what the upgrade changes.
Also record what you will need after the upgrade: the BitLocker recovery key if the system drive is encrypted, the product key or digital licence state, and any driver or application that must be reinstalled. An upgrade that fails after touching the boot configuration can ask for the recovery key before Windows starts, and a key that exists only inside the system you cannot boot is no help. Keep it on paper or on another device.
Free space is part of the preparation, not an afterthought. Leave a comfortable margin beyond the size of the download, because the staged build, the old build, and the rollback data all coexist during the process. If the system partition cannot offer that margin, make room before the next attempt rather than during it, and never shrink a partition that holds the only copy of your data without an image first.
Read the State With Built-in Tools
Windows Update, the Windows Update troubleshooter, the Deployment Image Servicing and Management tool, System File Checker, and chkdsk are Microsoft's built-in tools that ship with Windows. They are not part of Qiling Disk Master, and this section uses them to read and repair the servicing state before the upgrade is retried. The troubleshooter resets the update components; the servicing tool reports whether the component store can repair itself; the file checker verifies protected system files; chkdsk reports disk errors that would make any of the above fail.
Order matters when you use them. Read the free space and the disk health first, because a failing drive makes every repair unreliable. Then check the component store, and only then retry the upgrade. Running the repairs in the opposite order can leave the store reset while the disk still returns read errors, and the next attempt fails with a code that points somewhere else entirely.
Note which of these actions write to the disk. The troubleshooter and the store repair both change system files, and a repair install replaces the system image while keeping your files and programs. None of them touches your documents, but each one changes the system enough that the image from the previous section should already exist when you start.
Prepare the Disk With Qiling Disk Master
Qiling Disk Master does not install Windows, and it does not repair the component store. What it does is make the next attempt survivable: it images the system disk, makes room on a system partition that is too small, and builds the bootable medium you need if the upgrade leaves the machine unable to start. The three operations run in that order, because each one depends on the state the previous one leaves behind.
Operation 1: Image the System Disk
This operation applies before every feature update, and it must finish before you change a partition. It reads the disk without modifying it.
Step 1. Open System Backup and confirm the source. On the Backup and Recovery tab, choose System backup. The wizard selects the system partition, the boot partition, and the recovery partition for you; check that all three are ticked, because a system image without the boot partition cannot restore a machine that will not start.
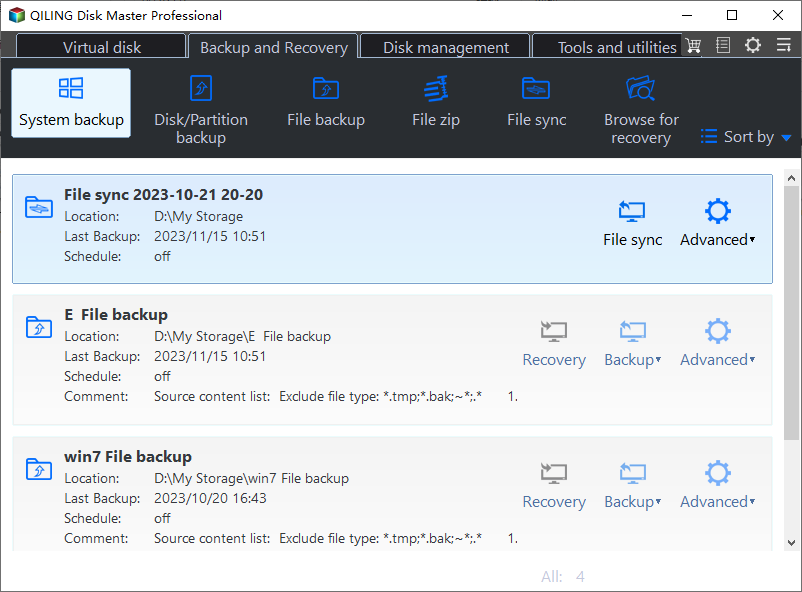
Step 2. Choose a destination on another physical disk. A folder on the same drive protects nothing, because the upgrade writes to that drive. Pick a location on a second disk or a network share, and give the task a name you will recognize months later.
Step 3. Preview the task and click Proceed. Review the source and destination in the preview, start the job, and wait for the finished message. Then open the image and read one folder from it; an image you have never opened is an assumption, not a backup.
Operation 2: Make Room on the System Partition
This operation applies when the upgrade stops for space or when the free space is below what the new build needs. Run it only after Operation 1 is finished.
Step 1. Extend the system partition into unallocated space. Right-click the system partition, choose Resize/Move, and drag its right edge into the free space behind it. The space must be directly adjacent; if another partition sits in between, that partition has to be moved first, which is a longer job.
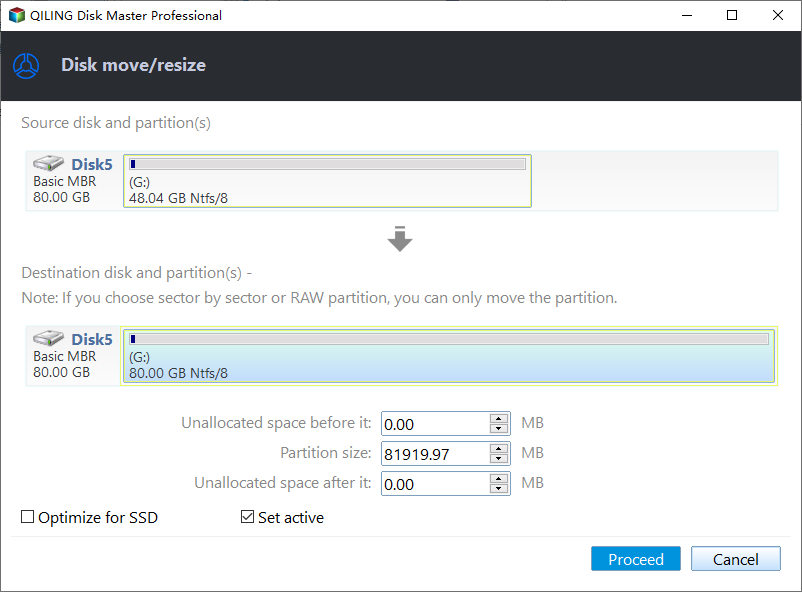
Step 2. Preview the resize and click Proceed. Confirm that the pending change affects only the system partition and that the new size is the one you planned. Keep the machine powered during the move, because the system partition is in use and the operation restarts into its own environment to finish the job.
Operation 3: Build Bootable Media for a Failed Upgrade
This operation applies when the upgrade has already left the machine unable to start, or when you want a way back before you begin. Build it on a working machine and keep it with the image from Operation 1.
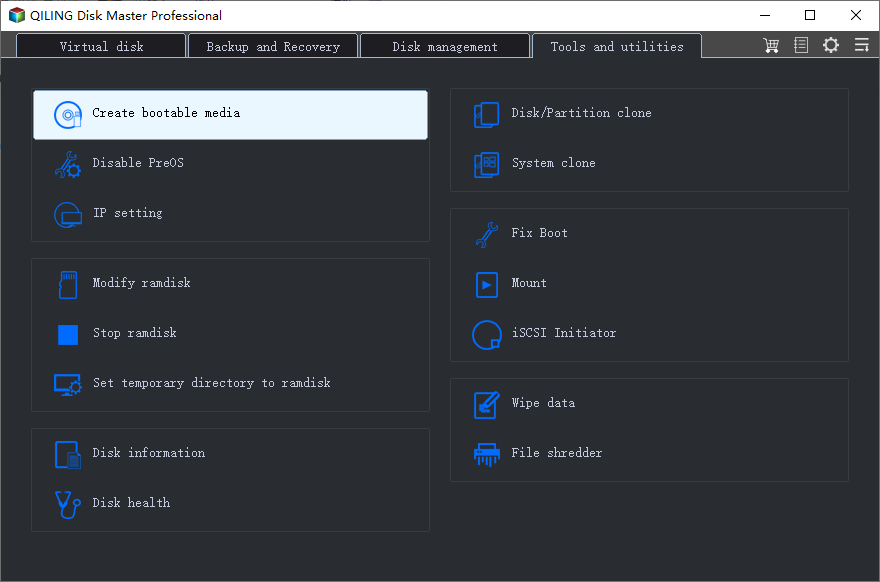
Step 1. Open Create bootable media. Go to Tools and utilities and choose Create bootable media. The wizard only opens; nothing is written to a device until you choose the media and confirm.
Step 2. Choose USB bootable device and the spare USB drive. Keep USB bootable device selected, pick a stick that is not your Windows install media, and leave the ISO and CD/DVD options unselected. The extra boxes below are only needed for hardware that the recovery environment cannot see.
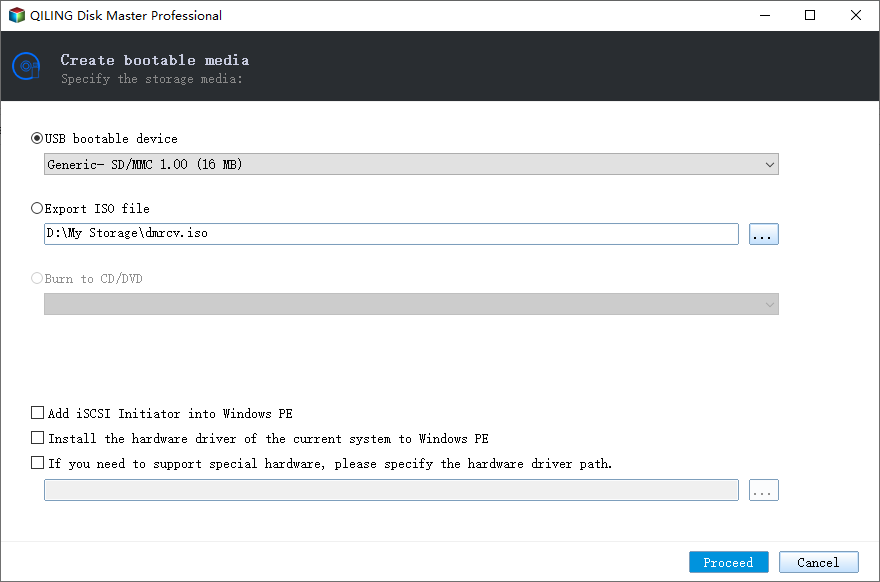
Step 3. Preview the task and click Proceed. The progress window reports the build and the write; wait until it reaches 100% and the Finish button appears. Test the stick once on the same machine, so that you know it boots before you need it after a failed upgrade.
Frequently Asked Questions
Will 0x800F0991 damage the Windows installation I am using now?
Usually not. The upgrade rolls back to the current build when servicing fails, and the rollback keeps your files and programs. Damage appears when the process is interrupted by a power loss or a full disk, which is why the image comes before the attempt.
Does a repair install keep my programs?
Yes. A repair install, also called an in-place upgrade, replaces the system files and keeps documents, settings, and installed applications. It needs the same free space as a feature update, so make room first and keep the image in case it fails.
Why does the error appear so late in the process?
Because that is when the staged build is matched against the component store. The copy phase can finish completely and the upgrade can still fail at the servicing stage, which is why a fast download and a stable network do not prevent this code.
Related Articles
- Fix the 0xC1900101 Upgrade Error
- Check Whether Your PC Can Update to Windows 11
- Can I Install Windows 11 on a Windows 10 PC
- What You Should Know About Windows 11
- Checking Media Fail on Windows Startup
Products
Articles & Tutorials
- Data Recovery
- Data Backup
- File Recovery
- File Backup
- System Backup and Restore
- Disk and Partition Clone
- Technical articles
- Mobile articles
- Disk Master Help
- Windows Data Recovery Tutorials
- Windows Secure Delete Tutorials
- Windows Partition Management Tutorials
- Windows File Backup and Restore Tutorials
- Windows System Backup and Restore Tutorials
- Windows Disk Backup and Restore Tutorials
- Windows Clone Tutorials