Recover Files After MBR2GPT Fails at 0x000036B7
Quick Navigation:
- What the 0x000036B7 Code Leaves Behind
- Stop Writing to the Disk
- Image the Drive Before Any Retry
- Recover with Qiling Deep Data Recovery
- Frequently Asked Questions
A conversion that stops at 0x000036B7 usually ends with a disk that no longer starts and a lot of worry about the files on it. The code is a layout complaint, not a report of destroyed data. The conversion stops because it cannot place the partitions it needs in the space it found, and in most cases every folder is still where it was. The important part is what you do next: every retry and every repair attempt writes to the disk, and those writes are what turn a recoverable layout into missing files. This guide covers the order that protects the data.
What the 0x000036B7 Code Leaves Behind
The conversion rewrites the partition table and creates new partitions for the modern boot scheme. It reserves room for an EFI system partition and a reserved partition, and when the free space on the disk does not fit that plan, it stops and reports the code. The message is about geometry, so the volumes themselves are normally intact.
There are two possible end states. If the check failed before any write, the table is unchanged and the disk still holds its original partitions. If it failed after the table was rewritten, the disk may carry a partial layout and no longer start, while the Windows volume sits in place with its file system untouched.
The state decides the next move. A disk that still boots as before needs no recovery at all, only more free space and a different plan. A disk that no longer boots has to be read from another machine, and the folders on it are the priority.
MBR2GPT is a Microsoft tool that ships with Windows and is not part of any Qiling product. It is named here only to explain the message you saw, and none of the recovery steps below run it.
Stop Writing to the Disk
Do not repeat the conversion to see whether it works the second time. Each run writes to the partition table again, and a disk that is already half converted is the worst starting point for a recovery scan.
Do not accept a prompt that offers to initialize the disk, and do not format a volume to make it visible. A format writes a new file system over the records that describe your folders, and that is the one action that can turn a readable disk into an empty one.
Stop booting from the disk as well. A machine that repeats its startup repairs writes to the same areas on every attempt, and a disk that keeps restarting is also the easiest way to overheat a drive that is already suspect.
Image the Drive Before Any Retry
Take a sector-level image of the whole disk before you scan it. The image is a safe copy that you can scan again, hand to a specialist, or restore later, which means the original disk only has to be read once.
Connect the drive to a working desktop with a spare data cable, or place a laptop drive in a USB enclosure. A desktop port keeps the drive powered for the whole job, which matters when the disk is old or already unstable.
Read the image, not the failing disk, when the original starts to make noise or drops off the bus. Everything after this point happens on the copy, and the original stays untouched until you decide what to do with it.
Recover with Qiling Deep Data Recovery
Qiling Deep Data Recovery reads the file records below the partition table, so a volume that Windows no longer mounts can still be listed with its folder structure. Scan the image or the attached disk, preview the files you need, and save them to a third drive.
Step 1. Choose the Recovery Mode
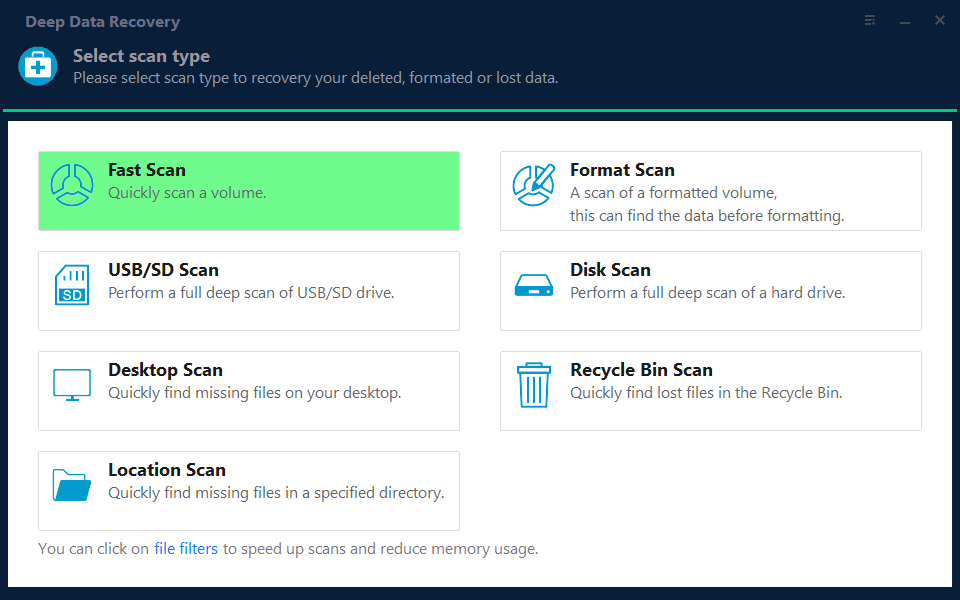
Use Fast Scan when the volume still mounts but shows nothing, because the file records are probably in place. Choose Format Scan or Disk Scan when the volume reports as RAW or Disk Management shows the space as unallocated after the failed conversion.
Step 2. Select the Affected Disk
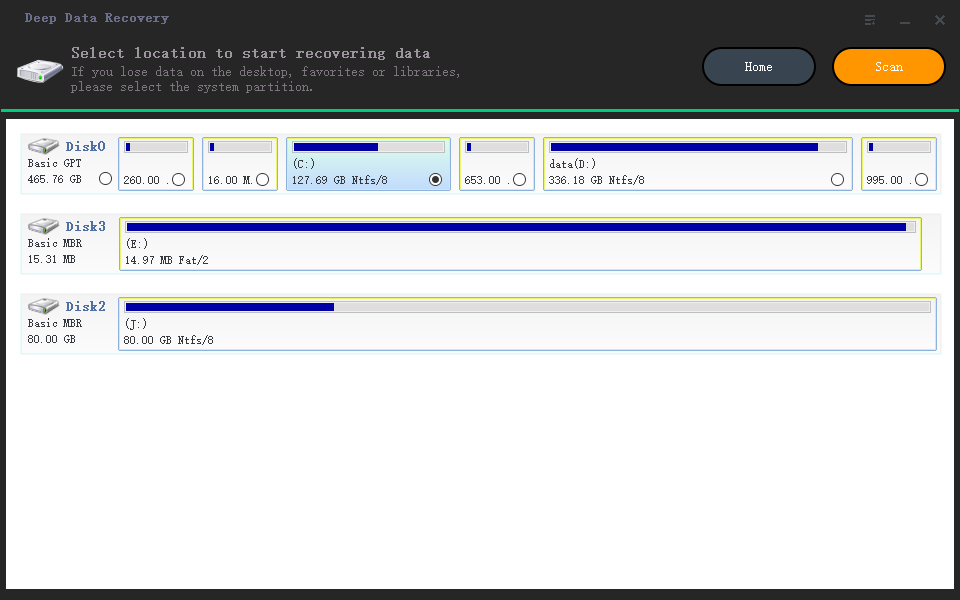
Pick the disk by model and capacity, not by letter, since the letters may have been reassigned. Do not select the disk that will receive the recovered files, or the scan will compete with its own output.
Step 3. Review the Scan Results
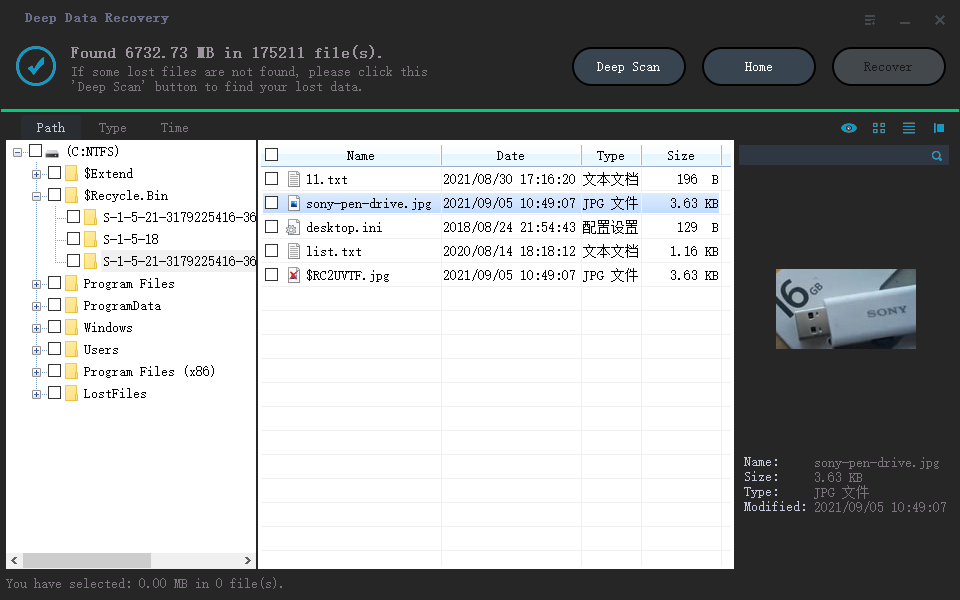
Sort by date and open the folder that matches your user profile. Preview a few documents and photos of different types before you select anything, so the batch you save is known to open after recovery.
Step 4. Save the Files to Another Disk
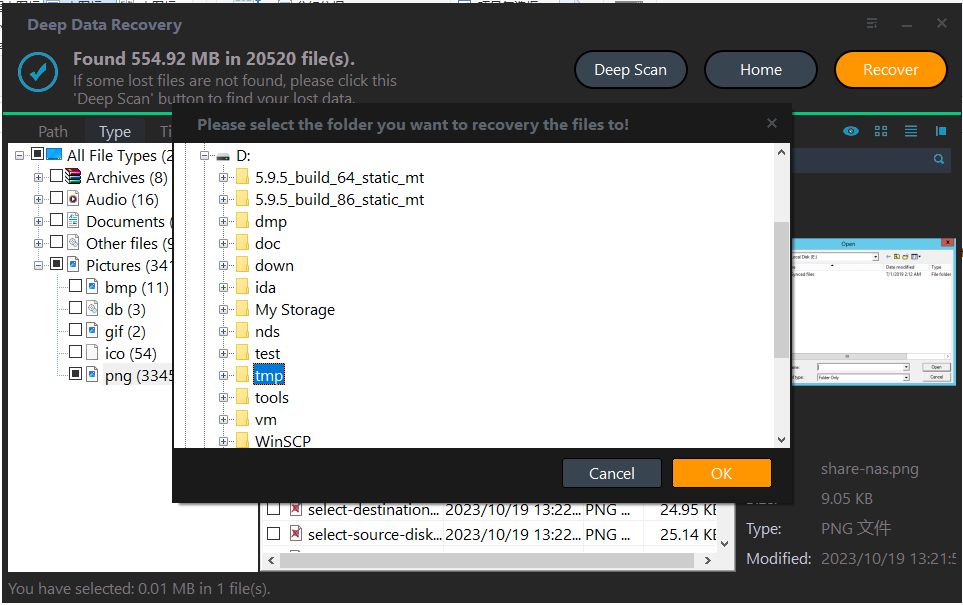
Write the results to a disk that is not part of the problem, and keep the image until you are satisfied that everything important is out. Only then decide whether the disk should be converted again or rebuilt from scratch.
Frequently Asked Questions
Did the failed conversion delete my files?
Almost never. The code stops a layout change, and the volumes keep their file systems unless something later writes over them. A scan of the disk shows whether the records are still present.
Can I run the conversion again after recovering the files?
Yes, once the data is saved elsewhere and the free space is arranged. Running it again before that risks the only copy of the data for a problem that may need a different layout anyway.
Should I let Windows repair the startup first?
Not before the files are out. Startup repair rewrites boot areas and can also rewrite the partition table, which is the one structure a recovery scan still needs in its original state.
Related Articles
- Recover Files After a Partition Table Rebuild
- Recover Files After a Failed Disk Clone
- Recover Files After Deleting a Partition in Windows 11
- Windows 11 25H2 Lost Partition Becomes Unallocated
- Recover Data From a Laptop That Will Not Boot
Products
Articles & Tutorials
- Data Recovery
- Data Backup
- File Recovery
- File Backup
- System Backup and Restore
- Disk and Partition Clone
- Technical articles
- Mobile articles
- Disk Master Help
- Windows Data Recovery Tutorials
- Windows Secure Delete Tutorials
- Windows Partition Management Tutorials
- Windows File Backup and Restore Tutorials
- Windows System Backup and Restore Tutorials
- Windows Disk Backup and Restore Tutorials
- Windows Clone Tutorials