Recycle Bin Emptying Not Working Synology/QNAP [Resolved]
You're experiencing storage space issues on your Synology NAS device. You've tried emptying the recycle bin, but it's not freeing up space and you're worried about accidentally deleting important files. To resolve this, you can try restarting your NAS device, checking for any duplicate or unnecessary files, and then emptying the recycle bin again. You can also consider upgrading your NAS storage or adding an external drive to increase your storage capacity. Additionally, you can enable the "Quick Scan" feature on your Synology NAS to quickly identify and remove unnecessary files. If you're still experiencing issues, you may want to consider seeking assistance from Synology's support team.recover those accidentally lost NAS files and documents? "
Why Does Emptying the Recycle Bin Not Work
You can free up NAS storage space by emptying the recycle bin, which is an effective way to clear disk storage and restore more important data. However, you may encounter a problem where the recycle bin refuses to erase your files, likely due to various factors.
- Software Program
- Corrupted Recycle Bin
- Third-party Application
- No Administrator Rights
4 Solutions to the NAS Emptying Recycle Bin Not Working Problem
If you're having trouble emptying the Synology recycle bin, there are a few methods you can try to resolve the issue. One possible solution is to check if the recycle bin is still in use by another user or process, and if so, try to terminate the process or log out and log back in.
1. Wait Until the Retention Period to Expire
After emptying the Synology recycle bin, if storage space isn't reflected immediately, try waiting a bit and then refresh the interface to see if it updates.
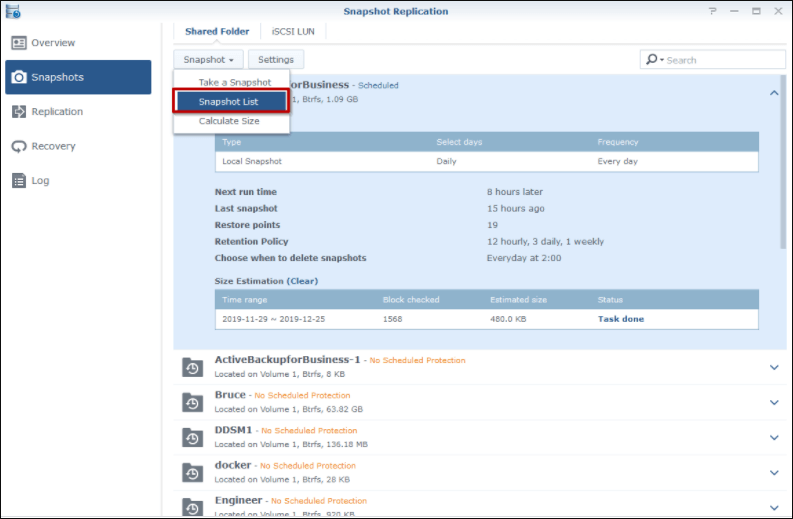
2. Delete Synology Snapshots and Btrfs
If the issue persists, you can try deleting Synology snapshots directly, which may resolve the retention time issue caused by the snapshots and Btrfs file systems. However, this will result in the loss of all snapshots. Alternatively, you can use Qiling NAS data recovery software to recover deleted snapshots and Btrfs data if desired.
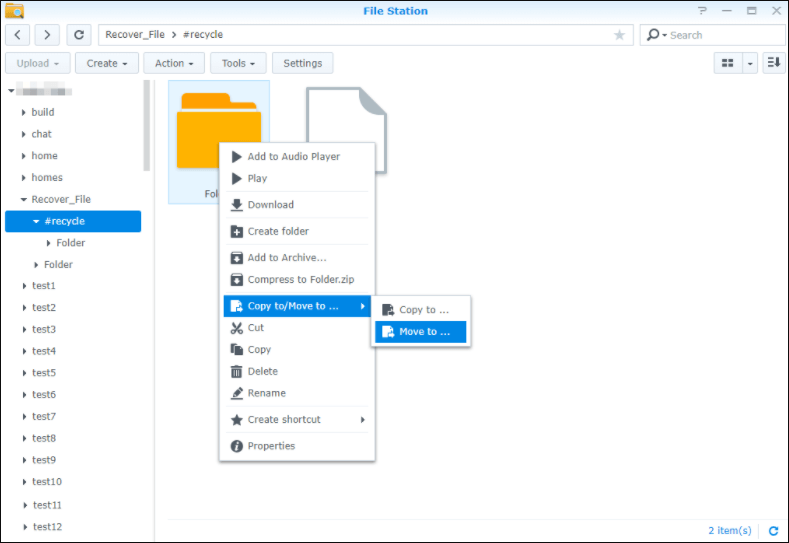
3. Deleted Files Stored on the Shared Folders
To free up storage space on your Synology NAS device, delete files from shared folders by opening the Control Panel, clicking Privilege Settings, finding shared folders, and ticking Remove Data. This will help you reclaim storage space.
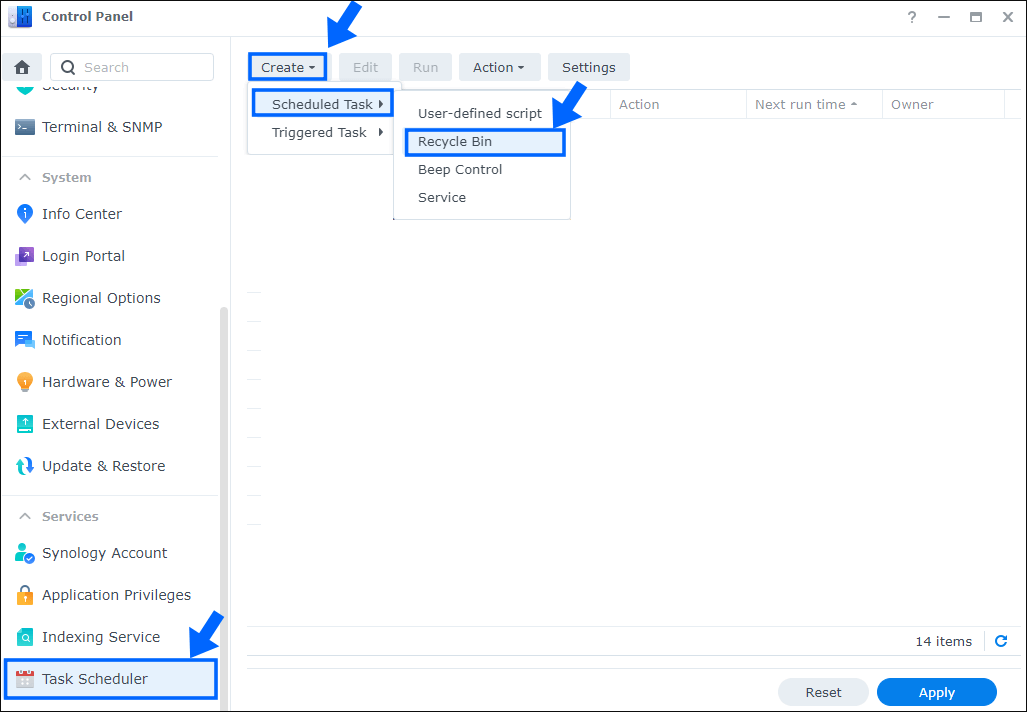
4. Empty Synology Drive Recycle Bins Automatically
To avoid running into the same issue next time, you can set up Synology Drive to automatically empty the recycle bin. To do this, go to Control Panel, then Task Scheduler, and create a new task with the action "Recycle bin". This will enable the function to periodically empty the recycle bin for you.
NAS Data Recovery After Emptying the Recycle Bin
After successfully emptying the Synology recycle bin, you may still find that some important files and documents were accidentally or mistakenly deleted during the process.
Method 1. Use NAS Data Recovery Software
Fortunately, with Qiling's reliable NAS data recovery software, you can empty the Synology recycle bin without worrying about data recovery problems. It's easy to find and recover lost or deleted files with Qiling's software.
Deep Data Recovery is a reliable solution for recovering data from various NAS brands, including Synology, QNAP, Western Digital, and Buffalo, and can restore lost data due to various situations without requiring disk removal.
To recover lost or deleted files and documents after emptying the Synology recycle bin, follow the steps below.
Step 1. Select file type and start recovering.
Download and install Deep Data Recovery on your Windows 11/10 64-bit computer, then open it and select "Next" to start.

Step 2. Select a NAS server and start recovering.
All NAS servers will be automatically listed, choose your target NAS device and click "Scan".

Step 3. Enable SSH service on the NAS server.
To enable remote access for Deep Data Recovery, go to the "Control Panel > Terminal & SNMP" and check the box next to "Enable SSH service". Take note of the port number for remote access. Then, open Deep Data Recovery and click "Next" to proceed.
Step 4. Connect to the NAS server remotely.
This software automatically detects your IP and Port, all you need to do is input your user name and password. If the detected IP address or Port is incorrect, you can manually correct it. Once you've entered the necessary information, simply click "Connect Now" to initiate the connection.
Step 5. Recover lost/deleted NAS data
Qiling data recovery software will connect to your NAS and start a scanning process. After the scan, it will display all deleted, lost, or existing files on your NAS server, allowing you to view and potentially recover your data.
To recover lost files on a NAS, you can use the "Filter" feature or search for them by clicking "Search files or folders". Select the desired files and click "Recover" to save them to a new location.
To recover deleted files from your NAS, click the "Recover" button.

Method 2. Turn to NAS/RAID Data Recovery Experts
Qiling engineers have a broad understanding of all storage technologies and can effectively recover data from various DAS, RAID, NAS, and SD cards configurations, as well as support all vendors, media formats, and operating systems.
Consult with Qiling data recovery experts for one-on-one manual recovery service, which includes repairing damaged RAID structures and restoring data from all RAID levels, all after a free diagnosis. Our decades-experienced engineers are knowledgeable and equipped to handle the task.
- Data can be restored from various RAID levels, including RAID 0, RAID 1, RAID 5, RAID 6, RAID 10, and others, allowing users to recover their data in case of a failure or loss.
- Recover data from enterprise-grade RAIDs used in businesses, such as QNAP, Synology, WD, Buffalo, and others, to retrieve lost or inaccessible files and ensure business continuity.
- Retrieve lost RAID data caused by any issues
- Fix disks that become GPT protected partitions
- Recover data from RAID remotely, no need to ship
Conclusion
Qiling NAS data recovery software can help recover important files and documents from NAS devices without downtime, even after the recycle bin has been emptied. It can recover various types of files and documents stored on NAS devices.
Related Articles
- Elden Ring Stuck on Loading Screen on PC/PS4/XBOX
- How to Recover Black Box Recordings (FDR/CVR) from a Flight/Plane
- Free PDF Recovery: Recover Deleted, Unsaved, and Corrupted PDF File
- How to Fix Windows 11 Installation Stuck at 35%, 85%, 100%
- Deep Data Recovery Software Solutions for Windows
Looking for a data recovery online software? You can free download the Deep Data Recovery software to help you recover deleted, formatted or inaccessible data from your hard drive or digital device. - How to Delete Files on Flash Drive Permanently
Do not know how to delete files on flash drive permanently since you know there are ways to recover deleted files? Check out the details for how to permanently delete files from a thumb drive.