[Self-Check-and-Repair]: How to Repair External Hard Disk Not Detected in Windows 10
External hard drives are popular due to their large capacity and low price, making them a great choice for storing data, saving backups, and transferring files between computers. They offer a wireless alternative to internet connections, allowing users to copy and transfer data directly between the external drive and a computer via a physical USB or eSATA connection.
If your external hard disk is not detected in Windows 10, it may not be correctly connected or recognized by the computer. To fix this issue, you can try reconnecting the external hard disk, checking the USB ports, updating the drivers, or running a disk check to see if the issue is with the disk itself. If none of these solutions work, you can try using a different USB port or cable, or even formatting the external hard disk to start fresh.
Check Where Goes Wrong & Apply 3 Quick Fixes
Here are the possible causes for an undetectable external hard drive in one paragraph:
- Virus infection
- Loose connection
- Not working USB port
- Insufficient power supply
- Outdated, corrupted or unstable driver
- Drive letter confliction
- Corrupted or incompatible file system
Many users find that starting with some simple tricks can make a big difference in their experience. These initial tips have proven to be incredibly effective for most users, providing a smooth and easy start.
#1. Change another USB port for connection
If the external hard drive is recognized by other USB ports, the issue is likely a faulty USB port, not the hard drive itself. You can disregard the hard drive and proceed to troubleshoot the USB port on a separate page.
If none of the USB ports on your computer can recognize the external disk, it may indicate a problem with the storage device itself. To troubleshoot, you can try various fixes, which can be found in the article.
#2. Disconnect the power supply
To fix the issue, try restarting your computer in a clean state. Turn off your computer, disconnect the power cable, and wait for a while. Then, reconnect the power cable and turn on your computer. This should put the system in a clean state and allow it to read the external hard drive. If the issue persists, continue reading.
#3. Check in Windows Disk Management
When a connected drive is not detected, recognized, or showing up in Windows File Explorer, it's usually the case.
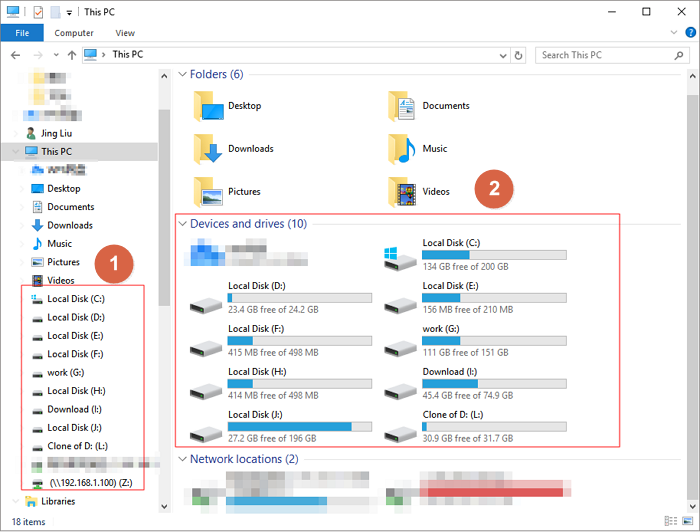
The situation where an external hard drive is not detected is not always a clear indication of a problem, as it can also be caused by a missing file system, lost drive letter, or the drive being listed as unallocated space in Windows Disk Management.
To open Disk Management in Windows 10, you can either search for it in the Start menu or use the built-in Windows key + X keyboard shortcut.
- This PC > Manage > Disk Management, or
- Press Windows + R keys together, type diskmgmt.msc and press Enter.
Did you see any weird drives there? Any strange status or characters you found in the disk map represent your external hard drive not properly displaying in the computer, seemingly not detected by Windows.
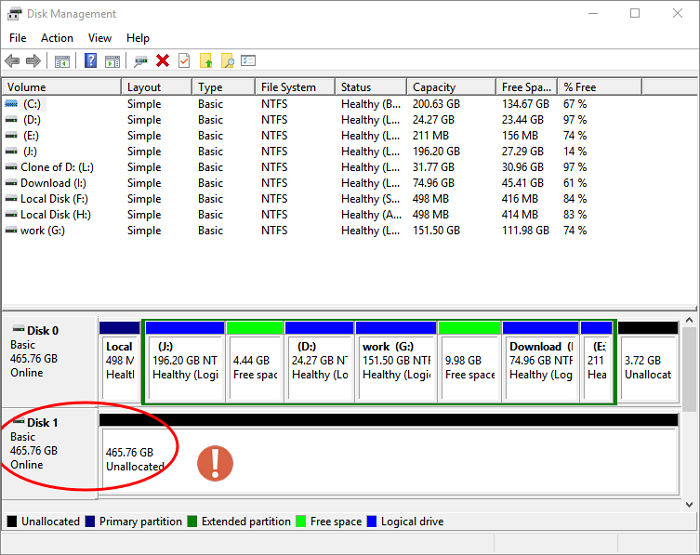
If you can't access your external hard drive in Disk Management, don't panic! Before trying to troubleshoot the issue, try to recover any important data on the drive first. Once you've done that, you can then proceed with further troubleshooting to get Windows to detect the external hard disk.
Recover Data from A Detected External Hard Drive in Disk Management
External HDDs or USB storage devices that appear in Disk Management are often inaccessible. They may be displayed as RAW file system, unallocated, or disk unknown/not initialized. To resolve these issues, it's essential to recover any data first, as subsequent operations may endanger data and make recovery difficult. Once data is safe, you can proceed with resolving the hard drive state.
Qiling can help recover data from an external hard drive in just three steps, making it a reliable tool for hard drive recovery.
To recover lost data, click the button to download Deep Data Recovery for Windows, and follow the installation wizard to install it on your computer.
Here is a step-by-step guide to recover data from an external hard disk not detected in Windows 10:
Step 1. Choose file types
- To recover lost data, download and install Qiling Data Recovery software on your PC or laptop.
- Connect the external hard drive to your computer.
- Run Deep Data Recovery and select the file types you want to recover. Click "Next" to initiate the recovery process.

Step 2. Choose and scan the external hard drive
- To recover lost data, choose the external drive from the External drives list and click "scan" to initiate the recovery process.

Step 3. Check the scan results
- Qiling data recovery software will immediately scan the selected drive for all data, including deleted, corrupted, and existing data.
- You can use the Filter feature to quickly locate files of a specific kind, such as Pictures, Word, Excel, PDF, videos, emails, and more.

Step 4. Preview and recover data
- Double-clicking a file from the scanned results to preview.
- Choose the files you want and click "Recover".
- To avoid overwriting the recovered files, it's recommended to save them to a different drive, such as an external hard drive or a USB drive, instead of the original drive where the files were lost. This ensures that the recovered files are preserved and can be safely transferred to the original drive if needed.
After completing the self-examination and transferring the required data to a safe location, you can now start the process of reconnecting the drive and making it visible in Windows 10.
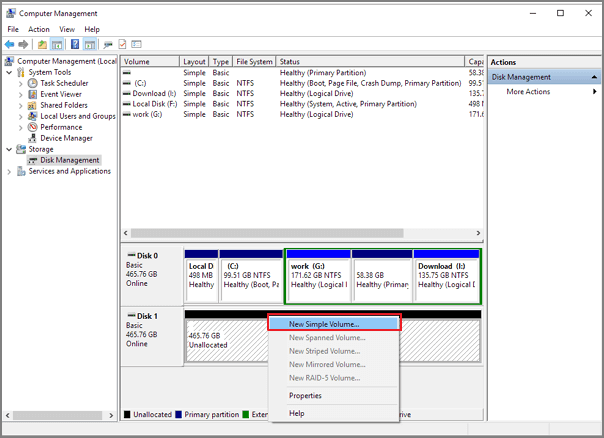
Create A New Simple Volume
If your external hard drive is not showing up in Windows Explorer but is visible as unallocated space in Disk Management, it's likely due to a driver issue or disk corruption. To resolve this, try updating the USB drive, checking for disk errors, and running a disk check.
Step 1. Right-click on the unallocated space area on your external hard disk and choose "New Simple Volume..." from the context menu.
Step 2. You will be welcomed to the new simple volume wizard window, where you will click Next.
Step 3. When specifying the volume size, you can simply leave the default settings for volume size unchanged and click Next.
Step 4. Assign a proper drive letter to the hard disk by selecting one from the drop-down list and clicking Next.
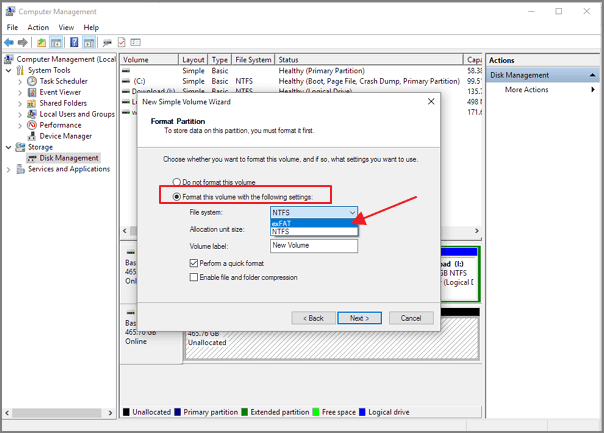
Step 5. To format the drive, select a compatible file system such as NTFS or exFAT. Choose one and proceed with the option to perform a quick format, then click Next.
Step 6. The wizard has completed successfully. You can now use the new simple volume. To confirm, click Finish.
Format External Hard Drive with A Recognizable File System
If your external hard drive is not detected by Windows, it may be due to a partitioned drive with corrupted or missing file systems. This can cause one of the partitions to not show up or be detected. Additionally, if you're using an Apple APFS hard drive on a Windows 10 computer, Windows may not be able to read it due to its exclusive file system for macOS. In these cases, correcting the file system may resolve the issue and allow Windows to read the external hard drive.
- Warning
- Formatting the drive will erase all data on it. If you haven't made a backup, you can try using Deep Data Recovery to recover some critical files before formatting the drive.
Step 1. Right-click on the external hard drive partition where the issue persists, and select the "Format" option.
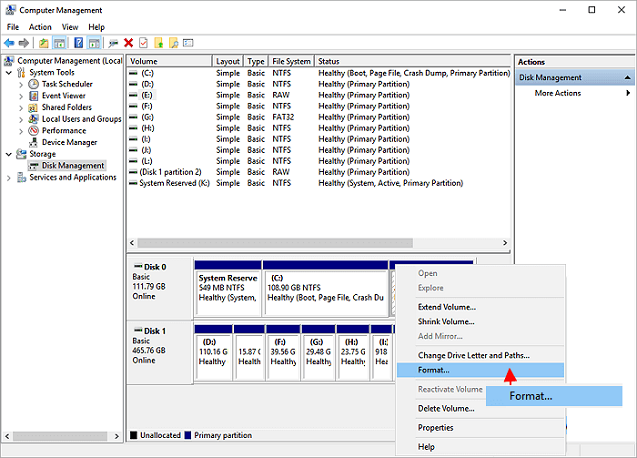
Step 2. Enter a volume label you prefer, choose NTFS or FAT/FAT32 file system for the partition and perform a quick format. Click OK.
Step 3. Confirm to format the partition by clicking OK.
Update Outdated and Corrupted Driver
If all else fails, the last resort for average computer users is to troubleshoot driver issues, a somewhat complex process that can be overcome with patience and a few minutes of learning, potentially resolving the "not detecting" issue.
To update the driver for an external storage device in Windows Device Manager, follow these steps: Open Device Manager, find the external storage device under the "Disk drives" or "Storage devices" section, right-click on it, select "Update driver" from the context menu, choose "Search automatically for updated driver software", and follow the prompts to complete the update. Alternatively, you can also use the "Search for drivers by their service name" option to find the correct driver. If you're prompted to restart your computer after the update, do so to ensure the changes take effect.
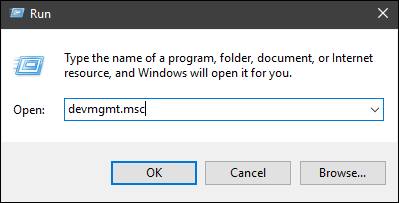
Step 1. To open the Device Manager, press the Windows + R keys to bring up the Run dialog box, type `devmgmt.msc` in the box, and then press Enter. This will open the Device Manager, where you can view and manage the hardware devices connected to your computer.
Step 2. If you see any devices with a yellow or red exclamation point next to them, it means they have a problem with their drivers. To fix this, right-click on the device and choose Properties. This will allow you to update or reinstall the driver, which should resolve the issue. The Disk drives section also lists all the connected disk drives, including internal and external hard drives, USB drives, and other storage devices. If you see any devices with a yellow or red exclamation point next to them, it means they have a problem with their drivers.
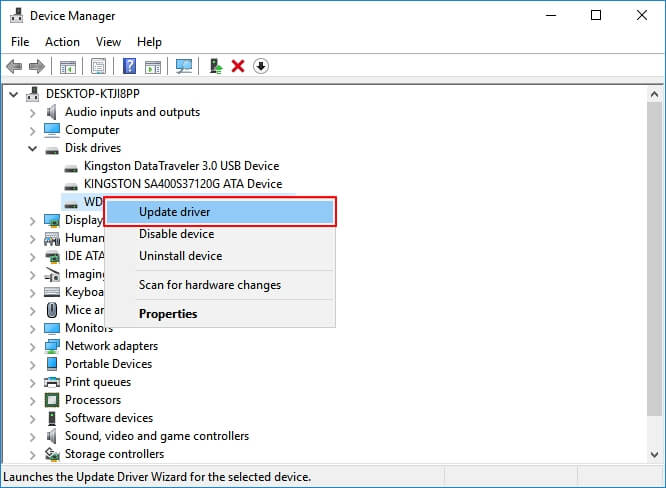
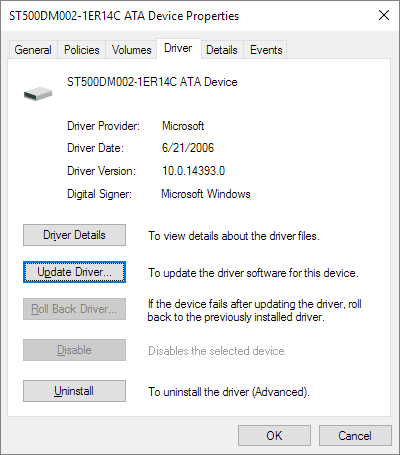
Step 3. Under the Driver tab, you can first try with Update Driver and click OK.
Step 4. After completing the installation, restart your Windows computer to automatically install the latest and compatible driver for your external device. This ensures that your device is properly configured and functions as intended.
If updating the driver fails, try uninstalling and reinstalling the driver in step 3 the next time.
Video Guide for External Hard Drive Data Recovery
Physical hard drive issues, such as an external hard disk not being detected, can be frustrating and confusing. While some issues can be resolved with suggested solutions, others may not work due to the extent of the damage. If you're unable to fix the issue on your own, it's best to seek professional help from a service to resolve the problem.
The good news is that even if your drive is beyond repair, as long as Disk Management can detect it, you can use Deep Data Recovery to recover all your data without causing further damage to the failed hard drive.
Related Articles
- How to Recover Illustrator File After Crash
- OneDrive Recycle Bin Retention | Recover Deleted Files in OneDrive
- How to Recover Deleted Files from Recycle Bin | Recover Recycle Bin
- How Do I Recover CR2, CRW, NEF, RAW Photos from Camera? [Complete Guide]
- Best Partition Recovery Software to Get Back Files from NTFS Partition
The NTFS recovery software is designed for people to recover deleted or lost data from a formatted NTFS partition or disk. Free download this undelete or unformat NTFS partition tool to do partition recovery in Windows or Mac. - Shift Delete Recovery – Get Back Shift Deleted Files
Shift-deleting files may seem like a permanent solution, but it's not always the case. With the right tools and techniques, you can recover shift-deleted files.