How to Extract and Restore Specific/Individual Files from Windows 11/10/8/7 Backups
You can use tools like 7-Zip, WinRAR, or Windows built-in tool "DISM" (Deployment Image Servicing and Management) to extract specific files from a Windows image backup. These tools allow you to browse through the backup and select the files you want to extract. Alternatively, you can also use a third-party tool like Qiling backup to extract specific files from the backup.
I'm having this issue that I lost very important document file in my PC and I've tried many ways to restore it. But the problem is that I've saved new files to the storage devices where I lost the file. Yes, the document has been overwritten.
You can recover or extract a specific file from a Windows backup, but it depends on the type of backup you created. If you created a System Image backup, you can use the Windows Recovery Environment to restore the entire system, including the file you're looking for. If you created a File Backup (also known as a File History backup), you can use the File History tool to restore specific files and folders. To do this, go to Control Panel > File History, click on the "Restore personal files" button, and select the file you want to recover."
Windows Backup and Recovery tool allows users to create a system image with ease, and also enables the backup of important files, folders, and partition data as images. However, the question remains: can we extract or restore specific or individual files from Windows backup? The answer is yes, and there are two effective methods to do so. By following these methods, users can restore wanted files from their Windows 10/8/7 backups.
Method 1. Restore specific files from Windows 11/10/8/7 backup
We recommend using powerful file recovery software from Qiling, which allows you to effectively find and restore specific files from Windows 10/8/7 backups in just 3 simple steps.
To use Qiling file recovery software, you first need to mount a Windows backup image before searching for specific files.
For Windows10/8/8.1 users:
1. Type: Computer Management in the search box and hit Enter.
2. Go to "Actions" > Select Attach VHD.
3. To attach a Windows Backup file, click "Browse" to navigate to the location of your Windows Backup files, select the drive you want to attach, and then click the "Open" button.
4. Windows will attach the Virtual Hard Drive VHDX file as a new drive with a light blue icon.
If the virtual drive partition doesn't have a drive letter, assign a new one by right-clicking on it and selecting "Change Drive Letter and Path..." to make it accessible.
5. Now you can access the virtual drive and find the files you need from it.
For Windows 7 users:
1. Open Disk Management > Click Action > Select Attach VHD.
2. To restore a Windows image from a backup, click on the "Browse" button and select the location where the Windows image backup files are stored. Look for the files with the .vhd file extension, which are the actual backups of the Windows image.
3. When you mount the VHD Windows image, it will be displayed as a new drive on your computer. At this point, you will see an AutoPlay window pop up.
4. You can browse to find specific files from the Windows backup image by using the Windows Backup and Restore Center, which allows you to browse and restore files from a backup image.
If you have a large number of Windows backup files and don't want to search and find specific files one by one, Qiling file recovery software can help. It scans and finds your target files within just 3 simple steps.
If the files are less than 2GB, Deep Data Recovery Free Edition will do the job.
Step 1. Run Deep Data Recovery. Select file types and click "Next" to begin the process.

Step 2. To recover lost files, start by selecting the drive where the files were lost. This software allows you to scan and recover data from various devices, including hard drives, solid-state drives, USB drives, SD cards, pen drives, and cameras.

Step 3. Qiling data recovery software supports 1000+ file types including photos, videos, documents, emails, audio files and many more. You can browse the full scan results and filter by file type.

Step 4. Select the files you want to preview. Click "Recover" and set a storage location to save the recovered data.
Once the Windows backup images are successfully restored, the files can be used directly without any issues.
To ensure the Windows image backups are properly removed from your system, right-click the virtual drive in Disk Management and select Detach VHD. This action safely unmounts the backups, freeing up space and resources.
Method 2. Extract individual files from Windows backup
For Windows 10/8/8.1 users:
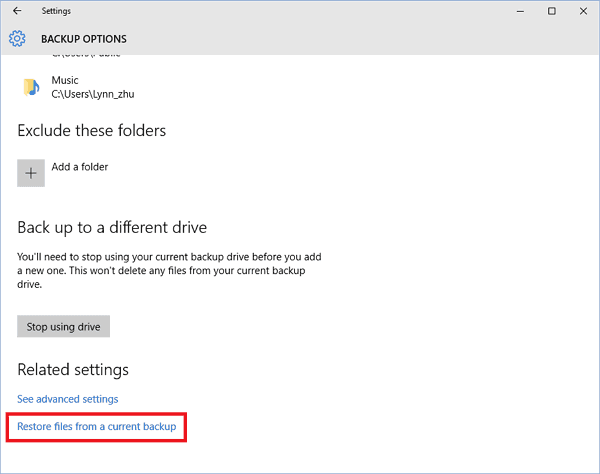
1. Click Start > Settings > Update & security.
2. To restore files from a current backup, go to Backup > More options > Scroll down the page and click "Restore files from a current backup".
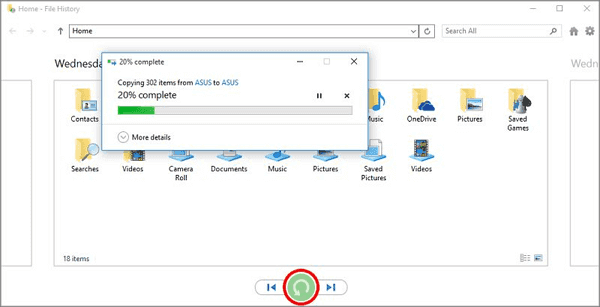
3. Browse through different versions of backups and search by name to find the files or folders you are looking for, and restore them as needed.
4. To restore specific files, select the desired files and tap or click the "Restore" button to relocate them to their original position.
For Windows 7 users:
1. Click Start > Type: backup and select Backup and Restore.
2. Click "Restore My Files" > Locate and find the individual files or folders you want to restore and click Next.
3. Please select the location where you want to restore the target files to.
4. When dealing with existing copies of files, you have three options: you can copy and replace the existing file, choose not to copy the file at all, or copy the file but keep both versions.
5. After restoring files, view the restored files and click Finish to close the dialog box.
Related Articles
- How to Recover Overwritten Files in Windows 10/8/7 Easily
- How to Fix Folders Turned into Shortcuts
- Recover Cropped Image| How to Revert Edited Photo to Original
- How to Restore, Unlock Encrypted Excel File Without Password
- Top 6 Apps to Recover Data From Corrupted SD Card in Android Mobile
Corrupted SD cards can be frustrating, especially when they contain valuable data. Fortunately, there are ways to recover data from corrupted SD cards in Android devices. - Broken Micro SD Card Recovery - How to Recover Data from Broken SD Card
What to do if your sd card is physically damaged? Whenever a Micro SD card is broken or damaged, you need to know how to recover data from broken memory card or broken SD card data recovery as soon as possible. Here, you can follow the method on this page for damaged memory card recovery.