Error: Google Docs Didn't Save My Work _ How to Recover Unsaved Changes to Google Docs
Q: Google Docs didn't save my work... What's next?
"I was busy writing my resume this morning, and it took me over an hour to complete it. But when I had added all the details in each section and was ready for a preview, the content just vanished! It seems that all the work on the resume paper didn't automatically save to the drive as usual. I did it at home, using a secure network and laptop. I feel so panicked! Where should I go now? How can I get my work back on Google Docs?"
Google Docs is an online word processor that allows you to create and format documents with your team, without the hassle of file access errors. Multiple editors can work on the same document simultaneously, and changes are automatically saved to Google Drive, eliminating the need for constant saving. However, if the autosave feature suddenly stops working, you may risk losing your work, making it essential to know how to react in such a situation.
How to Recover Unsaved Google Docs
Unfortunately, there is no foolproof way to recover an unsaved Google Docs document. However, the most effective way to recover an unsaved document is to recover from its most previous version, as you don't know at which point the autosave failed. To do this, you can check the document's version history, which shows you all the previous versions of the document, and you can then select the most recent one that was saved before the autosave failed. This may not be the exact version you were working on, but it's the best chance you have at recovering some of your work.
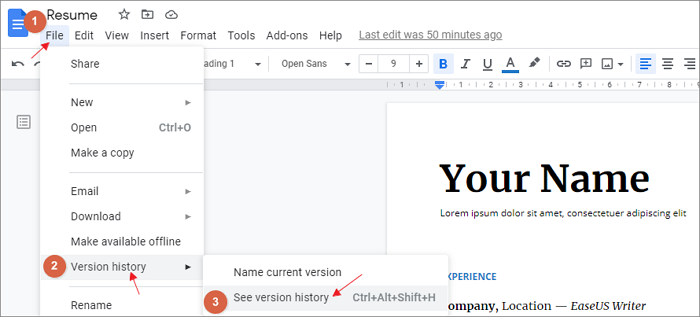
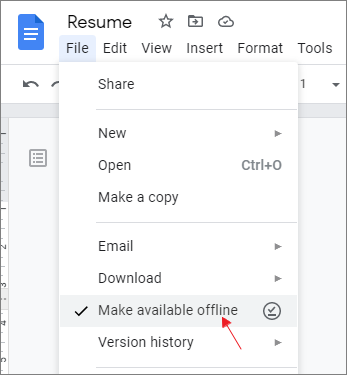
Step 1. To view the version history of a Google Doc, click on the "File" menu on the top left, then select "Version history", and finally click on "See version history".
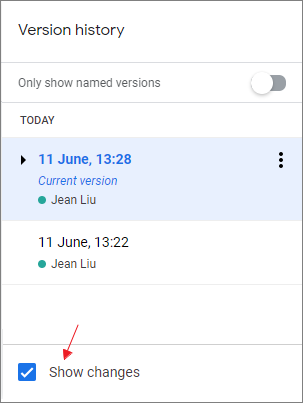
Step 2. On the right pane, saved file editions are listed in a time view. Click on each record by date and time to select the desired one. Ticking "Show changes" at the bottom allows quick filtering by viewing changes between editions.
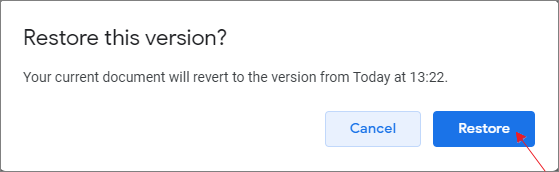
Step 3. Once you've decided on the correct version, click on it and use the "Restore this version" button to bring it back.

Step 4. Confirm the message to restore this selected version and click Restore to restore the selected version.
Bonus tip: You can recover a deleted file by checking the Google Drive Trash, where deleted files are stored for a certain period. To do this, go to Google Drive, click on "Junk", select the file you want to recover, and click on "Restore" under the "File" menu. This will restore the file to its original location. This method is an alternative to recovering from the version history within the processor.
Have You Been Syncing Files from Google Docs to Computer?
The "Make available offline" option in File allows for an extra layer of safety by syncing the currently editing document to the cloud drive, effectively creating a real-time backup. This ensures that your online editing is protected from sudden data loss due to unstable internet or autosave issues.
How to preview offline files and recover unsaved changes by online Google Docs
Step 1. On your computer, go to drive.google.com and sign in.
Step 2. At the top right, click the Ready for offline icon.

Step 3. To view the document in offline preview, click on the "Offline preview" button. This will allow you to access the document without needing an internet connection. You can then find the document on your device and double-click on it to open it in a new window.

Make It Clear: Why Is Google Docs Not Saving Changes?
The benefits of using Google Docs over Microsoft Word are clear, with its intelligent and dependable Save feature, as well as its ability to provide access to a world of users for collaborative writing and editing. However, issues like "Google Docs didn't save my work" can arise, so it's essential to understand why this might happen.
Here, we think the following 6 things are making the trouble:
- Temporary issues with Google Drive servers
- Web browser issues like Google Chrome, Safari, Firefox
- Weak internet connection or harmful network connection
- Excessive concurrent operations on a document in Google Docs can cause the application to freeze, preventing users from editing or accessing the document. This issue arises due to the limitations of the Docs' architecture in handling multiple simultaneous changes to a single document.
- Too long or too large your document files are
- Google Drive storage is getting full around the corner
Next Time Try Microsoft Word Rather Than Google Docs
When working on a large project, consider using Microsoft Word for editing. Its offline functionality ensures you can work without worrying about internet connectivity issues, and the autosave feature provides an added layer of protection against data loss. This means you can focus on editing without the risk of losing your work due to a sudden internet outage or remote server problems.
Since Word doc/docx files are typically stored on local computer hard drives or external USB drives, the chances of recovering them are higher. If the files have disappeared from a physical storage drive, they can often be restored using third-party data recovery software.
Qiling Document Recovery Software
- Recover lost or deleted documents, photos, audio, music, emails
- Recover Word, Excel, PowerPoint, and other files
- Repair videos, photos and documents that won't open after recovery
- Recover lost files from formatted hard drives, emptied recycle bins, memory cards, flash drives, digital cameras, and camcorders easily with specialized software. These tools can help restore deleted or formatted files by scanning the device for remaining data and reconstructing the original files.
How to Recover Lost and Deleted Word Documents:
Step 1. Select file types and click "Next" to start.
Launch Deep Data Recovery on your PC. Select the file types you want to recover and click "Next" to proceed with the recovery process.

Step 2. Choose the Word file location
Select the drive or a specific folder you want to scan, then click the "Scan" button.

Step 3. Locate your Word files
The software will immediately start scanning all lost data on the selected drive. After the scan, click "Documents" in the left panel, select "Word" from the category bar, and then click "Preview" to view the recovered Word files.

Step 4. Recover Word files
After previewing the lost Word files, select the desired Word files and click "Recover". Then, select a folder to store the Word files.
Related Articles
- Download Qiling Bootable Data Recovery Software to Recover Files
- How to Enable or Disable TRIM on SSD in Windows 11/10
- Qiling Data Recovery Software Full Review [Tested in 2022]
- How to Use CMD to Remove Virus from Any Drive in Windows 10/11
- Top 5 Best Free Data Recovery Software for Windows in 2023
Here are the top 5 best free data recovery software for Windows 11/10/8/7 to download: You can use free file recovery software to recover lost or deleted files on your Windows PC. Some of the top options include several popular options. - How to Undelete Files in Windows 11/10
I accidentally deleted a file? Can I get deleted files back or undelete in Windows PC. This article explains how to undelete files in Windows 11/10.