[Solved] IDM File Has Been Moved
Check Workable Solutions
If IDM says "the file has been moved", it might be downloaded to a different location than expected. Try checking the IDM download history or the "Downloaded" folder in the IDM settings to see where the file was actually saved. You can also check your computer's default download location, which is usually the Downloads folder.
You're experiencing an issue with IDM 6.26 where it claims the .mkv file has been moved, but you can't find it on your computer. Despite trying various solutions, the problem persists. To resolve this, you might want to try reinstalling IDM, checking for any conflicts with other download managers, or verifying the file's integrity and location on your computer. You could also try using a different download manager to see if the issue is specific to IDM. If none of these steps work, you may want to consider seeking further assistance from IDM's support team or online forums. This can help resolve the issue.
| Workable Solutions | Step-by-step Troubleshooting |
|---|---|
| Method 1. Manual Method | Open IDM > Right-click IDM file > Click Options > Click Save to...Full steps |
| Method 2. IDM Recovery Software | Download IDM recovery software > Choose a drive to scan > Preview and recover...Full steps |
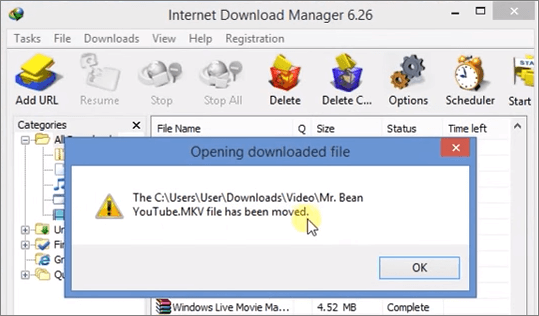
Internet Download Manager (IDM) users may encounter the "file has been moved" error while trying to access a file, but this issue has no specific cause. If the IDM downloaded file has also been moved, users can try a manual way or use Qiling data recovery software to restore the files.
Manually Restore Moved Files from IDM
To restore the moved files from IDM, you can try the manual method. This involves going back to the previous version of IDM, which was working correctly, and then restoring the files from the backup.
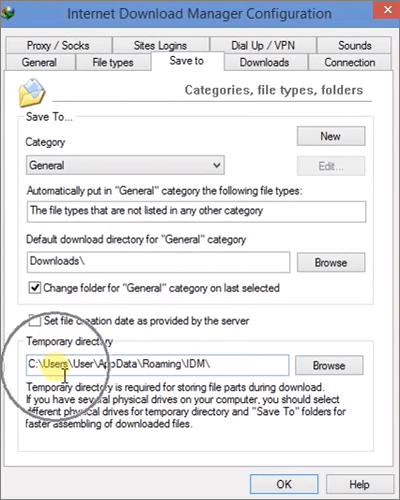
Step 1. Open IDM. Right-click the file, and then click "Options" > "Save to" > "Temporary directory".
Step 2. Copy the directory address, paste to Windows Explorer, and hit Enter. Find the "DwnlData" folder.
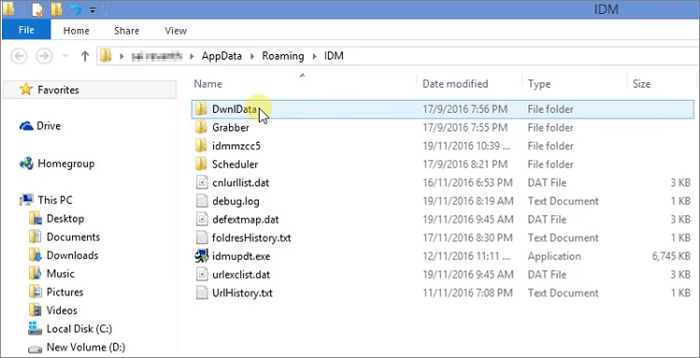
Step 3. Open each file using "Open with" until you find your file.
Step 4. Once you find your file, go to the menu bar > click "Tools" > "View". Deselect "Uncheck and hide extensions for known file types".
Step 5. Go to your file again. Simply rename the file to make sure that your file will not be moved again.
If you're unable to recover deleted files from IDM using the manual method, you may need to use a third-party data recovery tool to help you recover the moved files.
Restore Moved Files in IDM With File Recovery Software
There are many programs available that can help recover files moved from IDM, and one top-notch option is Deep Data Recovery. This reliable software can handle various data loss situations, including deleted recovery, formatted recovery, virus file recovery, OS crash recovery, lost partition recovery, and more. With just a few clicks, you can use Deep Data Recovery to recover moved files from IDM on your computer.
Download this powerful data recovery software now and learn how to get back files which have been moved from IDM with details below.
Step 1. Select file types and click "Next" to start
Launch Deep Data Recovery, select file types and click "Next" to begin the process.

Step 2. Select a drive and start scanning
Hover over the partition where you lost data, then click "Scan".

Step 3. Check and preview scanned files
To narrow down the scan results, you can use the file format filter on the left or upper right corner. This will help you find the specific files you need. Once you've filtered the results, you can click the "Preview" button or double-click a file to view its content. This way, you can quickly and easily find the files you're looking for.

Step 4. Recover lost data to a secure location
To recover lost data, select the file, click the checkbox next to it, and then click "Recover". It's best to save the recovered data on a different disk than the one where it was initially lost. This ensures the recovered data is stored safely and securely.
Related Articles
- How to Solve We're Sorry but Word Has Run Into an Error and How to Repair Corrupted Word/Excel/PPT Files
- How to Recover Files After Factory Reset Windows 10/11
- Repair Corrupted PSD Files with Online Free PSD Recovery Tool
- Windows 10 Startup Folder Location, How to Change Startup Programs
- Data Recovery Software Full Version Free Download (in recent years)
You can download the full version of Qiling data recovery software from their official website to recover your precious files after various data loss situations, rather than using the trial or demo version. - Data Recovery Software with Original File Names [Full Guide]
If you're trying to recover lost data with original file names, Deep Data Recovery software is a professional solution that can effectively assist you in retrieving data and files with their original names.