Follow 5 Effective Ways to Fix Mac Fusion Drive Not Showing Up
Quick Navigation:
| Workable Solutions | Step-by-step Troubleshooting |
|---|---|
| Fix 1. Check the Fusion Drive Label |
Select help from the Apple menu; if there is a Fusion Drive labeled drive present, click OK...Full steps |
| Fix 2. Fuse The Split Drives into One |
Hold Ctrl+ R; select and then exit the terminal, uninstall the macOS and press Continue...Full steps |
| Fix 3. Repair Fusion Drive Corruption |
Press Command + S; enter fsck –fy into the command line and press Enter, do not interrupt until...Full steps |
| Fix 4. Format Fusion Drive | Take backups; choose the FAT32 data file; the backed-up data should be restored to the storage media...Full steps |
| Fix 5. Access Fusion Drive Data | Install Mac OS X on a non-booting Mac through USB or Thunderbolt, then switch on the Mac...Full steps |
| Recover data from Mac Fusion Drive | Use Qiling Recovery Wizard for Mac Free; locate the Fusion Drive disk that contained...Full steps |
Apple's Fusion Drives were first released in 2012 and are commonly used in products like the iMac and Mac Mini.
The Apple Fusion Drive, like any other storage device, can sometimes experience problems, and data loss is a possibility, making it difficult to retrieve data. Additionally, the Fusion Drive can be complex to use, which can add to the frustration of dealing with potential issues.
If your Mac Fusion Drive is not showing up, you can try restarting your Mac, checking the drive's connection, and running the Disk Utility app to repair the drive. If the issue persists, you can try resetting the System Management Controller (SMC) and the Power Management Unit (PMU) to see if it resolves the problem. Additionally, you can try running a diagnostic test on the drive to identify any hardware issues.
Apple Fusion Drive Problems
A Fusion Drive combines a solid-state drive (SSD) and a hard disk drive (HDD) to provide a system with both excellent performance and large storage capacity.
The battle of hard drives is a comparison between Fusion Drive, SSD, and HDD. Fusion Drive combines a solid-state drive (SSD) with a traditional hard disk drive (HDD) to provide a balance of speed and storage capacity. SSDs, on the other hand, use flash memory to store data, making them incredibly fast but often limited in storage capacity. HDDs, the traditional spinning disk drive, offer large storage capacities but are slower than SSDs. Ultimately, the choice between these options depends on individual needs, with Fusion Drive offering a middle ground, SSDs prioritizing speed, and HDDs emphasizing storage capacity.
Hard drives come in various types, including internal, external, portable, and solid-state drives, each with its own unique features and purposes.
The Mac OS prioritizes storage on the SSD, while storage on the HDD is prioritized based on data usage. This allows both halves to operate concurrently, making the drive a single storage piece with fast access and a large 1TB capacity.
Mac fusion drive not showing up. This article will delve into the common issues associated with the Apple Fusion Drive and explore methods to overcome them, providing a comprehensive review of potential solutions to these problems.
Why Is Fusion Drive Not Showing up on Mac?
A Fusion Drive is a storage technology used in Mac computers, featuring a combination of an SSD for fast macOS loading and an HDD for ample file storage.
When a fusion drive in Files appears as two separate drives, it can be due to an unreadable file system or drive failure, causing the two storage units to become inaccessible.
If your Fusion Drive isn't showing up on your Mac, it's possible that the hard drive is in good working condition, but still won't appear in Disk Utility or Storage under System Information. This can also happen if the SSD isn't accessible, which would prevent your Mac from booting. Other common reasons for this issue include corruption, firmware issues, or the drive being disconnected or improperly connected.
- Corrupted or formatted with an incompatible file system.
- You have not formatted the Disk Fusion Drive.
- You have an older version of the desk utility.
How to Fix Fusion Drive Not Visible Issue on Mac?
The fusion drive on a Mac is responsible for storing the operating file system and user data, enabling the computer to operate normally.
If the fusion drive doesn't show up on Mac, you may not be able to access your data, which could even prevent your Mac from starting.
The following solutions can help you recover data from your Mac fusion drive.
1. Check Whether the Fusion Drive Label is Available or Not
If you acquire a fusion drive-equipped computer or other item without your knowledge, your drive is considered a fusion drive. This can happen if you purchase a used device or inherit one with a fusion drive, or if someone installs one on your device without your consent. In such cases, the drive is considered a fusion drive, and you may not be aware of its capabilities or the potential risks associated with it.
- With more storage capacity available, you can store more data on the device, making it a more efficient option for storing large amounts of information.
- If you have a SATA interface, you will see two discs in the System Information window.
To test whether your computer has a fusion drive, follow these steps without opening it up:
Step 1:To access the Storage section, select the "Help" option from the Apple menu, then click on the "Storage" section.
Step 2:If a Fusion Drive labeled drive is present, click OK and close the window.
2. Fuse The Split Drives into A Single Drive
To restore the split Fusion Drive, you can either continue to use the two separate drives or merge them as one by following specific procedures, which may vary depending on your system configuration and the cause of the split.
Step 1: Refresh your computer and hold Ctrl + R. Lift them when you see the Apple logo. Your computer enters macOS Recovery.
Step 2: In Terminal, select Utilities and enter the command "diskutil resetFusion" to reset the Fusion Drive. Respond with "Yes" to confirm the action.
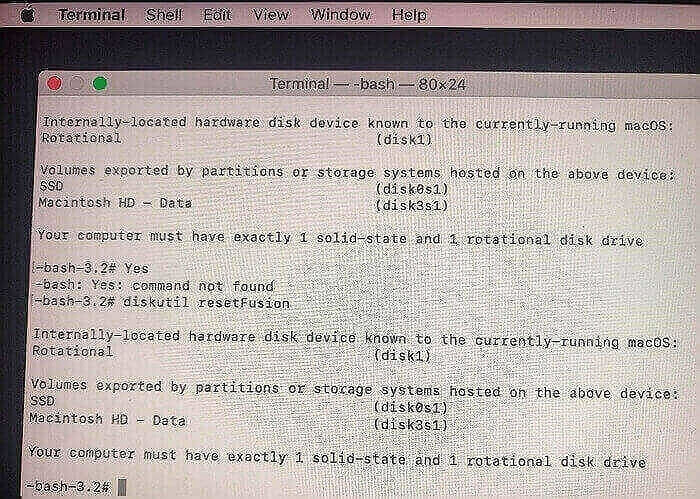
Step 3: To resolve the issue, exit the Terminal and uninstall the macOS. Press Continue and then reinstall macOS as directed. This will cause your computer to restart and reform the fusion drive as a single drive.
3. Repair Fusion Drive Corruption with First Aid
To resolve issues with your hard disk drive, use the First Aid option. This feature allows you to review and repair the storage drive's fundamental structure by following a few simple steps.
Step 1: To enter Single-User Mode on your Mac, start by turning it on and then press Command + S repeatedly until the screen displays white text. This will activate Single-User Mode upon startup.
Step 2: To run a full system check and automatically fix any errors, enter the command "fsck –fy" into the command line and press Enter, but make sure to let the process complete without interruption to prevent data loss.
Step 3: Repeat the same command if you get the notice "The volume Macintosh HD could not be repaired."
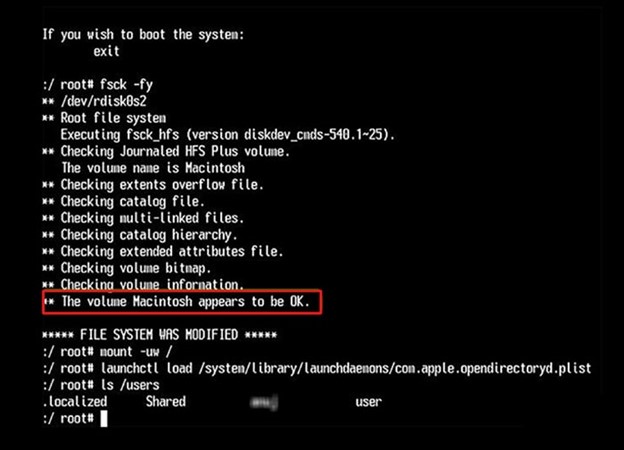
Step 4: Repeat the procedure until "The volume Macintosh HD seems to be OK" displays, then restart your Mac by typing exit.
4. Format Fusion Drive to A Compatible File System
Windows File Explorer won't see a Mac-based storage disc connected to a Windows PC because of the incompatibility of data files. The disc is formatted with APFS or HFS+, which can only be accessed by Mac OS X. To resolve the issue, you'll need to either use a Mac to access the disc or reformat the disc to a Windows-compatible file system, such as NTFS or FAT32.
Step 1: To make a complete backup of the storage drive's contents using an operating system suitable for the drive, connect the drive to a computer running a compatible OS, such as Windows, macOS, or Linux. Open the OS's built-in backup software or a third-party program, select the drive as the source, and choose the files and folders to include in the backup.
Step 2: Choose the FAT32 data file format to format the disc, which has a maximum file size of 4 GB.
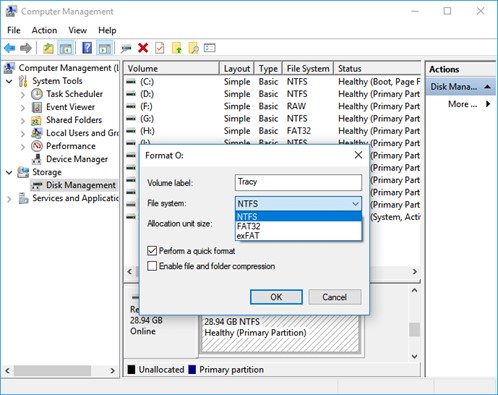
Step 3: The backed-up data should be restored to the storage media.
5. Use bootable data recovery software to access fusion drive data
A Mac Fusion drive may fail to boot due to incorrect file systems, faulty disks, or electrical component failure. In such cases, follow these steps to recover files from a non-booting Mac.
Step 1: To install Mac OS X on a non-booting Mac, first switch on the Mac device. Next, switch on the non-booting Mac and hold the T key until a connected symbol displays, then let go. This will allow you to install Mac OS X through USB or Thunderbolt.

Step 2: To restore your system from a backup, go to the macOS window, select "Restore Backup", and then click "Proceed". Next, delete all files from the Fusion Drive, and then restore macOS. Finally, recover your files from the hard disk.
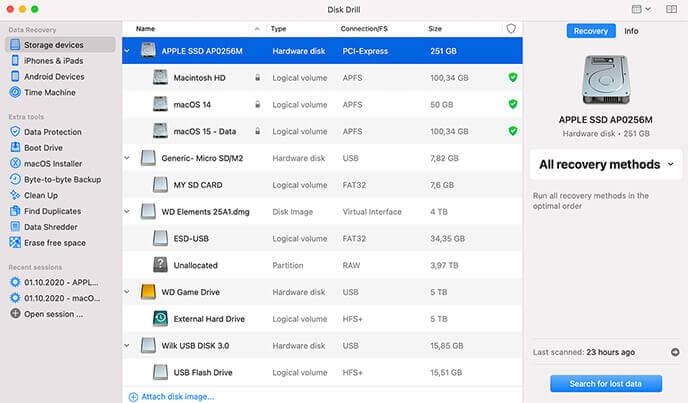
6. Deep Data Recovery for Mac Free- Best Alternative
You can recover data from a Mac Fusion Drive using the Qiling Mac data recovery program, which is a DIY approach useful when there is no backup. This program supports recovery of documents, images, movies, and audio files, and can restore lost Fusion Drive data. To recover data, simply download the program and follow the simple steps provided.
Step 1. Launch Deep Data Recovery. Select file types and click "Next" to start the recovery process.

Step 2. To recover data from a Fusion Drive partition, select the partition where the lost data and files are located, then click the "Scan" button. If unsure which partition is the Fusion Drive partition, click the "click here" link at the top to verify the partition name.

Step 3. Deep Data Recovery for Mac will immediately scan your Fusion disk partition and display the scanning results on the left pane.

Step 4. To recover deleted files, select the desired files in the scan results and click the "Recover" button to get them back.
Conclusion
If you're having trouble with your Mac's Fusion Drive not showing up, try using Deep Data Recovery for Mac to assist with data recovery, especially if other troubleshooting methods haven't worked. Good luck!
Related Articles
- Full Guide: Easily Format Text on Mac without Making Mistakes
- Know All: The Latest Mac OS Update in 2022
- Repair and Recover Your Corrupted SD Card on Mac
- Upgrade to Mac OS X El Capitan 10.11.6, No Data Loss [2022 Tutorial]
- Fix External Hard Drive Not Showing Full Capacity on Windows & Mac
If your external hard drive shows the wrong capacity, it may display less space than it actually has. There are various reasons why this might be happening, and this article can help you identify the causes and find solutions to restore the full size of your drive on both Windows and Mac. - 5 Ways to Fix the Fatal Device Hardware Error Without Losing Data
If your internal or external hard drive, SSD, USB flash drive, or other storage media becomes inaccessible due to a fatal device hardware error, this issue can be resolved. You can try five different methods to fix the issue and recover your valuable data using the Qiling file recovery software.