Recover Data After Windows 10/11 Crashed
You can try using a Linux live USB to access and recover your files from the crashed Windows 10. This way, you can bypass the operating system and directly access your files. Alternatively, you can also use a data recovery software on a separate device to recover your files. If you're not comfortable with these options, sending the laptop to a repair shop is the safest bet to recover your files and fix the Windows 10 issue.
Windows 10/11 crashed, how to recover files
Many users experience Windows 10 crashes, often resulting in serious issues like the blue or black screen of death or the OS failing to start.
The system is in a critical state and needs to be restored to a healthy state, but this can be a daunting task for ordinary Windows users who are not familiar with OS repair. Additionally, there's the concern of recovering data from the crashed computer, which is a crucial aspect to consider, especially if important files and documents are at risk of being lost.
Don't worry, follow this step-by-step tutorial guide to help yourself out.
- 1. After a Windows 10 crash, you can recover your data using powerful data recovery software. This type of software can scan your system for deleted files and restore them to their original location, even if the operating system is no longer functioning properly.
- 2. Protect OS and data from crash
Part 1. Recover data after Windows 10/11 crash
When Windows 10 crashes, data recovery becomes a priority. Having a backup is ideal, allowing you to restore your data easily. However, if a backup isn't available, Qiling file recovery software can be used to recover data. Additionally, using Deep Data Recovery with Bootable Media can facilitate successful data recovery even when the computer is unable to boot properly.
Here are the steps to recover data from a crashed Windows 10 in one paragraph:
Step 1. Create a bootable disk
To create a bootable USB, start by preparing an empty USB drive, either by copying any data to another device or simply removing it from any existing content. This ensures the USB is blank and ready for the bootable disk creation process. Once prepared, you can use tools like Deep Data Recovery WinPE Edition to create a bootable USB. This process will erase the data on the USB, so ensure you've backed up any important files before proceeding. The tool will guide you through the steps to create a bootable disk, allowing you to use the USB to boot into an operating system or run specific software.
Connect a USB drive to your PC, then launch the Deep Data Recovery WinPE Edition software. From there, select the USB drive and click the "Create" button to create a bootable disk.
Step 2. Boot from the bootable USB
Connect a bootable disk to the PC that won't boot and change the boot sequence in the BIOS settings, usually by pressing F2 at startup. This often resolves the issue.
To boot the PC from a device other than the hard drive, press F10 to save and exit the settings, selecting "Removable Devices" or "CD-ROM Drive" as the boot priority. This allows you to boot from a bootable USB disk or CD/DVD instead of the hard drive.
Step 3. Recover data from a hard drive that won't boot
When booting from a USB, you can run Deep Data Recovery from the WinPE bootable disk. This allows you to select the drive to scan and recover lost files.

Click "Scan" to start the scanning process.

After scanning, you can preview and recover data from the computer or laptop by selecting the targeted files and clicking the "Recover" button, saving the recovered data to another place to avoid data overwriting.

After recovering your essential data, you can reach out to Microsoft support or online resources for help repairing your crashed Windows 10 OS. A clean install of Windows 10 is often the most effective solution to resolve this issue.
Part 2. Protect OS and data from crash
Knowing how to recover data from a crashed Windows OS or a dead computer is crucial, but it's not enough.
Having a full backup of Windows 10 and data on your computer is the best plan to protect your system and data from a sudden system crash or error. You can use File History or backup software to create the backup.
Here, we'd like to show you an automated way of backing up Windows 10 and data by using Qiling file backup software - Qiling Backup, which can automatically backup your Windows 10 and data at a scheduled time.
Step 1. To start, select the Disk backup option from the Backup and Recovery page.

Step 2. It is available to back up a whole disk or a certain partition. Choose the one you need.
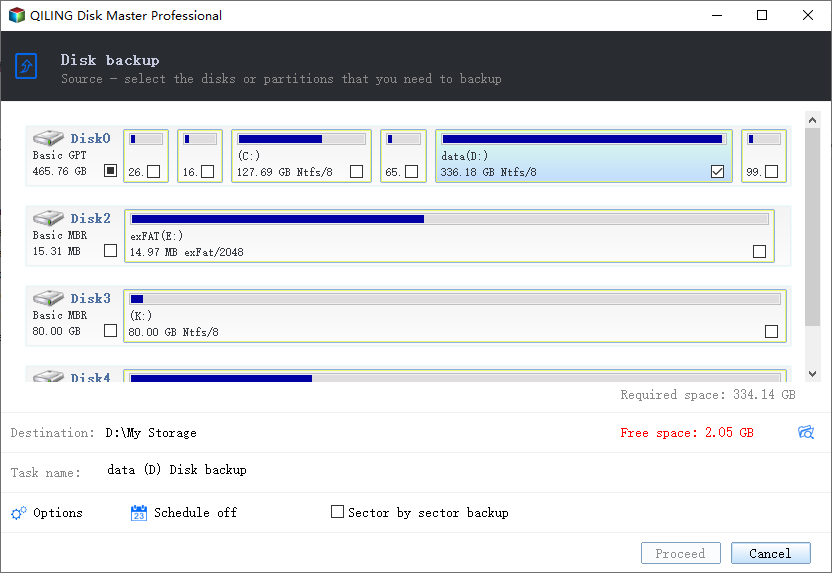
Step 3. Select the destination where you want to save the backup.

Step 4. For disk/partition backup, you can choose to save the backup to a local drive or a network-attached storage (NAS) device.
Step 5. After the backup process is completed, your task will be displayed at the left. From there, you can manage your backup by clicking on any task, which will allow you to recover it, create incremental backups, and more.

To prevent Windows 10 crash errors, you can schedule automatic backups. This ensures that your system and files are regularly saved, making it easier to recover in case of a crash.
Creating a system repair disk using Qiling Backup allows you to quickly restore Windows 10 to a healthy state by utilizing the created system backup image.
Part 3. Restore OS with Windows Recovery Services
Using manual Windows repair services is an easy to complete way to solve Windows issues. Qiling's professional technical team can help solve system startup errors, including system failure, blue screen, black screen, and more.
- 1. Fix Windows boot issues, including BSOD
- 2. Fix Windows error and configure Windows environment
- 3. Restore the system when it fails to boot
- 4. Optimize Windows computer to make it run quickly
Related Articles
- Qiling Free Trial Code: Free Get Deep Data Recovery License Code & Serial Key
- Recover Deleted Volume Windows 10/11
- How to Disable AutoSave in Word/Excel on Windows and Mac
- Your File History Drive Was Disconnected for Too Long, How to Reconnect File History Drive
- How to Recover OBS Recording Deleted, Crashed and Corrupted
Any way to recover OBS recordings that were accidentally deleted, not fully finished due to software crash or corrupted after computer suddenly turns to black or blue screen? Read the post and figure out whether your OBS video recordings can be retrieved or not. - How to Recover Overwritten Files in Windows 10/8/7 Easily
If you've accidentally overwritten files in Windows 10/8/7, there are three possible methods to recover them. These methods can help you recover overwritten files, including Word, Excel, PPT documents, and other types of files.