Fix and Restore External Hard Drive Shows Only 32GB to Full Capacity
If your external hard drive shows only 32GB, we have a complete fix for you. All you need is to follow through with provided methods below and you can find your drive full capacity back:
| Workable Solutions | Step-by-step Troubleshooting |
|---|---|
| Part 1. Restore Drive Capacity | Method 1. Update external hard drive driver...Full steps Method 2. Update firmware of external drive...Full steps Method 3. Delete and create new partition...Full steps |
| Part 2. Restore Data | For the deleted partition data, run Qiling recovery software > Scan and recover...Full steps |
My External Hard Drive Shows Only 32GB Available, Help
To restore your 1TB external hard drive to its original space without losing any data, you can try the following: disconnect the external hard drive from your Windows 10 PC, then connect it to an older Windows version (like Windows 7 or 8) or a Linux machine. On these systems, the drive should be recognized as a 1TB drive, and you can use the built-in disk management tools to format the drive and restore its original capacity. Alternatively, you can try using a third-party software like Hiren's BootCD or Qiling Partition Manager to recover the lost space. Be sure to back up any important data on the drive before attempting any of these methods, as there is a risk of data loss.
After installing Windows, you connected an external hard drive to your computer, but it can only read 32GB files related to the Windows installation. You're wondering where your old data went and if it's possible to access the lost data and restore the external hard drive to its full capacity. Is that correct?
Many people have encountered the issue of external hard drives, such as USB drives or external hard drives, showing the wrong capacity, with some even displaying 32GB when they should show 1TB or 2TB. This has left many users confused and wondering what could be causing this problem.
An external hard drive or USB drive showing only 32GB instead of its actual capacity can be due to a variety of reasons. It could be because the drive is not properly formatted or the file system is corrupted, leading to a mismatch between the actual capacity and the reported capacity.
- Creating WinPE bootable disk
- Creating a Windows installation or Windows backup image disk
- External hard drive storage error
To fix the issue of an external hard drive or USB hard drive not functioning at full capacity, follow the methods gathered on this page. You can try the two parts below to resolve the problem right now.
- Tip
- If you have critical data saved on an external hard drive or USB 3.0 external hard drive, a powerful data recovery software can help you recover all your data with just a few simple steps.
Part 1. Fix and Restore External Hard Drive Which Shows Only 32GB to Full Capacity
The reasons why external hard drives, hard drives, or USB devices with large capacities become limited to 32GB are varied. Fortunately, there are multiple ways to fix this issue and restore the full capacity to the storage device. Three recommended methods are available, and you can follow one of them to fix and restore your device to its original full capacity.
Method 1. Update External Hard Drive Driver
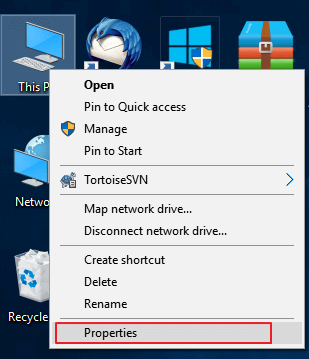
Step 1. Connect the not working USB flash drive to your PC, then right-click on This PC/My Computer and choose Properties.
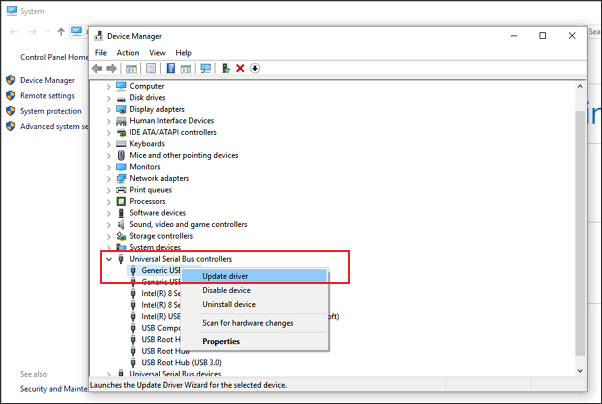
Step 2. To update the driver for the yellow marked USB Serial Bus controller, click on "Device Manager" on the left taskbar, expand the USB Serial Bus controller section, right-click on the marked item, and select "Update driver" or "update driver software".
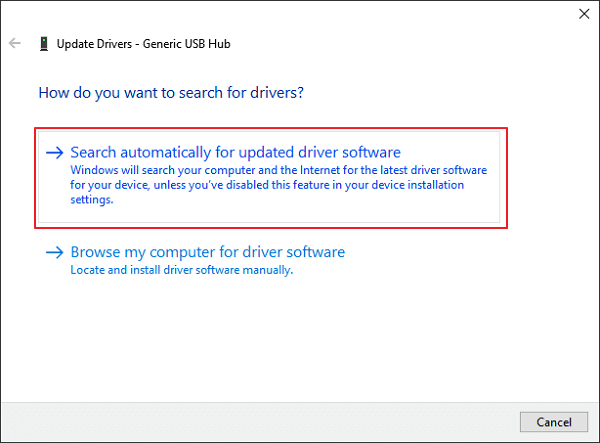
Step 3. Click "automatically search for driver software online"...
Method 2. Update the Firmware of an External Hard Drive
Here are the 3 steps to follow to see the detailed operation steps:
Step 1. Check the firmware version of your external hard drive/hard drive/USB
1. Connect your external hard drive to the PC.
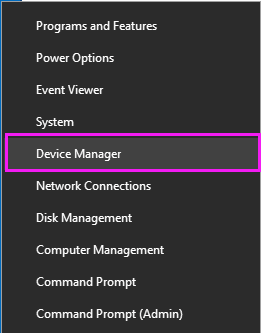
2. Right-click on the Windows icon and select Device Manager.
3. To access the properties of your external hard drive, you can follow these steps: Select Disk Drivers, expand it, then find and right-click on your external hard drive, select Properties.
4. To view the manufacturer and firmware version of your device, click on Details, then select Hardware IDs from the Properties drop-down menu, which will display the information in the Value box.

Step 2. Download the firmware update of your external hard drive/device
1. To update the drivers for your external hard drive, go to the website of the manufacturer and navigate to the support page or search for "download drivers" on the site. This will allow you to access the latest drivers for your device.
2. Click Support, Download, or Drivers.
3. To resolve the issue, enter the model number of your external hard drive or hard drive in Search Knowledgebase, Search Downloads, or Model / Parts ID to find the correct one. This will provide you with the necessary information to troubleshoot or repair your device.
4. Check if there's an update for your drive's firmware, and if so, download and install it onto a portable USB drive.
Step 3. Burn downloaded ISO and upgrade the firmware
1. To update the firmware of your external hard drive, open the portable USB drive that contains the firmware ISO, right-click on the ISO file, and select the option to burn the disk image. This will begin the firmware update process.
2. To burn a DVD or CD, insert a writable disk or USB to your PC and select the optical drive from the Drive Burner, then click Burn.
3. To resolve the issue, restart your PC and the burned disk or USB drive. Then, press the corresponding key to enter the BIOS settings, which is usually F2, F10, F12, or Esc, depending on your system.
4. Select the optical or USB drive you want to use using the arrow keys and press Enter.
5. Once you've completed the firmware upgrade process, your external hard drive will be fully functional and have its full capacity restored.
If the computer is not recognizing your device, try Method 3, which will help you resolve the issue.
Method 3. Delete 32GB Partition and Create New Partition to Restore Full Capacity on the External Hard Drive
When a computer only recognizes a 32GB partition on an external or internal hard drive, the solution is to delete the 32GB partition and create a new partition on the entire drive, restoring its full capacity.
1. To connect and access an external hard drive on a PC, first plug in the external hard drive to the computer. Then, open the Device Manager by right-clicking on it, and from the dropdown menu, select Disk Management.
2. To delete a 32GB partition on an external hard drive, you would locate the partition, right-click on it, and select the option to delete the volume. This would remove the partition from the drive. However, please note that deleting a partition can result in data loss if there are files on the partition, and it's always a good idea to back up any important data before making changes to your hard drive.
If you have important data saved on the drive, you can now follow Part 2 to restore all lost data with the help of powerful data recovery software.
3. When Disk Management shows you a whole unallocated space on the external hard drive, right-click on it and select the New simple volume to create a new partition with all space on it.
4. Rename the drive and set the file system to NTFS.
To restore the full capacity of your external hard drive, you can try the following steps: First, remove the external hard drive from your computer and disconnect it from any power source. Next, use a soft cloth to wipe the external hard drive's surface to remove any dust or debris.
Part 2. Restore Data From an External Hard Drive Which Shows Only 32GB
If you have important data saved on an external hard drive that previously showed only 32GB of space, you can use the best hard drive data recovery software, Deep Data Recovery, to scan and recover all lost data with ease.
Deep Data Recovery key features:
- Recover deleted data from various storage devices, including the Recycle Bin, hard disk drives (HDD), solid-state drives (SSD), USB drives, pen drives, SD cards, external hard drives, and more.
- 1,000+ file types supported, including photos, videos, documents, emails, and more.
- Repair corrupted files during data recovery on Windows 11/10/8/7
To restore files from an external hard drive, download a data recovery tool and follow the steps below.
Step-by-Step Tutorial:
Step 1. Select file types and click "Next" to start
- Download and install Qiling Data Recovery on your PC or laptop.
- Connect the external hard drive to your computer.
- Launch Deep Data Recovery. Select file types and click "Next" to initiate the recovery process.

Step 2. Choose and scan the external hard drive
- You can recover data from an external drive by selecting it from the External drives list and clicking on "Scan for lost data".

Step 3. Check the scan results
- Qiling data recovery software will immediately scan the selected drive for all data, including deleted, corrupted, and existing data.
- You can use the Filter feature to quickly locate files of a specific type, such as Pictures, Word, Excel, PDF, videos, or emails.

Step 4. Preview and recover data
- double-clicking a file from the scanned results to preview.
- Choose the files you want and click "Recover".
- Select a different drive to save the recovered files instead of the original one.
After using the external hard drive to back up your data, you should be able to use it again for saving data, whether it's a 1TB WD, Seagate, Toshiba, or Lecia model, among others.
Related Articles
- How to Fix 'the device is not ready' on USB Flash Drive/HDD
- 3 Steps to Recover Data from exFAT Drive
- Free Download Lenovo Data Recovery Software [for Laptop & Mobile]
- [Solved] USB Drive Detected But not Accessible
- 4 Ways for How to Recover Deleted Folder in Windows 11/10 [2023]
To recover a deleted folder in Windows 11/10, you can try four different methods: restoring it from the Recycle Bin, using the Previous Versions feature, recovering from a Windows Backup, or using Deep Data Recovery to retrieve permanently deleted folders. - 5 Ways for How to Recover Deleted Games on Windows 11/10 PC [2023 Guide]
If you've accidentally deleted games on your Windows 11/10 PC, there are ways to recover them. You can try checking the Recycle Bin, which may still have the deleted games stored in it.