Fixed: Samsung 860 EVO Not Detected in Windows 10/11
"I have had a very long and frustrating day and now I'm turning to the forums for some help......pc which had a brand new Samsung EVO860 SSD in it, it has some very important files...... Windows 10 does not show it at all, not in explorer, not in disk management. All I need is the SSD to be accessible so I can cut the files I need from it and move them to where they belong......"
If your Samsung 860 EVO SSD is not detected in Windows 10, we've can help. Sometimes, the hard drive can play hide-and-seek, making it invisible in BIOS, disk management, Samsung Magician, and Device Manager. However, with our step-by-step guide, you can resolve this issue and make your SSD visible again. We'll provide a remedy at the end of the article, so you can stop worrying and get back to using your device.
| Workable Solutions | Step-by-step Troubleshooting |
|---|---|
| Samsung 860 Not Detected in BIOS |
|
| Disk Management Can't See It |
|
| Samsung Magician Not Recognizing |
|
| Samsung 860 EVO Not Showing Up |
|
Samsung 860 EVO Not Detected in BIOS
If your BIOS is outdated, it may not support the Samsung 860 EVO SSD, so update the BIOS to the latest version and see if it's detected in the BIOS after the update.
Updating the BIOS is a more delicate process than installing Windows programs, as a failure could potentially render the computer unusable.
Update the BIOS to the Latest Version
Step 1. Check the computer outlet and BIOS version.
To avoid damaging your motherboard due to an accidental shutdown, ensure that your outlet and charging cable are functioning properly. This will prevent any potential harm to your device's internal components.
Follow steps to check BIOS version for downloading in the next step:
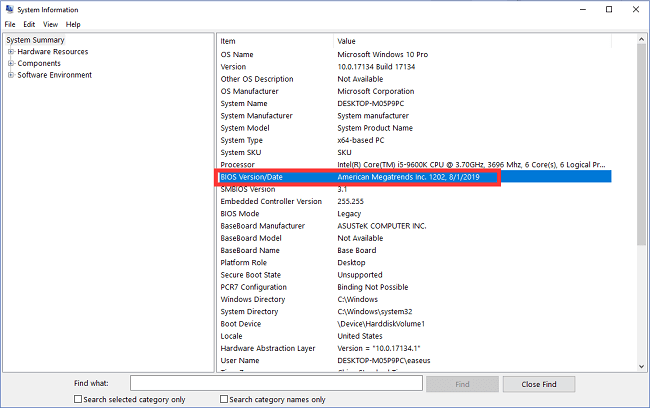
To find the BIOS version on your computer, type "System Information" in the search box, click on it, and then see the "BIOS Version/Date" on the panel. You can then download the latest BIOS version from the manufacturer's website, unzip the file, and use it to update your BIOS.
Step 2. Go to Advanced Startup
To restart your computer, go to Settings, then click on Update & Security, followed by Recovery, and finally click on Restart now.
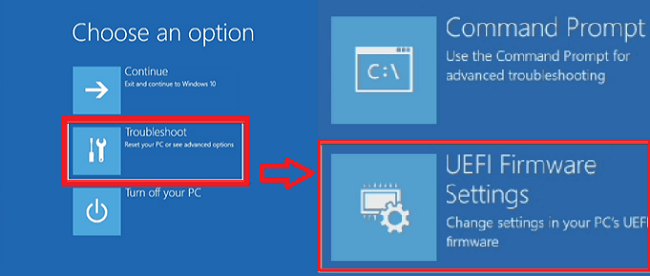
Step 3. Access the "Choose an option" page
To access the UEFI Firmware Settings, go to Troubleshoot > Advanced options > UEFI Firmware Settings, then click the Restart button.
If your Samsung SSD is not showing up in the BIOS, there are several methods you can try to resolve the issue. First, ensure that the SSD is properly connected to the motherboard and that the SATA cable is securely seated.
Fixed 2022: Samsung SSD Not Showing Up in BIOS
If your SSD is not recognized in Windows 10, there are several steps you can take to troubleshoot the issue. First, ensure your BIOS is updated, as an outdated BIOS may prevent the SSD from being recognized.

Windows 10/11 Disk Management Can't See Samsung 860 EVO SSD
Here are three solutions to cope with Samsung not being detected in disk management.
Fix 1. Update 860 EVO SSD driver
Fix 2. Uninstall SSD Driver
Fix 3. Format the SSD
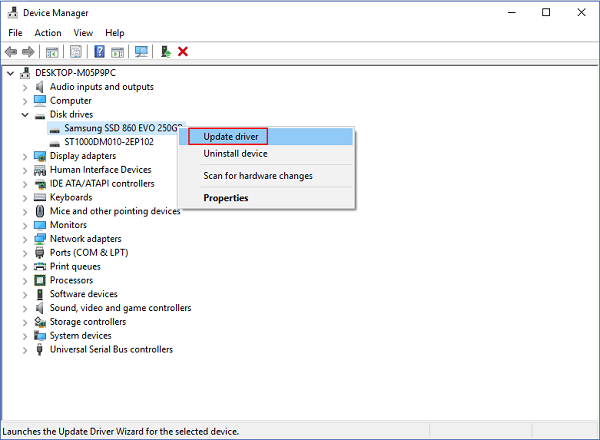
Fix 1. Update 860 EVO SSD Driver
Step 1. Press Windows + X, select Device Manager on the menu.
Step 2. To update the driver for a disk drive, expand Disk drives, right-click the targeted drive and select Update Driver.
Step 3. Choose Search automatically for updated driver software.
Fix 2. Uninstall SSD Driver
Step 1. Press Windows + R to open the Run window.
Step 2. Type devmgmt.msc and click OK to run Device Manager.
Step 3. Expand Disk Driver, right-click Samsung drive and choose Uninstall Device.

Step 4. Restart PC.
Windows will automatically update and re-install the driver.
Fix 3. Format the SSD
If the above fixes don't work, you can try formatting the hard drive, but make sure to back up your data first. You can use Qiling Partition Master to format the hard drive. This will erase all data on the drive.
You can download the software, right-click the SSD and choose the "Format" feature to format the SSD.
Step 1. Right-click the hard drive partition and choose the "Format" option.
Step 2. In the new window, set the Partition label, File system, and Cluster size for the partition.
Step 3. To begin the process of formatting the hard drive partition, click on the "Proceed" button. This will initiate the formatting process, which will erase all data on the selected partition.
Step 4. You can see a warning window, click "Yes" to continue.
Samsung Magician Not Recognizing Samsung SSD
If you're looking to upgrade or clone your Samsung SSD, try the three methods related to Samsung Magician, which can be found on the Samsung website.
Fix 1. Update Samsung Magician to Latest Version
Fix 2. Install the NVMe Driver
To disable RAID mode and enable AHCI in Windows 10, go to the BIOS settings and change the SATA operation mode to AHCI. Save the changes and restart your computer. Then, go to the Device Manager, find the disk controller, and update the driver to the latest version.
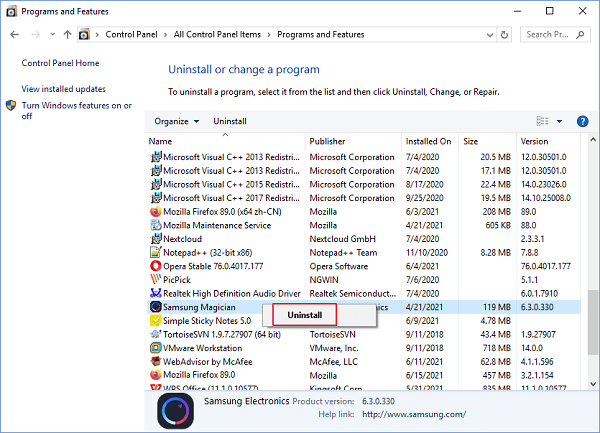
Fix 1. Update Samsung Magician to Latest Version
Step 1. Type Control Panel on the search box, click to start.
Step 2. Click Programs and Features.
Step 3. Scroll down to find Samsung Magician, right-click it, and choose uninstall.
Step 4. To resolve the issue, restart your computer, then visit the official Samsung website to download the latest version of the Samsung Magician software.
Fix 2. Install the NVMe Driver
Installing the compatible NVMe driver is the ideal choice to use Samsung Magician. If you have not set it up, you can do the steps as follows:
To download the NVMe driver, visit the official website and scroll down to the Samsung NVMe driver part, where you can find a compatible driver for all Samsung models.
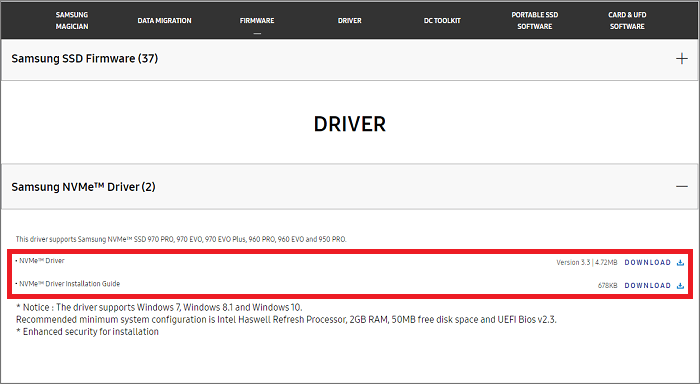
After the download is complete, open the related files to install the driver, then restart your computer and verify that your SSD is displayed in Samsung Magician.
Fix 3. Disable RAID Mode and Enable AHCI in Windows 10
Step 1. To run the Command Prompt (CMD) as an administrator, type "CMD" in the search box, right-click on the result, and select "Run as administrator".
Step 2. Type the command line and press Enter.
Bcdedit /set {current} safeboot minimal
Step 3. Restart the computer and enter BIOS settings.
Step 4. Change the SATA Operation mode to AHCI.
Step 5. Save changes and exit.
Step 6. Repeat step 1 to open CMD.
Step 7. Type the command line and press Enter:
bcdedit /deletevalue {current} safeboot
Step 8. Now, restart your computer and run Samsung Magician to check if your SSD is detected.
Samsung 860 EVO Not Showing Up in Device Manager
If the device is not showing up in the Device Manager, try manually scanning the device one more time. Alternatively, check if your hard drive has a bad connection, which could be causing the issue.
Fix 1. Search New Devices in Windows Device Manager
Fix 2. Check Hard Drive Connection
Fix 1. Search New Devices in Windows Device Manager
Step 1. Press Windows + X and click Device Manager.
Step 2. Click Action and then click Scan for hardware changes.
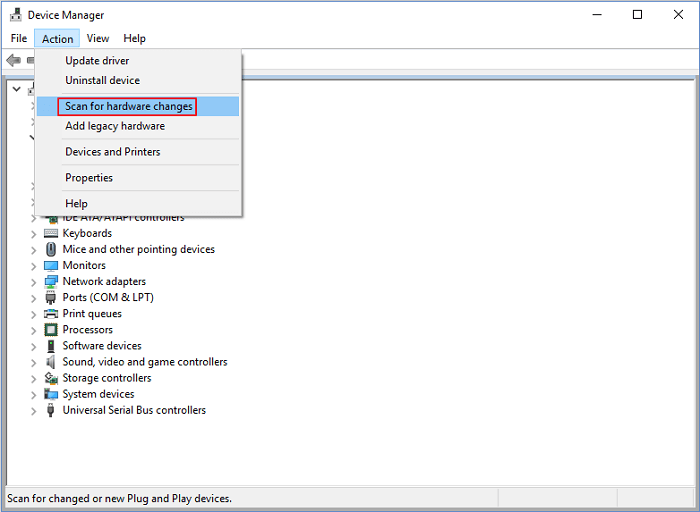
Step 3. Check the Disk drivers to see if it is working.
Fix 2. Check Hard Drive Connection
If your SSD is not correctly connected to your computer, the system can't detect it. Try disconnecting and reconnecting the cable to resolve the issue.
Step 1. Prepare a screwdriver. And cut off the power supply of your computer.
Step 2. Use the screwdriver to open the computer case.
Step 3. To resolve the issue, simply disconnect the cable connected to the Samsung hard drive, then reconnect the SSD. This should resolve the problem.
Remedy: How to Recover Data from Undetectable Hard Drive
If the fixes aren't available on your Samsung SSD, try connecting the hard drive to another PC. If it still disappears on the other PC, it's likely the hard drive has issues, and you should recover data via Deep Data Recovery.
Step 1. Select file types and click "Next" to start.
Launch Deep Data Recovery, select the desired file types, and click "Next" to initiate the recovery process.

Step 2. Scan the SSD
To recover lost data from a specific SSD, you can follow these steps: Select the SSD where you lost data, and click the "Scan" button. This will initiate the scanning process, which may take some time depending on the size of the drive and the amount of data that needs to be scanned.

Step 3. View the results
When the scanning process is complete, you can identify and recover lost SSD data by using the "Filter" and "Search" options to locate files in the "Deleted Files" and "Other Lost Files" folders.

Step 4. Recover SSD files
To recover lost SSD files, select the desired data and click the "Recover" button to retrieve them.
Related Articles
- Microsoft Word Won't Open Windows 10/Mac | Fixed Here!
- How to Use Deep Data Recovery
- How to Recover Deleted TikTok Videos in Android/iPhone/PC
- Data Recovery Software with Original File Names [Full Guide]
- How to Do Samsung SD Card Recovery on Windows/Mac
Samsung SD card recovery software enables the recovery of deleted photos, videos, files, and more from a Samsung SD card. The detailed guide to recover data from the SD card can be followed on both Windows and Mac operating systems. - Best 5 SD Card Photo Recovery Apps to Recover Deleted Photos from SD Card
Here are the top 5 best apps to recover deleted photos from SD card, helping you keep all the great moments safe and in good situation. They apply to the SD card photo recovery app for Android, Windows PC or Mac OS.