Recycle Bin Windows 10 - Full Guide [with Pictures]
What Is Windows Recycle Bin
The Recycle Bin is a storage place for files you no longer need, allowing you to restore them if accidentally deleted or changed your mind, and can be emptied to free up space, permanently deleting any files inside.
Where Is the Recycle Bin in Windows 10
To find the Recycle Bin in Windows 10, look for the desktop icon labeled "Recycle Bin" or search for it in the Start menu. The Recycle Bin is also accessible through the File Explorer, where you can find it in the navigation pane on the left side of the window. If you're unable to find the Recycle Bin, check if it's been moved to a different location or if it's been deleted. If you're still unable to find it, you can try searching for it in the Start menu by typing "recycle bin" in the search bar.
To show the Recycle Bin icon on your desktop, right-click on the desktop, select "Personalize", then "Themes" and "Desktop icon settings", and check the box next to "Recycle Bin" to enable it. Click "Apply" to save the changes. This will restore the Recycle Bin icon on your desktop.
![]()
Once you've opened the Recycle Bin, you can see all the files deleted from your computer. To restore a file, simply select it and click "Restore", or to permanently delete it, select it and click "Delete".
If you're having trouble finding the Recycle Bin through the Desktop properties option. There are other ways to locate it, such as using the Run tool, PowerShell, or Settings.
Further Reading
The Recycle Bin in Windows 10 is a folder that temporarily stores deleted files and folders. To access it, click on the Start button, type "recycle bin" in the search bar, and select the "Recycle Bin" icon from the search results.
Now that you know where to find the Recycle Bin in Windows 10, you can ensure that all your deleted files are appropriately recycled.
How to Manage Recycle Bin on Windows 10
Users can easily hide or remove the Recycle Bin on their Windows 10 desktop, whether it's to declutter their space or simply because they find it unsightly. They can do this by right-clicking on the desktop, selecting "Personalize," and then clicking on "Themes" followed by "Related settings" and finally "Recycle Bin." From there, they can toggle the "Show the Recycle Bin on the desktop" option on or off as needed. This allows users to customize their desktop to suit their preferences.
Hide/Remove Recycle Bin Step by Step
To delete the Recycle Bin from Windows 10, you can uncheck it in the Desktop Icon Settings, but for a complete removal, you'll need to edit the Registry. This involves navigating to the "Desktop" key and deleting the "Recycle Bin" subkey. However, this should be done with caution as modifying the Registry can potentially cause system instability. If you're not comfortable with this process, it's recommended to leave the Recycle Bin visible or hidden, but not deleted.
Step 1. To access the Taskbar and Start Menu settings, open the Registry Editor on your computer and navigate to HKEY_LOCAL_MACHINE\SOFTWARE\Microsoft\Windows\CurrentVersion\Explorer.
Step 2. Right-click on the "Explorer" key in the registry, then select "New" and choose "DWORD (32-bit) Value" from the drop-down menu.
Step 3. To configure the "NukeOnDelete" value, double-click on it to open up its properties.
Step 4. In the "Value data" field, change the value from "0" to "1" and click "OK". Close the Registry Editor and restart your computer for the changes.
- Warning
- Before editing the Registry, users should back up their Registry by going to "File > Export" in the Registry Editor, as editing the Registry can be dangerous.
To hide or show the Recycle Bin in Windows 11/10, follow these steps: Right-click on the desktop and select Personalize from the context menu. In the Settings window, click on Themes, then click on Desktop icon settings.
Empty Recycle Bin in Windows 10 to Free Up Space
The Recycle Bin serves as a safety net for your files, but when you're ready to get rid of something permanently, emptying the Recycle Bin is the way to go.
To empty the Recycle Bin, open it, select the items you want to delete, and then delete them. Alternatively, you can click on "Empty Recycle Bin" at the top of the window to delete all items at once.
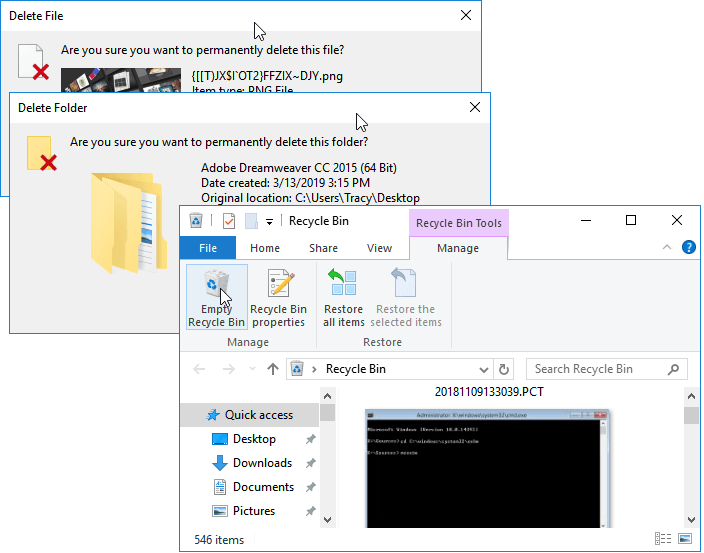
After confirming, the items in the Recycle Bin will be permanently deleted and cannot be restored. Be sure to double-check before proceeding, as emptying the Recycle Bin is a one-way process.
Recycle Bin Corrupted/Not Working, How to Fix
When managing the Recycle Bin, issues may arise, such as it being unable to empty or being emptied by mistake, or it crashing. If you encounter any of these problems, refer to this user manual for solutions.
Case 1. "Empty Recycle Bin" Is Greyed Out
Some users experience the issue where the "Empty Recycle Bin" option is greyed out or missing, even though the Recycle Bin contains files, which cannot be emptied.
The issue of being unable to empty the Recycle Bin may be due to not logging in with an administrator account, a corrupted Recycle Bin, or interference from a third-party program. To resolve this, you can close or uninstall the interfering software, perform a clean restart, or manually clear the $recycle.bin folder.
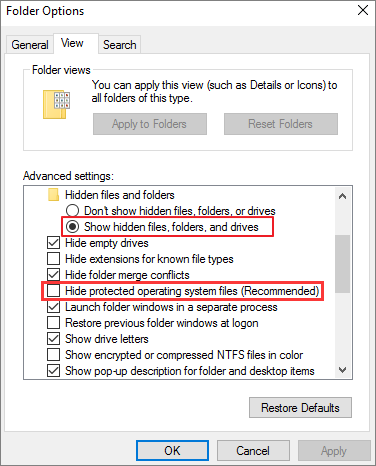
The $recycle.bin folder is a hidden system file that stores deleted files, and to view it, you need to show hidden files and folders in File Explorer, then uncheck the option to hide protected operating system files.
After setting up the recycle bin, you can find the $recycle.bin folder in the root directory of each volume, typically at C:\$RECYCLE.BIN or D:\$RECYCLE.BIN. From there, you can delete all files by highlighting them, pressing the Delete key, and confirming the deletion to permanently remove them from your hard drive.
Case 2. Windows 10 Recycle Bin Corrupted
The Recycle Bin can become corrupted, leading to issues with deleting or restoring files, which can be frustrating and time-consuming to resolve.
The Recycle Bin can become corrupted if you delete a large number of files at once or try to delete a protected file or folder. This can cause the bin to fill up and become damaged.
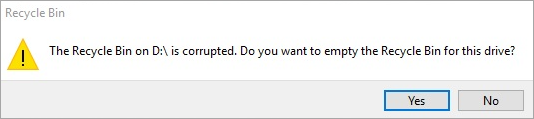
If your Recycle Bin is corrupted, you may see an error message when trying to delete files or folders, stating "The Recycle Bin is corrupted" or "Windows can't empty the Recycle Bin". as this issue can be resolved with full-around solutions, including two effective ways.
Method 1. Fix Corrupted Recycle Bin with Command Prompt
To fix a corrupted Recycle Bin, you can use the Command Prompt by typing the command "attrib -h -r -s C:\$Recycle.Bin" and then press Enter. This will remove the hidden, read-only, and system attributes from the Recycle Bin, allowing you to access and empty it normally. Alternatively, you can also try running a System File Checker scan to replace any corrupted system files, or use a third-party tool like Recycle Bin Repair to fix the issue.
rd /s /q C:\$Recycle.Bin
This will delete all of the files in the Recycle Bin, including any corrupt files. This should fix the problem and allow you to delete files or folders normally.
Method 2. Fix Recycle Bin Not Working Using Registry Editor
To fix a corrupted Recycle Bin, you can try using the Windows Registry Editor. Open the Registry Editor and navigate to HKEY_LOCAL_MACHINE\SOFTWARE\Microsoft\Windows\CurrentVersion\Explorer\RecycleBinFlags to make the necessary changes.
To fix the issue, find the "GlobalSettings" value at the key, change its value from 1 to 0, and this should reset the Recycle Bin and resolve the problem.
You can also try emptying the Recycle Bin manually to repair the corrupted Recycle Bin. For more information, you can check out our topic article on how to solve this problem.
Case 3. Mistakenly Empty Recycle Bin and Permanently Lost Data
Losing important files can be frustrating, especially when you've just emptied your recycle bin. Fortunately, there are ways to recover deleted files, giving you a second chance to retrieve what you need. You can try using data recovery software, which can scan your computer's hard drive for deleted files and restore them to their original location. Alternatively, you can also try using a file recovery service or seeking the help of a professional data recovery expert.
If you've accidentally deleted files and they're no longer in the Recycle Bin, You can try using recycle bin recovery software, the Windows Previous Versions feature, or the Windows backup and restore tool to recover them. If all else fails, consider contacting a data recovery specialist. With these methods, you should be able to get your deleted files back, even if the Recycle Bin has been emptied.
Read More
Read the in-To recover deleted files from the Recycle Bin in Windows 10, first, ensure that the Recycle Bin is enabled and not set to delete files permanently. Next, navigate to the Recycle Bin, right-click on the file you want to recover, and select "Restore" to move it back to its original location.
Tips for Making Good Use of Recycle Bin
To make the most of your Recycle Bin, regularly empty it to free up space on your computer and prevent accidental file recovery. You can also use it to undelete files by restoring them from the Recycle Bin. Additionally, consider setting up automatic backups to ensure your important data is safe.
- Enable deletion confirmation to avoid accidentally removing needed files.
- Expanding the capacity of the Recycle Bin allows it to store more temporarily deleted data, giving you more chances to recover lost files.
- The Recycle Bin saves temporarily deleted files for up to 30 days, but you can adjust the expiration date to store deleted data for longer periods.
- Regularly create full backups for your computer to minimize the risk of data loss.
Conclusion
The Recycle Bin in Windows 10 is a folder that stores all the files you have deleted from your computer. You can access the Recycle Bin by double-clicking on the icon on your desktop. You can empty the Recycle Bin at any time to remove all the files stored in it. However, restoring individual files from the Recycle Bin is easy to make if you need to.
If you accidentally delete a file from the Recycle Bin, You can use a secure Recycle Bin recovery software, Deep Data Recovery, to help you recover your files.
Related Articles
- (July 2022) Ultimate Guide to Mac Time Machine Backup
- Chrome History: How to View, Delete, and Recover
- USB Fixes: Troubleshoot/Repair Corrupted USB Erros in 2025 [Full Guide]
- SD Card Repair on Windows 10 and Android
- 5 Ways to Fix BSOD Error 0x00000133
If you're experiencing issues with the Blue Screen of Death, specifically Error 0x00000133 or DPC Watchdog Violation 0x00000133, this guide can help you fix the problem in Windows 10. Additionally, if you're looking to recover data, you can consider using Qiling. - MS SQL Error 4064/4062: Cannot Open User Default Database
If the MS SQL database is unavailable at the time of the connection, you may not be able to connect. Instead, you receive error message 4062 or error message 4064 - cannot open user default database. Here, reliable solutions are available. Follow the steps and fix the MS SQL database error manually or using Qiling MS SQL Recovery software.