Windows Photo Viewer Can't Display This Picture Windows 11/10/8/7
Windows Photo Viewer may display an error message when it can't show a picture, which can be due to various reasons such as insufficient system memory, large or incompatible image sizes, corrupted pictures, or outdated Windows Photo Viewer. This issue can be resolved by addressing these underlying causes, and we'll explore each possible reason and its fix in this post.
Method 1. Change Another Photo View to Open Pictures
If an application isn't working, try opening the image in a different photo viewer like Adobe Photoshop, MS Paint, Photos App, Raw Image viewer, Photo Retouch, etc. to see if the issue is with the app or the image.
If photos open in another application, the issue likely lies with the Photo Viewer. Try restarting your PC, and if that doesn't work, consider updating or reinstalling Photo Viewer to resolve the issue.
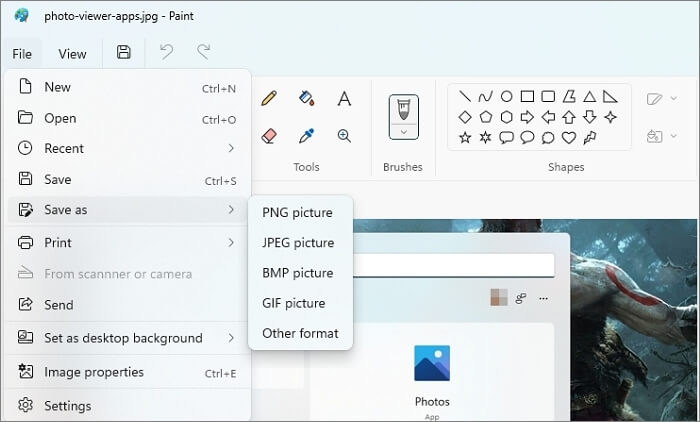
Method 2. Change File Format
Windows Photo Viewer typically supports common file formats like GIF, BMP, DIB, JPEG, TIFF, PNG, and WDP, but may struggle with others. If you're unable to open a photo using Windows Photo Viewer, it's likely because the file format isn't supported, so check the format of the photo file to see if that's the issue.
After converting the file, you can open another application and choose to save it as a new file in a format that will work with the photo viewer, or use online tools to achieve the same result.
To change a file's format, select the file, press F2 to rename it, and change the extension to a different image format like PNG, GIF, or BMP. Then try opening it to see if it works, as standard file formats often share similar headers.
Method 3. Check if the Pictures Are Corrupted
If a picture is corrupted or damaged, the Windows Photo viewer may not be able to display it. In such cases, you can repair the image using a file repair tool like Qiling, which can help restore the damaged photo.
Many professionals use Deep Data Recovery due to its advanced repairing features. This all-in-one data recovery tool can quickly recover damaged or corrupted photos, making it a highly recommended tool for professionals. Its advanced features and functionality make it a valuable resource for recovering lost data.
- Repair corrupt and damaged photos: The Deep Data Recovery tool can repair damaged or corrupted JPEG and JPG photos stored on a hard drive, memory card, or other storage device, providing a preview of repaired photos after a quick scan before recovery.
- Recover and repair damaged videos: Qiling file repair software can recover damaged or corrupted videos in MP4 and MOV format.
- Fix corrupted Microsoft Office documents: Qiling file repair tool enables users to quickly and effectively repair damaged Excel, Word, and PowerPoint documents, making it a useful tool for anyone who needs to recover corrupted files.
- Qiling data recovery software can repair damaged, corrupted, or inaccessible PDF files, recovering all objects within them.
To fix corrupted photos, download this file repair and recovery program for free and follow a simple three-step process.
Step 1. Launch Qiling data recovery software, select file types, and click "Next" to initiate the recovery process.

Step 2. Scan the hard drive for broken photos files.
Step 3. To find corrupted photos, select the "Pictures" option, which can contain images in various formats such as JPEG, JPG, PNG, BMP, and others. Alternatively, you can click "Search files or folders" in the top right corner to search for specific files.

Step 4. Double-click on a damaged picture to repair and preview the file. Then, click "Recover" to save the images to a different location.
Method 4. Check if the Pictures Have Been Deleted or Removed
If you accidentally delete your photos, you can recover them using the Qiling data recovery software.
We recommend this professional tool as a favorite due to its fast and safe recovery features. It efficiently restores lost files from various storage devices, including HDD, SSD, USB, and SD cards, which have been affected by accidental deletion, formatting or corruption, virus attacks, OS crashes, lost partitions, and other issues.
IMPORTANT: Qiling Data Recovery Wizard supports Windows 11 data recovery.
Step 1. Select file types and click "Next" to start
Launch Deep Data Recovery. Select file types and click "Next" to start the recovery process.
Step 2. Choose the location and start scanning
To recover deleted/lost pictures, hover over the SD card, camera, or hard drive partition where the pictures were deleted, then click "Scan" to start the recovery process.
Step 3. Select the pictures you want to recover
After the scanning process is complete, navigate to the "Pictures" section in the left panel. To locate lost photos, click on "Lost" at the top of the list. From there, you can browse through the lost photos by device, type, or date.
Step 4. Recover lost photos
After the preview, click "Recover" and choose another location to save the desired pictures.
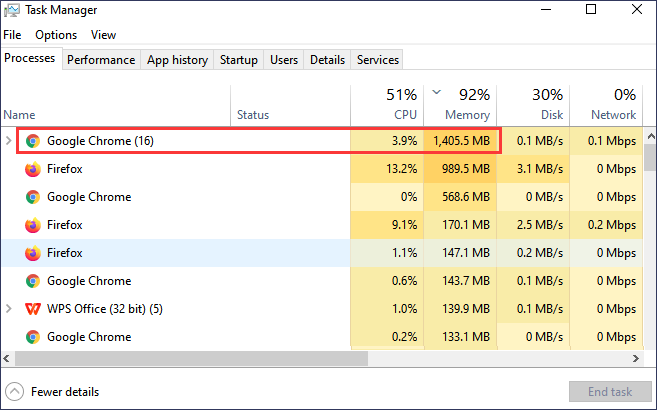
Method 5. Not Enough Memory Available
The "Windows Photo Viewer can't display this picture" error message can occur due to insufficient memory on your system. To resolve this, you can either reduce memory usage by closing unnecessary programs or upgrade your RAM to increase the available memory.
To ensure your PC runs smoothly with limited memory, consider upgrading to a higher memory capacity, ideally 32 GB, to future-proof your system. If you frequently work with images, invest in a high-speed RAM module to improve performance. This will help your PC handle demanding tasks efficiently.
In addition to closing unused tabs in browsers, you can also reduce memory usage by closing unwanted running applications that consume a lot of memory. This can be done by checking the RAM usage application from the Task Manager, which helps identify and close memory-hungry apps.
Method 6. Update Windows Photo Viewer
Due to bugs and outdated versions of Windows Photo Viewer, users may experience issues displaying photos. In such cases, updating the Windows Photo Viewer is recommended to resolve the problem.
To update Windows Photo Viewer, follow these steps: Go to Start > Settings > Update & Security > Windows Update, click on Check for updates, and install any available updates. This will ensure that your Windows Photo Viewer is updated to the latest version.
Step 1. To check for Windows updates, open the Windows Settings and navigate to the Windows Update section. From there, click on the "Check for Update" button and wait for the process to complete.
Step 2. If an update is available, check the list, and note if there is an update related to the Windows Photo Views.
Step 3. The update process will begin, install, and then automatically restart your computer, prompting you to click on the Restart button in a window that appears.
Once you're done, open an image using the Photo Viewer and verify that everything is displayed correctly.
Conclusion
If you're still following the post, you likely understand our shared methods. The reason behind Windows Photo Viewer not displaying a picture can vary, but trying the methods in this guide should resolve the issue. If your photos are corrupted or damaged, you may need to recover them using Deep Data Recovery.
All the methods mentioned are beneficial, so feel free to try them out. If you have any questions or queries, don't hesitate to ask us in the comment section and we'll be happy to help. Thanks!
Related Articles
- [Sovled] Lost or Missing Desktop Files After Windows 10 Update
- How to Recover Deleted Files/Folder from Desktop in Windows 11/10/8/7
- Fix Cannot Open JPG Files on Windows 10
- Full Recovery of Files And Folder Structure
- 4 Ways | How to Fix Word Runtime Error 91
A runtime error 91 is a common issue that occurs in Microsoft Office software, often with different error codes. This error typically happens when there is a problem with the code or data, causing the program to crash or malfunction. - Your PC Ran into a Problem and Needs to Restart in Windows 10/11
The blue screen error prompt 'Your PC ran into a problem and needs to restart' is a common error message. To resolve this issue, try one of the 11 standard fixes, which cover various problems that cause this error. If any important files are lost during the process, consider using deep data recovery software to retrieve them.