How to Recover Data from GPT Protective Partition
Quick Navigation:
- Protective MBR and GPT
- Recovering Data from GPT Partition
- Step-by-Step Guide to Recover Data from GPT Protective Partition
- Part 2. Recover Deleted Partition from Windows 7 - Restore the Deleted Partition with the Recovered Data
The GPT or GUID Partition Table is a standard design of partition tables of computer storage devices such as internal hard disks, external disks, and solid-state drives. They all use unique identification factors or globally unique identifiers (GUIDS).
The GPT is a component of the Unified Extensible Firmware Interface (UEFI) model. However, one also uses it in a few BIOS systems because of the several limitations posed by the Master Boot Record (MBR) partition tables. The MBR uses 32-bits for addressing logical block addressing (LBA) for the traditional 512-byte sectors.
Protective MBR and GPT
Like Master Boot Record, GPT utilizes logical block addressing (LBA) rather than the traditional Cylinder Head Sector (CHS) addressing. The protective Master Boot Record is in LBA 0 with the GPT header in LBA 1. The GPT header consists of a pointer to the partition table at LBA 2. According to the UEFI specifications, regardless of the sector size, there must be a minimum of 16,384 bytes for Partition Entry Array, and each entry consists of 128 bytes. Therefore, on a disk with 512-bytes, the 34 sector becomes the first usable sector.
To ensure backward compatibility, reserving space for the legacy MBR in GPT specification is still in practice. However, utilizing is such that it prevents MBR disk utilities from misrecognizing and overwriting GPT disks. Such a step refers to as protective MBR. Operating systems that fail to read GPT disks will identify the drive as unknown partition type and no space. Due to this, there is a reduction in accidental erasures. Likewise, if an OS is capable of reading GPT disks, it possesses the ability to check for protective MBR. If the disk is not EEh type or contains multiple partitions, then the OS refuses to manipulate the partition table.
Recovering Data from GPT Partition
GPT partition recovery is only possible if the operating system allows access to the partition and recognizes it as a part of the hard drive. However, with a few advanced hard drive recovery tools, it is possible to gain access to the protective partition and recover data present in the same. One of the must-have tools for users to recover data from a GPT partition is Deep Data Recovery software.
The reason Deep Data Recovery tool stands out from the rest of the recovery programs is because of its robust algorithm that restores the GPT table with ease. With the guidance offered by the program, GPT recovery is no longer a tedious process. The software is highly efficient and possesses the ability to recover data from damaged partition. The mechanism of the scan is such that it goes through sector-by-sector of the selected hard drive or a partition of the storage system and displays the recoverable files according to their file types. It, thus, makes things easy for a user to scan and retrieve the needed data using a few simple clicks.
The best hard drive recovery software that helps to recover data from GPT partition has several outstanding features. These make the program an efficient and perfect addition to recovering data.
Your Safe & Effective GPT Partition Recovery Software
- Get files back from unrecognizable drives (RAW), storage partition recovery after formatting action, or recover deleted partition in Windows 10, 8, 7, XP, Vista and Windows server.
- Restore deleted files from recycle bin, files lost due to clicking of the empty item, and recovery of records lost due to pressing "shift + delete" button.
- The undelete or unformat partition tool can also retrieve data lost due to other reasons such as the partition of a hard disk or hidden partitions, wrong operation, virus attack, software crash, operating system reinstallation, and other unknown reasons.
The specialty of the recovery tool is its ability to identify several file types from different categories such as computers, memory cards, digital cameras, external hard drives, USBs, and other drives.
Step-by-Step Guide to Recover Data from GPT Protective Partition
To GPT partition recovery, please installing Deep Data Recovery software is essential. It is the first pre-requisite. The software is available for the free trial, and users can download it from the official website. Following on the instructions will complete the setup with ease. The following guide helps one to recover the GPT partition table with a few simple clicks:
Step 1: Clicking the icon of the software launches the GPT recovery program. The primary screen displays the file types that the utility can recover with ease. As a default, the program selects all the types automatically. However, according to requirement, users can choose only the needed file type or types and click the "Next" button.

Step 2: The next window shows the partitions of the hard drive. It even shows partitions of any external storage drives connected to the computer. Now, the user should select the GPT partition to recover the data from the same. The window shows the partition along with the partition type. After making the selection, clicking the "Scan" button at the top activates the scanning of the partition.

Step 3: After completing the scan, iDiskhome recovery tool displays the recoverable data from the selected partition. It shows the files types in a tree directory to the left side of the screen. The center portion consists of the data or the files recoverable from each folder contained in the tree directory. The right side is the place to view the thumbnail of the selected data from the center pane. Users can begin marking the needed files against the checkbox and press the "Recover" button to restore the GPT partition table. The time taken to restore depends on the files selected and the total size. It is advisable to choose an external path other than the hard drive to ensure the security and safety of the retrieved data. The GPT partition recovery also provides a Deep Scan mode, which is helpful for those who think there is more data left in the selected drive. Choosing this will increase the scan time but helps in retrieving more files from GPT partition than the regular scan. It is preferable to use when the drive contains crucial information or files.

Using the simple steps as portrayed above, anyone can recover deleted partition Windows 7 with ease.
Part 2. Recover Deleted Partition from Windows 7 - Restore the Deleted Partition with the Recovered Data
It is vital to create several partitions on Windows 7 hard disk to install the operating system and organize other data. If there is only one partition to save OS and data, then it becomes difficult to retrieve when the drive malfunctions or corrupts. It is possible to create a partition and restore the data without relying on third-party software. You can recover the deleted partition in Windows 7 with the recovered data from Part 1. The following are the recover deleted partition in Windows 7 steps:
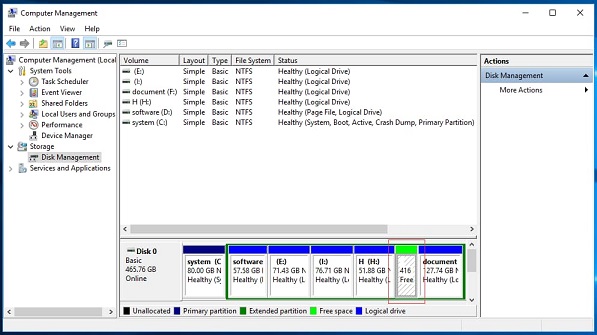
1. Opening the Disk Management on Windows 7 computer will reveal all the partitions of the hard disk. Type "Computer Management" in the search bar to enter the disk management window.
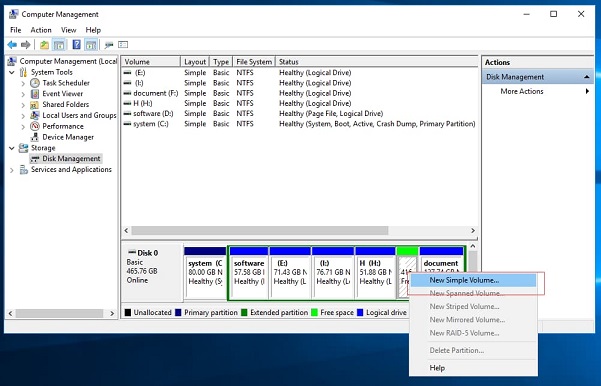
2. From the available partitions, choose one that labeled "Free space". Right-click on the partition and click the "New Simple Volume" option. A new Simple Volume Wizard opens up in the next step. Here, an individual can input the size of the new volume and choose whether to format the drive in NTFS or FAT32 format. After selecting the options, pressing the next button allows the user to assign a drive letter to the new partition. One can also provide a name to the unallocated space. After giving every detail, clicking the next button begins the process of creating the new drive with the assigned parameters and allocated volume. Once the formatting is complete, the newly formed partition is visible in the Disk Management window with the new name, format type, and available space.
3. Once the newly formed partition is ready, it is time to restore the recovered data from the lost partition in Windows 7 with ease. As the data is available, copying it to the new partition will complete the action of restoring the lost data hassle-free.
All the recoverable files will now be restored to their designated folders (from where they were deleted) – once the process completes, you can preview and access the recovered files immediately. Download the software to have a try now!!!
Related Articles
- 5 Ways to Recover Deleted Files in Windows 10
- How to Recover Data from Dell Laptop Hard Drive
- How to Recover Data from Damaged Hard Drive
- What Is Windows 10 Kiosk Mode and How to Set Up It?
Windows 10 Kiosk mode is the best choice to make the computer's processing smooth. Do you know what Windows 10 Kiosk is and how to enable and disable it? Read this article and find the answers. - Windows 11 22H2 Slows Down Copying of Files
The latest version of Windows has been found to slow down copying files from a hard drive. If you are experiencing this issue, read on for the solution. - Windows 11 Size: How Much Space Does Windows 11 Take Up?
What are the Windows 11 system requirements? How much space does Windows 11 take up on your disk? This article gives you all the answers. Besides, you are going to learn the way to free up Windows 11 disk space and recover lost/deleted files in Windows 11. Read on to get more information about Windows 11 size.