How to Unlock SD Card Without Switch [6 Methods]
If you have a tablet or smartphone, it's likely you have memory cards, but an inserted SD card can sometimes give an error indication by getting locked. The lock on an SD card is usually a switch on its left side that's used for writing protection, and turning it on by sliding it down will prevent any changes from being made to the card.
When the SD card is locked, you can't delete or modify the data stored on the memory card. This means you can only view the files and other actions are restricted. This is a great feature, but it might be a concern if you're not experienced enough to unlock the SD card.
The SD card can get locked due to various reasons, including the lock switch, but also other unfamiliar causes. Some of the more precise reasons for the SD card to be locked include.
- 💾Physical impairments on the SD card.
- 🔻The SD card switch might become triggered because of friction.
- 🔍To resolve the issue, go to the camera's menu and select the option to disable write protection on the SD card. Alternatively, you can use an Android app to remove write protection from the SD card.
- 🗂️The file/folder access permission has changed or set to read-only.
If your SD card doesn't have a physical switch to lock and unlock it, you can still unlock it by using a computer or a card reader. To do this, insert the SD card into a card reader or a computer's SD card slot. The computer will recognize the SD card and allow you to access and edit its contents.
How to Unlock SD Card Without Switch on PC
If you need to modify the contents on a locked SD card, you'll need to unlock it to gain complete read and write access. Many users struggle with unlocking an SD card without a switch on a PC, but there are alternative methods available. This article will guide you through six ways to unlock an SD card without a switch on your PC.
- Method 1. Unlock an SD Card Physically
- Method 2. Unlock SD Card Without Switch Through DiskPart
- Method 3. Remove Write Protection in Registry Editor
- Method 4. Unlock SD Card in Windows Using CMD
Method 1. Unlock SD Card Without Switch Through DiskPart
To unlock an SD card without a switch, you can use DiskPart instead. If your SD card doesn't contain a switch or you don't have instant physical access to it, follow these steps:
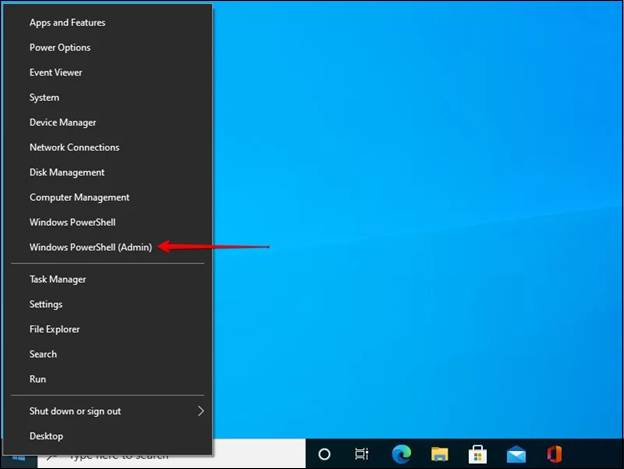
Step 1. To open Windows PowerShell as Administrator, right-click on the Start button and select Windows PowerShell (Admin). If prompted by User Account Control (UAC), choose Yes to proceed.
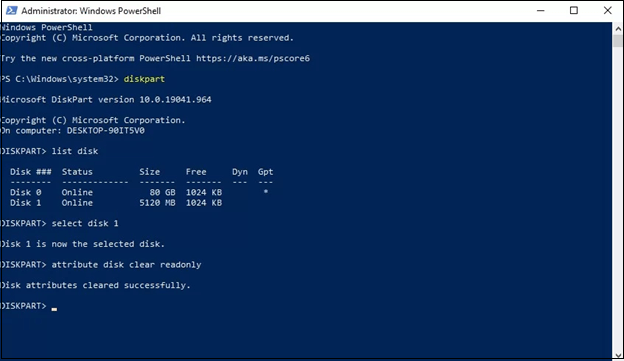
Step 2. Type diskpart here, and hit the Enter button.
Step 3. Now, hit the Enter button after typing list disk.
Step 4. Type select disk # (replace # with the disk number of your SD card) and press Enter.
Step 5. After typing attribute disk clear read-only, hit the Enter button. This command will remove the read-only attribute from the card, making it editable again.
If you know someone who's struggling with this issue, consider sharing this post on your social media to help them out!
Method 2. Remove Write Protection in Registry Editor
To remove write protection from an SD card in Windows, you can use the Registry Editor, but be cautious as this technique can cause issues. To do this, follow these steps: Alternatively, you can also use the built-in Windows feature to remove write protection, which is a safer option. However, if you need to use the Registry Editor, make sure to follow the steps carefully to avoid any problems.
Step 1. Connect your SD or micro card to the Windows PC.
Step 2. Hit the Windows + R to launch the Run window.
Step 3. To access the Registry Editor, type `regedit` in the Run dialog box and press the Enter button. This will open the Registry Editor, which is a powerful tool that allows you to view and edit the Windows Registry.
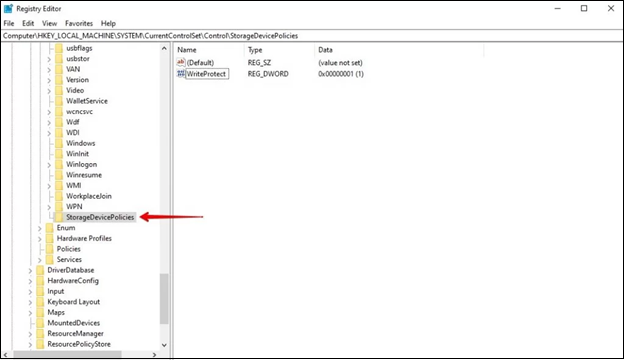
Step 4. To maximize the folder in the left panel, follow the path:
| HKEY_LOCAL_MACHINE\SYSTEM\CurrentControlSet\Control\StorageDevicePolicies |
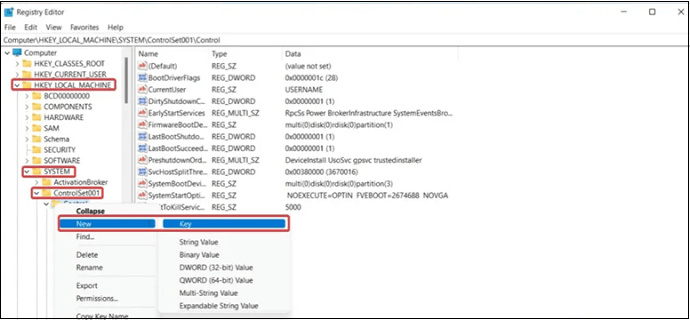
If there's no StorageDevicePolicies folder, you need to right-click the Control folder and create a new key named StorageDevicePolicies.
Step 5. To create a fresh WriteProtect value in the StorageDevicePolicies folder, right-click on it and select "New" followed by "DWORD (32-bit) value", then name it "WriteProtect".
Step 6. To disable Write Protect on a Windows system, double-click on the WriteProtect key, set its value data to 0, and click OK. This will allow you to make changes to the system.
Step 7. Exit Registry Editor, and re-link the SD card.
Removing write protection in the Registry Editor is a hassle-free process. You can share this information with your friends on social media!
Method 3. Unlock SD Card in Windows Using CMD
If your SD card is write-protected without a physical switch, you can easily unlock it using the Command Prompt (CMD) on Windows. CMD is a native application that allows you to access and retrieve data from external and local disks, including SD cards. By using CMD, you can bypass the write protection and access your SD card's data.
To unlock the SD card in Windows using CMD, first open the Command Prompt as an administrator, then use DiskPart commands to clear the read-only attribute from the SD card.
Step 1. Link the SD card to PC, and ensure it's recognizable.
Step 2. To open the Command Prompt as an administrator, press the Windows key + X on your keyboard, and select "Windows PowerShell (Admin)" from the menu.
Step 3. To perform the commands, simply type them in and press "Enter" after each one. You can start by typing the command line and then pressing "Enter" to execute it. Just remember to press "Enter" after typing each command to perform it.
- diskpart
- list disk
- select disk #
- attributes disk clear readonly

To fix the issue of not being able to type in the Command Prompt on Windows, try the following steps: 1) Check if Num Lock is enabled, as it can interfere with typing in the Command Prompt. 2) Ensure the Command Prompt window is not maximized, as this can cause issues with typing.
The error "Can't type in the Command Prompt" typically occurs when there's an issue with the keyboard or the Command Prompt itself, preventing users from typing commands. This can be due to a faulty keyboard, a problem with the Command Prompt's input focus, or a software glitch. To resolve this issue, users can try restarting their computer, checking their keyboard for any physical issues, or running the Command Prompt as an administrator to see if it resolves the problem. If the issue persists, further troubleshooting steps may be necessary, such as checking for any software conflicts or updating the Command Prompt to the latest version.

You may exit the command prompt when it shows "Disk attributes removed successfully." Now, verify that the instructions for unlocking a write-protected SD card above were successful.
How to Unlock SD Card Without Switch on Mac
To unlock an SD card on a MacBook, you can use the built-in Disk Utility tool. First, insert the SD card into your MacBook's SD card reader. Next, open the Disk Utility app, select the SD card from the sidebar, and click the "Erase" button. Then, select the "Quick Erase" option and click "Erase" again.
Step 1. To resolve the issue, connect your SD card to your MacBook, and verify that no files have "Read-only" permissions. If a file has write protection, it may prevent the entire disk from being written to, so you'll need to change its permission to "Read & Write".
Step 2. To launch the disk utility, navigate to the Spotlight symbol, enter "disk utility" in the search bar, and double-click on the resulting app from the list.
Step 3. To repair a corrupted SD card, launch the Disk Utility window and select the SD card name. Click on the "First Aid" tab at the top of the window, and follow the instructions to resolve the errors. This process will attempt to fix any issues with the SD card, but be sure to follow the prompts carefully.

How to Unlock Micro SD Card on a Phone
If you need to unlock a micro SD card without turning on your phone, you can try using a password to access it. To do this, follow these steps:
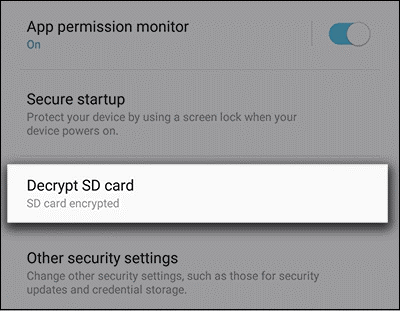
Step 1. To decrypt an SD card, go to Settings, then Lock screen and security, and finally select Decrypt SD card.
Step 2. You can enter your password, pattern, or PIN, and then wait for a few minutes for the decryption process to complete.
Unlock an SD Card and Recover Lost Data
If you can't unlock your SD card, you can try formatting it, which will erase all data, but you can use software like Deep Data Recovery to recover lost data.
Qiling is a powerful format PC recovery platform that can retrieve lost data from various scenarios, including deleting, formatting, unbootable or crashed systems, and partitions lost. Its highlighted features include the ability to recover lost data, making it a reliable solution for users who have experienced system crashes or data loss.
- Retrieve data from RAW drive and Bitlocker encoded drive.
- Retrieve deleted files, audio files, videos, photos, emails, etc.
- Support exFAT, NTFS, FAT32, and several other formatted drives.
- To recover deleted documents, you can use software specifically designed for SSD, HDD, SD cards, and flash drives. These tools can scan the storage devices and retrieve deleted files, even if they've been permanently deleted or formatted.
- Fully compatible with Windows Server, Windows 11/10/8.1/7, and more.
- Support 1000+ file types and 2000+ storage devices.
Download this professional data recovery tool now!
Step 1. Select the SD card to scan
- Download and install Deep Data Recovery on your Windows PC.
- To properly connect your SanDisk/Lexar/Transcend SD card to your computer, you should first insert the SD card into your computer's SD card reader or a USB adapter. If your computer doesn't have an SD card reader, you can use a USB adapter that converts the SD card into a USB drive. Once the SD card is inserted, you can access it as a removable drive on your computer, allowing you to transfer files between the SD card and your computer.
- To recover data from your SD card, open Qiling SD card recovery software and select SD Card Recovery on the left panel. All connected drives will be displayed, so choose your SD card and click "Scan for lost data" to begin the recovery process.

Step 2. Check for scan results
- Wait for the scanning process to complete.
- To show only specific file types in the File Explorer, follow these steps: Open File Explorer, click on the "View" tab, and then click on the "Options" button. In the Folder Options window, click on the "View" tab, and then select the file types you want to show or hide.
- Click "Preview" to check if they are the wanted files.

Step 3. Recover SD card data
- Preview the recovered files and click "Recover".
- You can choose a different location to save the recovered files instead of the original SD card. This helps prevent overwriting the original data on the SD card.

Summary
You might need to access an SD card occasionally to update its contents, even if it's been encrypted to prevent malicious access or accidental deletion. If you need to unlock the card, there are six methods you can try. Alternatively, you can use Deep Data Recovery to restore data from the inaccessible SD card.
How to Unlock SD Card Without Switch FAQs
Go through the below-mentioned FAQs to unlock the SD card without the switch:
1. How do I manually unlock my SD card?
The SD card has a Lock button on its left corner, which should be in the Up position (unlock) to ensure access to its contents. If the card has been encrypted, its information cannot be altered or deleted.
2. How do I unlock my microSD card password?
Go through the steps below:
- Link the locked memory card to your Windows PC through a card reader.
- To open the Run dialogue box, press the Windows key + R on your keyboard. This will open a small window where you can type the name of a program or file you want to run, and press Enter to execute it.
- To launch the Command Prompt (CMD) window, press the Windows key + R to open the Run dialog box, type "cmd" in the text box, and then click the "OK" button. Alternatively, you can type "cmd" in the Windows search bar and click on the "Command Prompt" result to open the CMD window.
- Type Diskpart, and hit the Enter button.
3. How do you fix a locked SD card?
To unlock an SD card, you need to locate the small toggle on its side and press the button up towards the edge of the SD card. This simple action will allow you to access the card's contents.
4. Why does my SD card say it's locked when it's not?
The issue is likely caused by the camera sensor switch, even if the SD card is not secured, as the camera will still display a message saying it is. The camera sensor switch is the source of the problem. The camera will still display a message saying it is secured, even if the SD card is not.
Related Articles
- How to Rebuild RAID Without Losing Data [for RAID 0/1/5]
Can I rebuild RAID without losing data? You can follow our organized tips to avoid data loss during the RAID rebuild. Don't forget to recover data from RAID with Qiling Data Recovery Software before starting to rebuild the RAID. - How to Fix C Drive is Full Easily (6 Ways)
This article describes the reasons for the “C drive is full” problem and 6 ways to fix it. The stepwise tutorial will be included as well. Please read on. - How to Change Partition Type ID Easily? (2 Ways Included)
This tutorial demonstrates how to change partition type ID in two efficient solutions and tells basic information about partition type ID. - Solved: Cobian Backup "The Engine Is Not Found" Error
This article provides you with solutions to the Cobian Backup “the engine is not found” error as well as a Cobian Backup alternative. - How to Run Windows 10 From SD Card?|Step-by-Step Guide
If you want to run Windows 10 or 11 from SD card on a notebook or tablet computer, you can first use Qiling Disk Master software to move Windows 10 or 11 onto SD card, and then boot from it successfully. - How to Transfer Windows 10 to a USB Flash Drive?
If you want to transfer Windows 10 to USB and make it bootable, you can use the Windows 10 built-in function Windows To Go or via third-party software – Qiling Disk Master Professional.