Upgrade Hard Disk to Fix 100% Disk Usage Error in Windows 10 & More Tips
A common issue with Windows 10 is the 100% disk usage error in Task Manager. This can be caused by various factors, including malware infections, disk errors, and resource-intensive programs. Other common causes include outdated drivers, corrupt system files, and excessive disk usage by background applications. Additionally, issues with the disk controller, disk fragmentation, and overheating can also lead to 100% disk usage.
1. ill service from Superfetch and Prefetch
Windows 10's Superfetch and Prefetch services aim to boost performance by predicting and preloading applications into memory, but this can also cause high disk usage.
2. Viruses and malware
Viruses and malware are unwanted and often malicious programs that can cause problems on your computer. They can consume excessive resources, leading to slow performance and even crashes, especially if your system is running low on space.
3. The common combination of programs like Skype and Google Chrome
A common cause of 100% disk usage in Windows 10 is when multiple resource-intensive programs, such as Skype and Google Chrome, are run together.
4. Hardware issue
Corrupted files on your computer's hard drive can cause it to enter a loop, resulting in high disk usage.
Your computer's hard drive may be too outdated, causing slow performance despite having ample free space.
How to Fix 100% disk usage on Windows 10 computer?
You need to confirm the high disk usage error by pressing CTRL+ALT+DEL and selecting task manager. In the processes tab, you'll find the highlighted disk volume with red. To fix the issue, try one of the following solutions.
1. Eliminate viruses and malware
Use antivirus software to scan the virus-infected files and clear them off.
2. Disable Superfetch service
To disable Superfetch in Windows 10, type services.msc in the search box, find Superfetch, right-click on it, and go to Properties, then change the Startup Type to Disabled and click OK to save the settings.
3. Disable Prefetch
To disable prefetcher in Windows 10, type "regedit" in the search box, then navigate to HKEY_LOCAL_MACHINE\SYSTEM\CurrentControlSet\Control\Session Manager\Memory Management\PerfetchParameters, and change the Value data of EnablePrefetcher to 0 in the DWORD window.
4. Replace hard drive
To determine if a hard drive failure is the cause of the error, check if the drive is making a loud clicking sound or if it's an older model with limited capacity. If so, consider upgrading the hard disk as soon as possible.
Use Qiling Windows backup software to upgrade your hard disk to a bigger one or a new one without reinstalling Windows 10 and applications, making it a fast and convenient way to replace a failing hard drive and solve 100% disk usage errors in your Windows 10 computer.
Steps to upgrade hard disk with Qiling Backup:
Step 1. Click on the "Tools and utilities" page on the main page, where you can find the clone and other utility options.

Step 2. Choose the source disk or partition, click "Next".
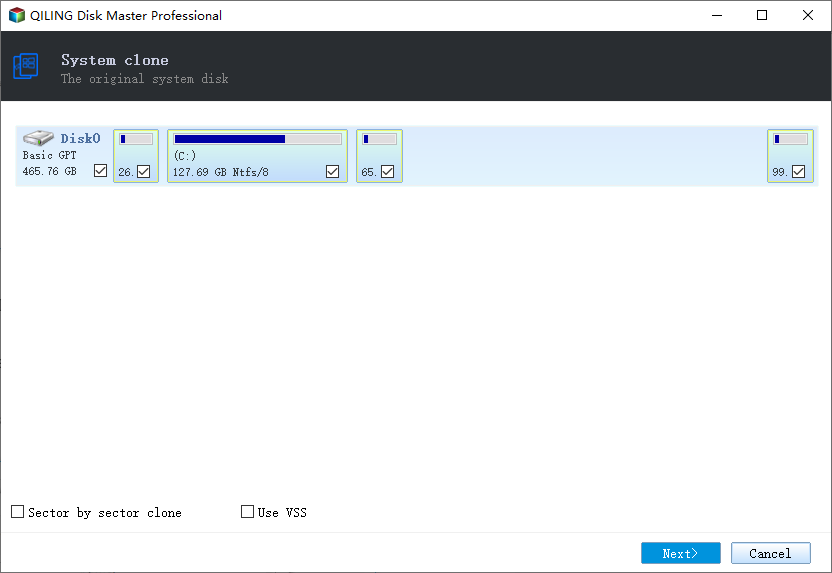
Step 3. To migrate the operating system to a new disk, you need to select the source disk, which contains the operating system, and choose a target disk that is larger than the source disk or partition. This ensures that the new disk has enough space to hold the operating system and its data.

Step 4. A warning window will pop up, stating that cloning will permanently erase all data on the target disk/partition. To proceed with the clone, click the "Proceed" button.

Related Articles
- Use CHKDSK to Fix the Selected Volume Corruption Problem in Windows 10
- How to Factory Reset Samsung Phone[Galaxy S8/9/10/20/21/22]
- How to Fix Windows 10 Upgrade Error Code 0xc0000017
- Fix Dropbox Not Syncing Error in Windows 10 [2022]
- How to Fix Zsh: Command Not Found: Python [with Video]
The zsh: command not found: python issue has been addressed in this article, with the top four solutions discussed. If data is lost while resolving this problem, Deep Data Recovery for Mac can recover the lost data. - How to Use CMD Delete File/Folder [Windows 11 Applicable]
To delete files and folders using Windows cmd, you'll need to use two command lines: del and rmdir. The del command is used to delete files, while the rmdir command is used to delete folders.