How to Fix Zsh: Command Not Found: Python [with Video]
With the removal of Python 2's system installation from Apple's macOS with the release of Big Sur, users are experiencing more frequent zsh command errors, such as "zsh: command not found: pip" and "zsh: command not found: python vscode", due to the lack of a system-wide Python installation.
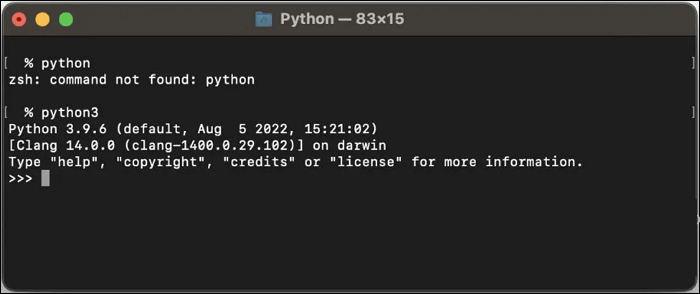
When running the Python command, you may encounter the error "zsh: command not found: python" on your Terminal or other servers. This issue can arise when Python is not installed or its executable file is not in your system's PATH. To resolve this, you can install Python, add its executable path to your system's PATH, or use a Python virtual environment.
Some users who relied on the system-provided Python 2 installation for their Python development environment were impacted when Apple deleted it, leading to issues like "zsh: command not found" when trying to execute the Python command.
To resolve the "zsh: command not found: python" issue on Mac, check the quick navigation first. If you have already installed Python, the issue might be due to the shell not being able to find the Python executable.
| Workable Solutions | Step-by-step Troubleshooting |
|---|---|
| Fix 1. Ensure Python3 installed | Installing a more recent version of Python, such as Python 3, or using a version manager...Full steps |
| Fix 2. Use Python3 command | When Apple deleted the system-provided Python 2 installation, it impacted users...Full steps |
| Fix 3. Update the PATH | This error may appear if Python is not installed on your system or the Python executable...Full steps |
| Fix 4. Restart the Terminal | A configuration reset can be used to restart Mac Terminal. The steps to factory reset...Full steps |
How to Fix Zsh Command Not Found: Python
To resolve the "zsh: command not found: python" error on macOS, you can try resetting the shell, checking the Python installation path, updating the shell configuration, or reinstalling Python.
- Fix 1. Make Sure Python3 Is Installed
- Fix 2. Use the Python3 Command Instead of Python
- Fix 3. Update the PATH
- Fix 4. Reset or Restart the Terminal
Before you are going to fix the zsh: command not found: python on Mac, watch this video first. It provides you with a more quick and detailed solution.
- 00: 00 - Introduction
- 01: 26 - Enter "python" in the command line
- 02: 10 - Check the Python version in Finder
- 02: 38 - Enter python3 instead of python
Fix 1. Make Sure Python3 Is Installed
If you've updated your Mac to Monterey 12.3, you may find that your zsh can't locate the Python command, and if you had Python 2 installed, you'll discover it's missing due to Apple removing the pre-installed Python 2 installation.
Installing a more recent version of Python, such as Python 3, or using a version manager like Homebrew or pyenv to manage your Python installations, will fix this problem. You can install various Python versions and switch between them using these tools. To get around this, you can follow the below steps to use pyenv to install Python 3.9.6 or any other specific version you need.
Step 1. To manage Python versions, install pyenv using brew by running the command "brew install pyenv".
Step 2. You can view every installable version with the "pyenv install --list" command.
Step 3. Then, "Pyenv install 3.9.6" will install.
Step 4. Enter "Pyenv versions" returns a list of installed versions.
Step 5. "Pyenv global 3.9.6" sets the default Python version globally.
Step 6. To fix the issue, add "eval "$(pyenv init --path)" to your "/.zprofile" or "/.bash_profile" file. This will initialize the pyenv environment and allow you to use it in your terminal.
Step 7. Run the command "$ source ~/.zprofile" to verify that Python still runs after reopening the shell.
If the "zsh: command not found: brew" error appears, it's likely because either Brew isn't installed or the current installation is defective or damaged. To resolve this, you should use the command: brew.
Fix 2. Use the Python3 Command Instead of Python
When Apple deleted the system-The Python 2 installation on a system caused issues for users who relied on it for their Python programming environment, leading to a "zsh: command not found: python" error when trying to execute the python command.
To fix the "zsh: command not found: python" problem, simply type "python3" instead of "python" in the command line. This should resolve the issue.
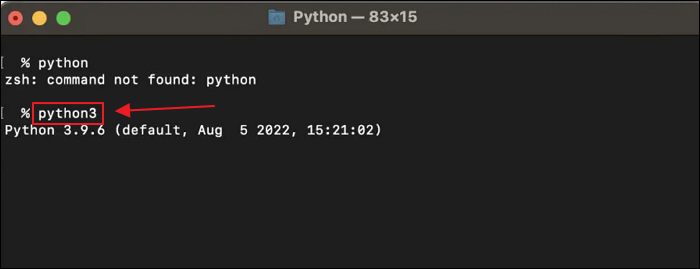
To ensure the version of Python on Mac is correct, you need to enter the specific command (python2 or python3) when running Zsh, as the default command 'python' may refer to either version.
Fix 3. Update the PATH
The error may occur if Python is not installed on your system or the Python executable is not in your shell's PATH.
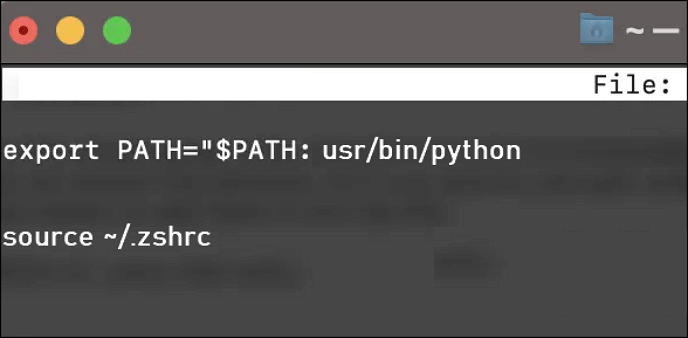
You can include Python's executable in the PATH if it is installed but not currently there. You can accomplish this by including the subsequent line in your shell profile file (for instance, /.zshrc):
export PATH="$PATH:/usr/bin/python"
You can reload the profile file by running the command `source ~/.bashrc` or `source ~/.
source ~/.zshrc
Now, entering the command python should successfully begin the Python interpreter. If you encounter any issues, you may need to install Python or check your system's PATH environment variable.
Fix 4. Reset or Restart the Terminal
To factory reset a Mac Terminal, you can use a configuration reset to restart it. This process involves following a series of steps.
Step 1. Launch the Terminal program on your macOS device.
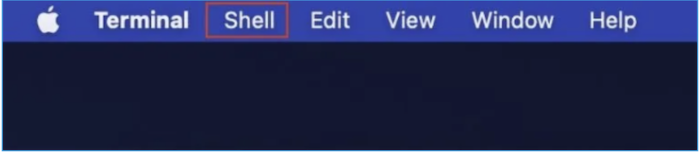
Step 2. Select the shell option by tapping on it in the menu bar.
Step 3. To reset your Mac, select "Reset" from the menu, or press Option + Command + R on your Mac keyboard.
You can reset the Terminal State by doing the aforementioned procedures. However, no divergence will be visible on the Terminal screen.
If one of the methods helps resolve the Zsh issue, consider sharing it on social media platforms like Facebook, Twitter, Instagram, and others to help others who may be experiencing the same problem. This can be a great way to spread the helpful solution and make a positive impact on the online community.
Extra-Tip: Recover Deleted Data and Applications on Mac
The "zsh: command not found: python" error occurs more commonly on macOS, particularly after macOS 12 Monterey, especially with 12.3. This is likely due to Mac users deleting the local Python support.
The zsh: command not found: python error on Mac can lead to data loss due to website issues, but don't worry, it's an easy fix with the help of Deep Data Recovery for Mac.
Your Mac system is more vulnerable to data loss when authorization issues, such as refused Zsh access, affect files directly. However, with Deep Data Recovery for Mac, you can recover deleted or lost data, including applications, and retrieve permanently deleted files on your Mac.
- 🗑️Deep Data Recovery for Mac can quickly recover deleted files and data from formatted storage devices, including the Trash.
- 🦠It supports recovery of macOS and Windows system data for sudden deletion, formatting, hard drive corruption, virus attack, etc.
- 📄It can recover and restore over 1000 file types and formats, including JPG, RAW, ART, XLTX, DOC, APE, M4A, etc.
Download Deep Data Recovery for Mac, a powerful tool that allows you to recover data on your Mac in just three steps. With this software, you can easily retrieve lost files, photos, and other important data that you thought were gone forever.
Step 1. Select the drive to be scanned
In the main Deep Data Recovery window, select the drive you need to recover lost/deleted files from and click the "Search for lost files" button.
Note: Before attempting data recovery, it's a good idea to click "Disk Backup" from the left sidebar to create a backup of your Mac, which will prevent further data loss. Once the backup is created, the software can recover data from the Mac backup, allowing you to write new data to your computer again.

Step 2. Select your lost data/files
Deep Data Recovery for Mac scans the selected disk volume and displays the results on the left pane, allowing users to sort and find specific files.

Step 3. Recover lost/deleted data
Once you have located the desired files, preview them, and then click "Recover" to initiate the recovery of your deleted or lost Mac files.

How to Add Python to Zsh
To add Python to Zsh, open Terminal on Mac and execute the following commands: `echo 'export PATH=$PATH:/usr/bin/python' >> ~/.zshrc` followed by `source ~/.zshrc`. This will configure the path to include Python, allowing the Python command to be launched when entered.
echo "alias python=/usr/bin/python3" >> ~/.zshrc
To set up your zsh profile to launch /usr/bin/python3 whenever Python is used, ensure that python=$, where the $ sign should equal the path python is installed on, is checked. This will resolve any issues you're experiencing.
You can use bash to install Node.js, install dependencies, and run a script.
echo "alias python=/usr/bin/python3" >> ~/.bashrc
A failed Python installation on your PATH can cause problems. When you try to run Python, it will try to launch the corrupted executable and stop looking for further corrupt files. To quickly fix this, you can simply place your new Python directory before the old Python directory in your PATH. This will allow you to run the correct version of Python.

The Bottom Line
Due to Python 2's end-With the removal of Python 2 installation from macOS 11 Big Sur, it's clear that Apple no longer considers Python 2 a secure or reliable version of the language, and it's also no longer actively supported by the Python development community. This means that the issue of the "zsh: command not found: python" error is becoming more prevalent.
The Terminal is a useful tool on Mac, but using it incorrectly can lead to horrible data loss. Fortunately, Deep Data Recovery for Mac can help. If you're experiencing issues with the Terminal, there are 4 ways to solve the error, but using this recovery software can provide an added layer of protection and assistance.
Zsh Command Not Found: Python FAQs
The "zsh: command not found: python" issue occurs when the zsh shell can't locate the Python executable in the system's PATH. This can be due to a missing Python installation, a corrupted PATH environment variable, or a conflict with another shell configuration. To resolve this issue, you can try reinstalling Python, updating the PATH variable, or using the `which` command to find the correct Python executable path.
1. How do I fix commands not found in Python?
To proceed, select the "Path" option. Python requires a path variable, which can be added by choosing "Path" from the menu, clicking "Edit", and then clicking "New" on the new screen that appears.
2. How do I run Python on the Mac terminal?
To check the Python version on a Mac computer, simply launch Launchpad, find Terminal, and input "Python" into the terminal. This will output the current Python version for you.
3. How to fix the error - zsh command not found?
You can attempt the solutions listed below to resolve the zsh problem. You can click the linked page on how to resolve Zsh: command not found to read more.
- Configure Environment $Path
- Install the package
- Reinstall the macOS
- Check the.zshrc file's Syntax Set Path.
4. How to delete files on Macbook with Terminal?
Step 1. To open Terminal on your Mac, select Utilities in the Finder window, then enter Terminal.
Step 2. In the Terminal window, enter "rm" followed by a space, then drag a file into the Terminal to delete it.
Step 3. Press Enter to erase the file permanently.
Related Articles
- Fix Deleting Files Does Not Free Up Space Error in Windows 10/8/7
- [Problem Solved] How to Install Mods in Sims 4 in 2024
- How to Fix An Error Occurred While Installing the Selected Updates
- Bypass "Administrator Blocked You From Running This App" in Windows 10 [Full Information]
Looking for ways to fix the error message - How to Get Live Wallpapers on Windows 10 [Full Guide]
Your PC's desktop does not have to stay bland and static. You can get live wallpapers on your Windows 10 computer with the methods outlined in this quick and easy guide. - How to Make A Minecraft Server with Detailed Guides in 2023
Do you want to host your Minecraft Server? Do you only want to play with your closed group? Then follow this easy guide to learn how to make a Minecraft server.