How to Make A Minecraft Server with Detailed Guides in 2023
Creating a Minecraft server allows you to play with your squad online while keeping out outsiders, making it a great option for parents concerned about their child's gaming safety. By setting up a separate server, you can control who plays with you, keeping your little one safe from strangers. While it requires some hardware and incurs a cost, it's worth it. Alternatively, you can host your server for free on Aternos, making it a great option for those looking to make a Minecraft server in 2022.
How to Add A Server to Minecraft
Setting up a Minecraft server for gaming can be a fun experience, with various methods to choose from. You can consider purchasing external memory and configuring the server yourself, or use your PC to host the server. Alternatively, you can set up a server directly on Minecraft Pocket Edition, making it a convenient option for those who prefer a more straightforward approach.
How to Make A Public Server in Minecraft
Making a public server in Java is a manageable task if done carefully. It involves implementing various components, such as handling incoming requests, processing data, and sending responses, in a structured and organized way.
To make a public server in Minecraft, follow these steps: First, open the Minecraft game and go to the "Multiplayer" tab. Then, click on the "Create a Server" button and fill in the server details, such as server name, game mode, and other settings.
Step 1: Update Java and Setup Minecraft Server Files
Minecraft is made using the Java programming language. Therefore, you should update Java to the latest version for setting up a server. Fetching the Java server files is also required for setting up a Minecraft server.
To avoid paying for a VPN, you can use free public Wi-Fi networks, but be aware that they are often unsecured and can be vulnerable to hacking. You can also use browser extensions like uBlock Origin or HTTPS Everywhere to encrypt your internet traffic and protect your online privacy.
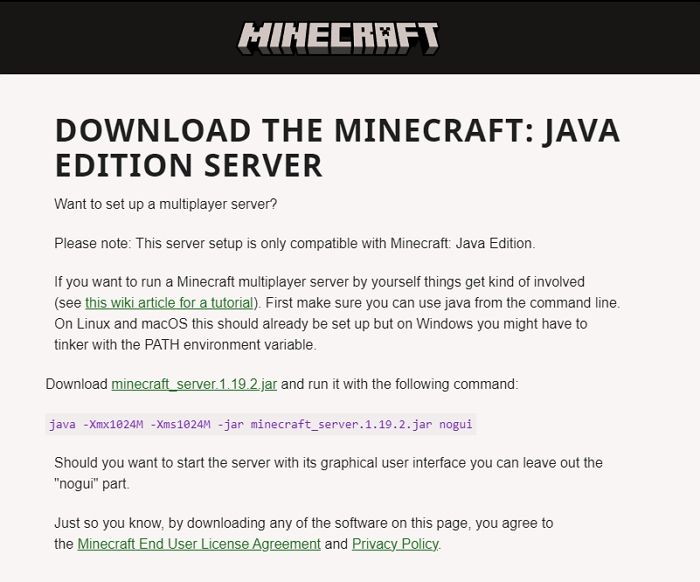
- Head over to Minecraft Server Downloads
- Navigate to and download the file minecraft_server.1.11.jar or server.jar
- Create a new folder named "Minecraft Server" and copy the Minecraft server .jar file into it. This folder will serve as the main directory for your Minecraft server, and the .
- Now double-click the Minecraft jar file to run the server file
Note: If the JAR file you downloaded is named server.jar, make sure to use server.jar instead of minecraft_server.1.11.jar throughout the setup.
To run the server file accurately for setting up a server, follow these steps:
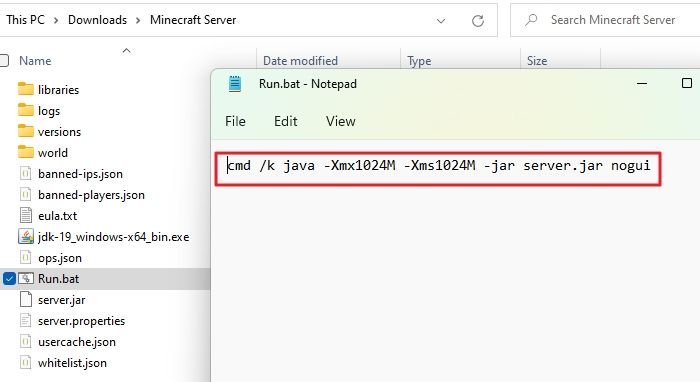
Step 2: Run the Server by Saving it as a Batch File
When saving a file in Notepad, you can add an extension and set the file type. By default, files saved in Notepad have a .txt extension, but for Batch files, you should remove the .txt extension and keep the .bat extension.
Here's how you can save it as a Batch File and run the server in one paragraph shortly:
- Go inside the Minecraft Server folder
- Right-click, navigate to New and choose text document
- Tap on New and create a Text Document named Run
- Input the following statement
cmd /k java -Xmx1024M -Xms1024M -jar server.jar nogui
- Now, name the file Run.bat and set the Save As Type to All Files.
To use the software, you will need to agree with its license agreements.
Step 3: Edit EULA
When running a Minecraft server, you're presented with a license agreement that must be agreed to in order to operate the server. However, instead of a checkbox or button to confirm agreement, you'll need to edit the EULA file (with a .txt extension) to accept the terms.
To edit and agree to the EULA agreement, simply click on the "Edit" or "Agree" button, review the terms and conditions, make any necessary changes, and then click on the "Save" or "Accept" button to confirm your acceptance of the agreement. This ensures that you have read, understood, and agreed to the terms and conditions outlined in the EULA.
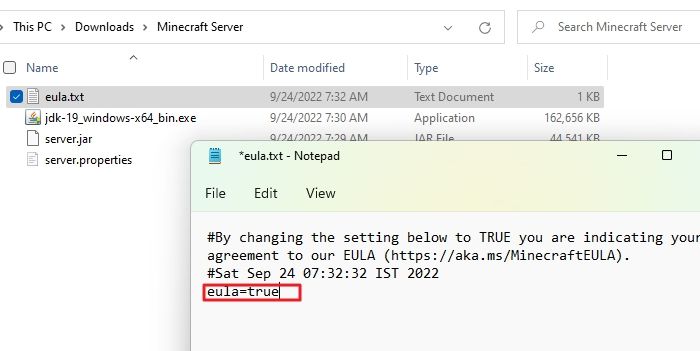
- Open eula.txt file
- Modify eula=false to eula=true
To set up the Server on your PC, run the BAT file. This will set up the Server on your PC.
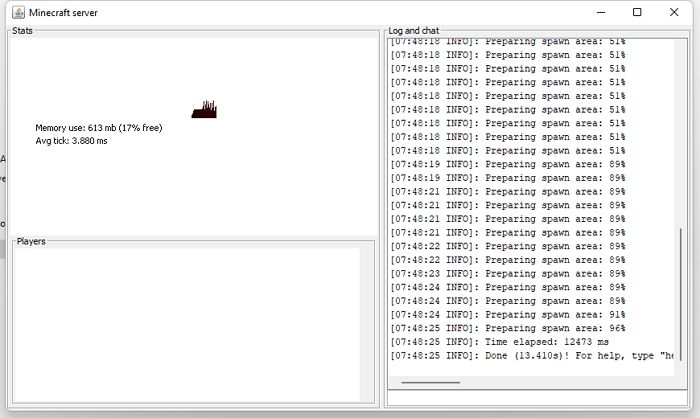
Step 4: Launch your Server
To launch your Minecraft server, you can Double-click on Server.jar.
Step 5: Join your Minecraft Server
To connect to your Minecraft server, follow these steps:
- To add a Minecraft server, open Minecraft and select Multiplayer from the main menu. Then, tap on the Add Server button.
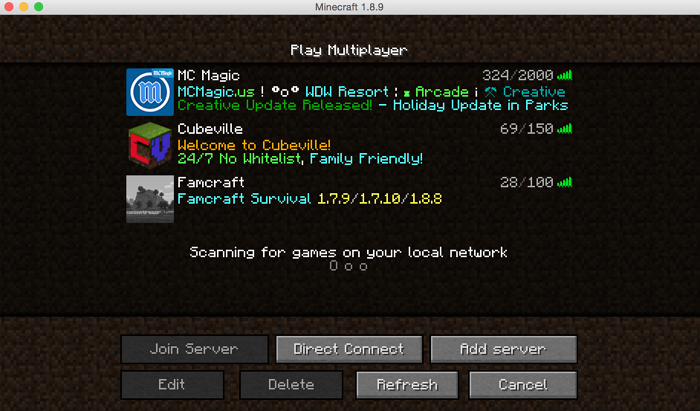
- In the Server Name field, enter your server name, and in the Server Address field, enter "localhost".
- To join a Minecraft server, press the Done button after selecting your server from the list, and then press the Join Server button again.
You won't need to change your router settings, making it easy for users to interact with your server computer. However, after that, you'll need to forward ports.
Step 6: Check out your External IP
After forwarding the ports, you'll need to note down your external IP address.
Follow the steps given below to find your external IP:
- Visit www.google.com on your web browser
- You can find your external IP address by searching for it in a search engine like Google. Simply type "external IP" into the search box and press enter.
The search engine will display your IP address, whether it's IPv4 or IPv6, and you should note down your External IP address carefully. This is necessary because any player who wants to connect to your server needs your External IP address to communicate with yours.
Step 7: Connect with your Minecraft Server
You can do this by opening the game and going to the "Servers" tab. From there, you can add your server's IP address and port number.
Here's how you can do It!
- Open Minecraft, navigate to the main menu, and go to Multiplayer.
- Press the Add Server button
- Enter your Server Name and Address in the desired fields
An IPv6 address is longer in size, but if you use it, add square brackets at the beginning and end while inputting them.
- To connect to a Minecraft server, you can follow these steps: Hit the Done button, and Minecraft will now prepare to connect to the server you've chosen. This may take a few seconds, depending on your internet connection and the server's load.
- Then, choose your Server and tap on Join Server
To ensure safety and security, it's recommended to share your external IP address with trusted individuals, allowing them to connect to your server while keeping unauthorized access at bay.
To set preferred preferences on Minecraft, you can configure its settings by accessing the game's options menu, where you can adjust various preferences such as graphics, sound, and controls to suit your playstyle.
Step 8: Configure Game Settings on your Server
If you're looking to add customizations to your Server, this step is a must-check out! It's not strictly necessary, but it's definitely worth exploring if you want to give your Server a personalized touch.
Follow the steps given below to configure your Server Settings:
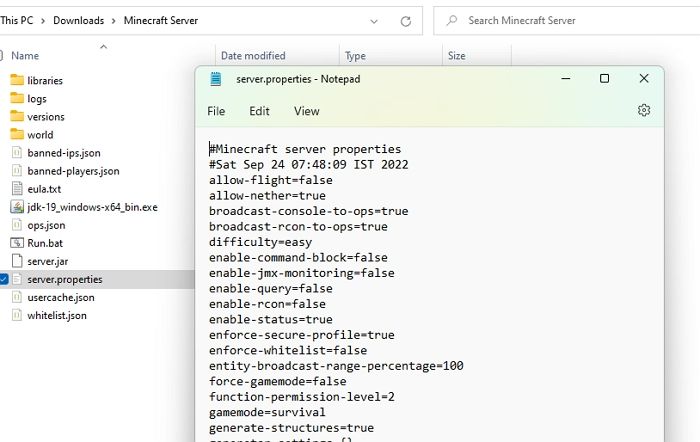
- Open the server.properties file in a text editor like VS Code or Notepad. This file is used to configure the server settings for Minecraft.
- Change gamemode=0 to gamemode=1 for a creative mood
You can now modify whichever settings you like, but it's helpful to know how to change them in text editors. Be sure to avoid editing the Server Editors file.
How to Make Your Own Minecraft PE Server for Free
Making a public server is a breeze, but creating a personal server for your close-knit group without breaking the bank is a great idea too!
To make your own Minecraft PE Server for free, follow these steps. First, download and install the Minecraft PE Server software on your device, such as a Windows or Android device.
Step 1: To use Aternos, open your web browser and visit https://aternos.org/go, then sign up for an account.
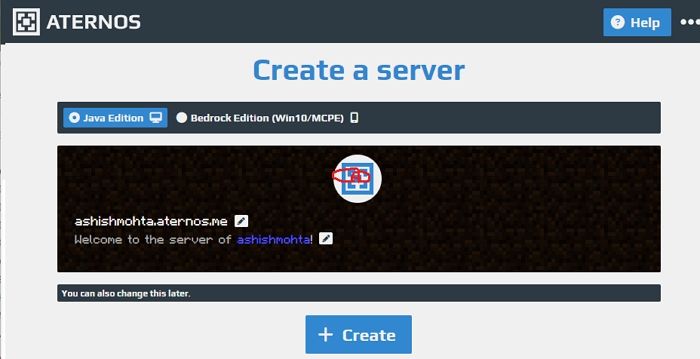
Step 2: Create your server by pressing the blue button that says Create your Server. Set a username, then press Agree and click the X checkbox.
Step 3: To add users to access the server, tap the Next button and enter the email addresses of those who should have access. Additionally, assign a password for each user's access.
Step 4: Press the Signup button Now, your Aternos Dashboard will open!
Step 5: Navigate to Software from the left pane.
Step 6: On the page's right side, click on Win10 / MCPE and tap on Reinstall.
Step 7: Press the "Yes, Reinstall" button and proceed with the action, allowing Aternos Server to install PocketMine's add-on.
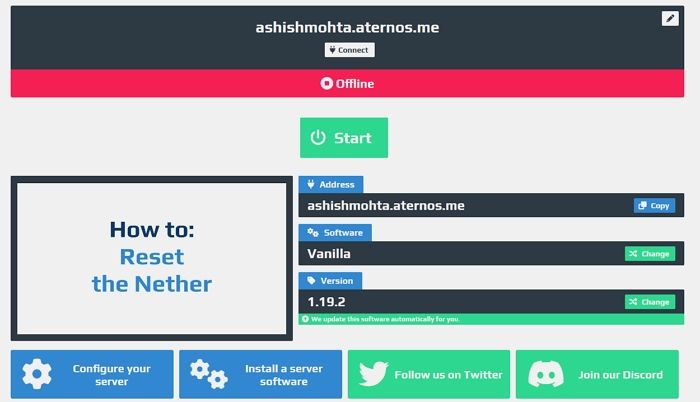
Step 8: Go to Server on the left pane and hit the green-colored Start button.
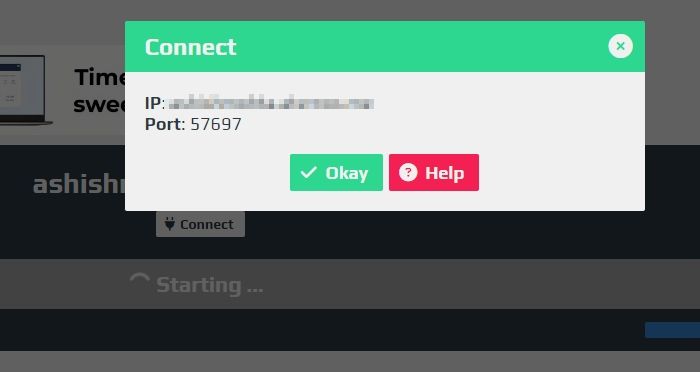
Step 9: To access the Press button, click on the button with a plug-shaped icon.
You will now see a pop-On your monitor, a server details screen appears, displaying the Server Name, Address, and port number. Take note of both the Server Name and Address, along with the port number, carefully.
Step 10: Now, head to Minecraft PE And click on Play.
Step 11: Navigate to the Servers tab and select Add Server.
Step 12: To set up a server, start by entering the server's name in the designated field. Next, enter the server's address, which is usually an IP address or a domain name, in the corresponding field.
Step 13: You are set for the game, so click on Play.
That's great news! Now you can enjoy playing Minecraft with your friends and family without any cost. You can explore, build, and survive together in a world of your own creation, all for free. What would you like to do next?
The Conclusion
After searching, you'll find that making a Minecraft server in 2022 is possible through various methods. You can either buy space on an external server and configure it, or use Minecraft Pocket Edition and Aternos hosting service to create a free server. This involves setting up a server, running files, launching it, noting the details, and adding them to the game. You can share the details with your friends and have fun!
Related Articles
- 5 Best Free Adobe CC alternatives You Don't Want to Miss
- [Fixed] CHKDSK Stuck at 10%, 11%, 12%, 100% in Windows 10/8/7
- What Is Mds_Stores High CPU Usage and How to Fix It?
- How to Recover Unsaved/Lost Notepad ++ Files with/Without Backups
- Hyper-V vs. VMware: Which Is the Better Choice for You?
Hyper-When it comes to choosing between Hyper-V and VMware for your virtualization needs, there are several factors to consider. Both platforms have their own strengths and weaknesses, making it essential to weigh the pros and cons before making a decision. While Hyper-V offers a more cost-effective solution with a free version available, VMware provides a more comprehensive and feature-rich platform with a wider range of tools and support options. Ultimately, the choice between Hyper-V and VMware will depend on your specific business needs and requirements, and this article aims to provide a comprehensive comparison to help you make an informed decision. - What Is Immutable Backup? [All You Need to Know]
Immutable backup and mutable backup are two different approaches to data backup, with distinct characteristics and benefits. Immutable backup refers to a type of backup where the data is frozen in a specific state at a particular point in time, ensuring that it remains unchanged and cannot be modified or deleted. This approach provides a reliable and tamper-proof way to store data, making it ideal for sensitive or critical information. In contrast, mutable backup allows data to be modified or deleted, which can be useful for certain applications but also increases the risk of data loss or corruption. Understanding the differences between these two approaches can help you choose the best backup strategy for your specific needs.