Fixed: Restart to Repair Drive Errors on Windows 10
Windows 10 users who receive the "restart to repair drive" error notification in their Action Center are not alone. Several users have reported this issue, and it's not a cause for concern. To resolve this error, users can try various methods, which will be explained in the article. Before that, let's briefly discuss the error and its underlying reasons.
What Is Restart to Repair Drive Errors
The "Restart to repair drive errors" message typically indicates an issue with your computer's hard drive, but you can easily resolve the problem by repairing your storage. There are various methods to do so, and addressing the issue will get your computer up and running smoothly again.
Many users have reported experiencing a problem after upgrading to the latest version of Windows. The issue typically resolves itself after restarting the computer and performing necessary troubleshooting steps.
Why Does My Computer Keep Having Restart to Repair Drive Errors
This error occurs due to hard drive issues, Windows registry problems, or failed updates, making your files and folders inaccessible. It indicates Windows has detected an unusual error while reading and writing on one of your drives.
Hard drive errors are a common cause of data loss and corruption, often resulting from poor system maintenance, malware, or user error. To resolve these issues, Windows users can employ the Chkdsk tool, which we will detail in the following article.
Failed Windows updates, particularly due to lack of disk space, can cause the "Restart to repair drive errors" notification. Clearing extra space might resolve the issue, but in some cases, it can lead to further problems.
How to Fix Repair Drive Errors on Windows 10 Without Data Loss
Before implementing the methods to address the problem, it's essential to do some preliminary work, including data rescue and recovery. Once that's done, we can proceed to go over each method one by one to address the specific problem at hand.
First Thing to Do: Rescue and Recover Data
The Restart to Repair Drive is a critical situation where the PC cannot be accessed, and some methods may result in data loss. It's essential to use data recovery software, such as Qiling Data Recovery Wizard, to import and export data in advance to prevent loss. This will allow for data restoration in the WinPE environment when the computer or hard drive cannot boot.
Qiling data recovery software is the perfect tool for you to use in this scenario, as it helps you recover data in the WinPE environment. It offers a great set of features that can entirely recover deleted files, or restore data from OS crashes, partition losses, documents, videos, and other data loss scenarios. It is an all-in-one platform to recover your data from damaged hard drives.
We recommend that you use Deep Data Recovery before attempting the methods we're about to discuss.
Step 1. Create a bootable disk
To prepare a USB for creating a bootable disk, back up any important data on it to another device. Then, use Deep Data Recovery WinPE Edition to create a bootable disk on the empty USB. This will erase any existing data on the USB.
Connect a USB drive to your PC, then launch the Deep Data Recovery WinPE Edition software. Select the USB drive and click the "Create" button to create a bootable disk for the software.
Step 2. Boot from the bootable USB
Connect a bootable disk to a PC that won't boot, then change the boot sequence in the BIOS settings to prioritize the disk. Typically, this can be done by restarting the computer and pressing F2 (or another key depending on the BIOS) to access the BIOS settings.

To boot the PC from a device other than the hard drive, press the F10 key to save and exit the BIOS settings, allowing the PC to boot from a bootable USB drive or CD/DVD.
Step 3. Recover data from a hard drive that won't boot
When you boot from a USB, you can run Deep Data Recovery from the WinPE bootable disk, which allows you to scan a selected drive to find all lost files.
Click "Scan" to start the scanning process.

After scanning, you can preview and recover data from the computer or laptop by selecting and clicking the "Recover" button, and then save the recovered data to another place to avoid data overwriting.

To fix the restart to repair drive issue on Windows 10 or Windows 11, try the following methods: after reducing the important data, you can attempt to fix the issue by trying each method, moving on to the next if one doesn't work.
Method 1. Reboot Computer
If your computer is experiencing issues, the first step to resolve the problem is to restart your computer, as it can automatically fix minor errors that occurred during the last improper shutdown.
Method 2. Run CHKDSK Command in Safe Mode
CHKDSK, a tool specific to fix disk-related errors in Windows computers, can be used to resolve the Restart To Repair Drive Errors issue altogether, as it is a disk-oriented error.
Run CHKDSK in safe mode in the following way:
Step 1. To resolve the issue, simply restart your PC and, as it boots up, start pressing the F8 key repeatedly. This will take you to the Advanced Boot Options menu, where you can troubleshoot and resolve the problem.
Step 2. To fix the Windows 10 update issue, you'll need to boot your computer in Safe Mode with Command Prompt. To do this, click on the Start menu and select the "Power" option. Hold the Shift key on your keyboard and click on "Restart.
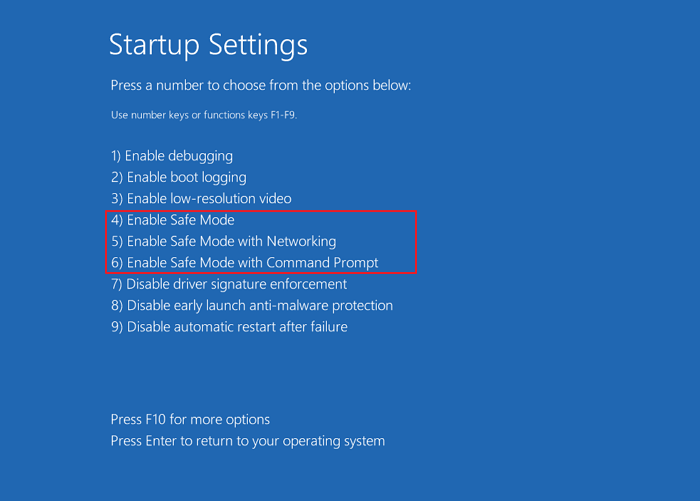
Step 3. The computer will now boot and display a list of drivers. Run the CHKDSK tool, which will automatically resolve minor errors once the wizard completes the process.
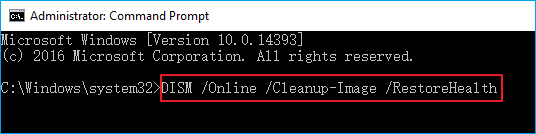
Method 3. Run DISM and SFC Scan
DISM (Deployment Image Servicing and Management) is a powerful tool that can resolve corrupted system files by scanning them, leading to the repair of drive errors that occur frequently.
Step 1. Boot from a bootable USB Drive and open the Command Prompt with Safe Mode as explained above.
Step 2. Write the following command on the command line given below:
dism.exe /Online /Cleanup-image /RestoreHealth
Step 3. If the DISM command fails to obtain the necessary files online, you can try using your installation media (DVD or USB) to provide the files. To do this, insert the media and run the following commands in an elevated Command Prompt: `dism /online /cleanup-image /restorehealth` and `dism /restorehealth`. If the first command fails, try the second one. If you're still having issues, you can try using the `/source` option to specify the location of the installation media, like this: `dism /online /cleanup-image /restorehealth /source:C:\path\to\your\media`.
DISM.exe /Online /Cleanup-image /RestoreHealth /Source :C : RepairSourceWindows /LimitAccess
To replace the C: RepairSourceWindows, insert your Windows DVD or USB drive and run the command "C:\RepairSourceWindows" from the command prompt with administrator privileges. This will allow you to replace the corrupted source files with the ones from the installation media.
These are the steps that you follow to run CHKDSK. However, you can also use SFC as a primary tool for fixing drive-related errors.
To perform SFC Scan:
Step 1. Once you are on the recovery screen, open the command prompt and type `SFC /scannow` followed by pressing Enter.
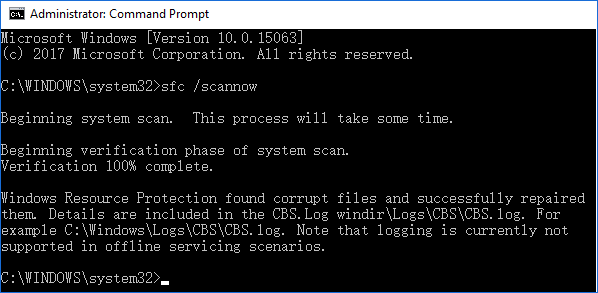
Step 2. The scan and repair process has been initiated. It may take a few minutes to complete. Please wait for it to finish.
If your problem persists, go to the following procedure given below.
Method 4. Run Automatic Startup Repair
To fix the "Windows cannot be installed to this disk. The disk for Windows RE recovery environment has a GPT disk structure" error, you can use Automatic Startup Repair. This process requires a Windows bootable USB. Insert the USB, restart your computer, and follow the on-screen instructions to run Automatic Startup Repair.
Step 1. Insert the Windows bootable installation USB into your PC, restart, enter the BIOS, set the USB as the first bootable device, and restart again for the PC to boot from the USB.
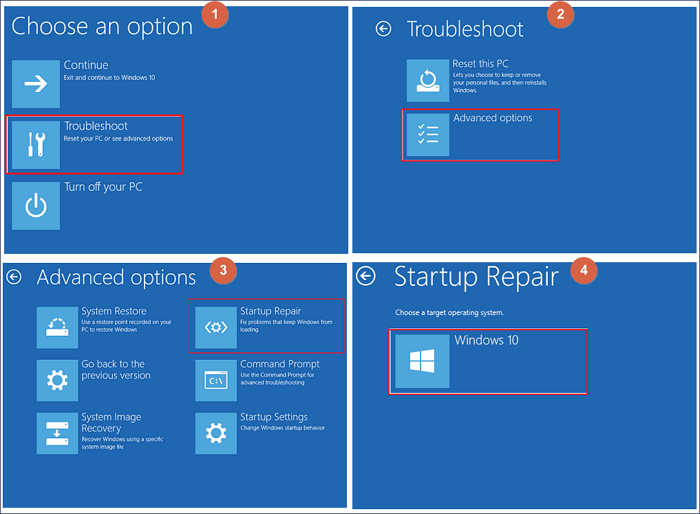
Step 2. To start the Windows installation, choose your language preferences and click "Next". Then, click on "Repair Your Computer" at the bottom left of the screen. A new screen will appear with the option to "Choose an option", so press "Troubleshoot", followed by "Advanced Options" and finally "Automatic Repair" or "Startup Repair".
Step 3. Wait for the Windows Automatic Repair process to complete entirely. Once done, restart your PC and boot to Windows.
It is one of the most effective ways to solve this issue, and we hope your problem is resolved. If not, there's one last resort which you can still look forward to.
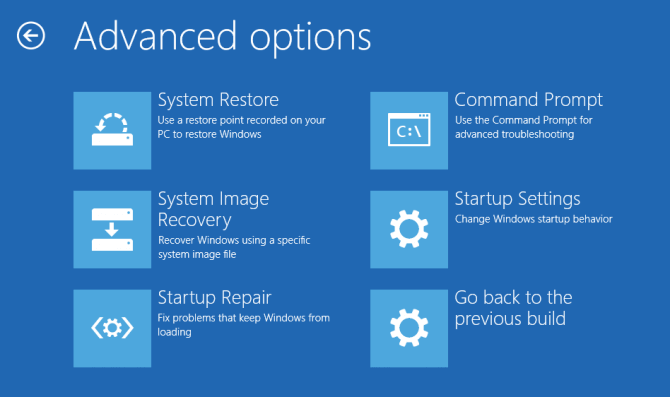
Method 5. Perform System Restore
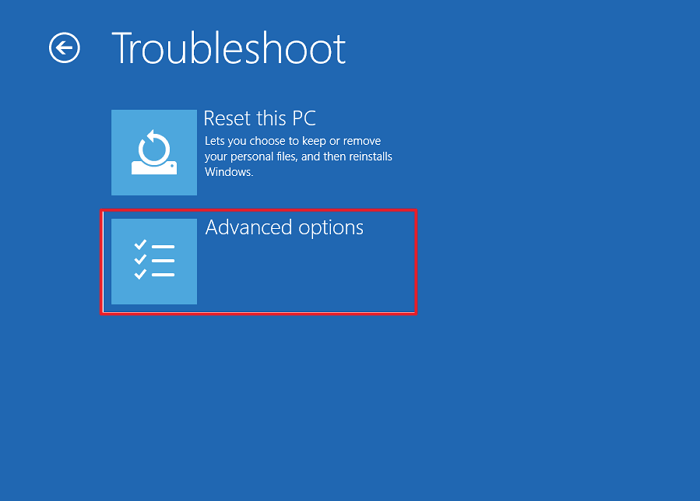
Step 1. Boot into advanced recovery and click on "Advanced Options".
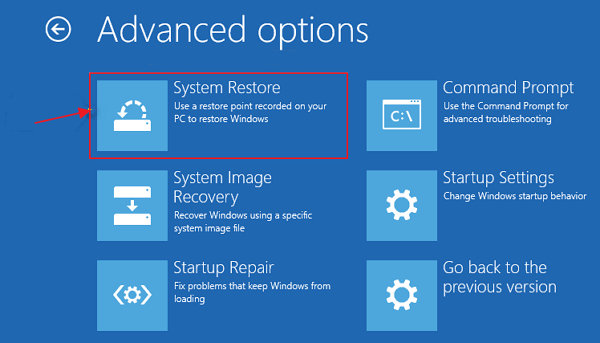
Step 2. Click on "System Restore" to launch the wizard.
Step 3. The system restore wizard appears, similar to the one in Windows, and clicking next displays a list of available restore dates.
Step 4. Select a date on which the PC was working perfectly. Click next, and let the wizard restore the PC to a working state.
To resolve the issue, you can restore your PC to a previous state where the problem didn't exist, and then back up your data and replace the hard disk if the problem persists.
Method 6. Use Manual Services to Fix Restart to Repair Drive Errors
Qiling offers manual fixing services where a professional technical team can resolve system startup errors, including system failure, blue screen, black screen, and other issues.
Consult with Qiling data recovery experts for a one-on-one manual recovery service, which includes the following services after a FREE diagnosis:
- Fix Windows boot issues, including BSOD
- Fix Windows error and configure Windows environment
- Restore the system when it fails to boot
- Optimize Windows computer to make it run quickly
Conclusion
The "Restart to Repair Drive Errors" issue can be resolved using various methods. This problem can arise due to hard drive issues, failed updates, or other factors. To resolve it, users can try methods such as checking for disk errors, running a System File Checker, and using the built-in Check Disk tool, as well as performing a System Restore, Safe Mode, or a System Update.
The post offers a variety of solutions to recover lost data, ranging from simple to extreme methods. The most secure way is to use Deep Data Recovery to recover data first, as the other methods may result in data loss. If your computer or hard drive can't boot, Qiling Data Recovery Wizard can help restore files. This article aims to provide helpful information on the topic.
Related Articles
- How Do You Fix 'Word Cannot Open the Document: User Does Not Have Access Privileges' Error? Fixes Are Here!
- Fix: The Volume Does Not Contain A Recognized File System in Windows 10/8/7
- File Recovery Software to Restore Deleted Files on Dell Laptop
- What Happens to the Data on an SSD When the Power Is Lost?
- How to Fix Windows 7 Backup Error 0x80041321 [Four Ways]
Fix Windows 7 backup error 0x80041321 with clear troubleshooting steps. Check backup settings, system files, disk errors, and restore backup tasks. - How to Enable Windows Auto Login without Password
If you're fed up with entering a long password every time you log in to your Windows system, this article shows you how to enable Auto Login without a password in Windows 10, saving you time and hassle.