How to Fix Windows 7 Backup Error 0x80041321 [Four Ways]
What Is Windows 7 Backup Error 0x80041321?
The 0x80041321 error is an error related to the Task Scheduler service, indicating a corrupt or tampered task image and a corrupt scheduled backup task, often appearing on the computer screen.
This error occurs when a backup task image has been tampered with or is corrupt, causing corruption in a scheduled backup task, or issues with the integrity or corruption in the registry.
Back up Windows 7 Files with Free File Backup Software Before Fixing the Error
Before attempting to fix the error, it's crucial to back up your Windows 7 files to prevent data loss, which can be irreversible. Utilize professional backup software, such as Qiling Backup, to safeguard your valuable data.
Qiling Backup, all-A free backup software can be a great help in backing up your files and system. It allows you to automatically make file backup, system backup, disk backup, and more, and can even create backups of different file types. Additionally, you can use it to back up your SSD to an image, providing an extra layer of protection for your data. This free backup tool is a valuable asset in maintaining the integrity and security of your digital files.
- High compatibility. The software supports various Windows versions, including Windows 11, 10, 8.1, 8, 7, XP, and Vista.
- More storage options. The software enables users to save backups to local drives, the security zone, NAS devices, and cloud storage, providing a comprehensive backup solution.
- Different backup modes. It enables the creation of various types of backups, including full, incremental, and differential backups.
Guide: How to Backup Files on Windows 7 with Free File Backup Tool
To create Windows 7 file backups, follow these specific steps. This guide will walk you through the process of making Windows 7 backups.
Step 1. Click "File backup" button to initiate a backup.

Step 2. Local and network files will be displayed on the left side, allowing you to extend the directory and choose which files to back up.

Step 3. To store the backup, select the location where you want to save it by following the on-screen instructions.

Step 4. To encrypt the backup with a password, click on "Options" in the "Backup Options" section. This will allow for various other customization options for the backup process.

To set up a backup schedule and choose to initiate a backup at a certain event, go to "Backup Scheme" and select the desired schedule and event trigger. This will allow you to automate your backups and ensure they run at specific times or in response to specific events.

Step 5. You may save the backup to a local disk, Qiling's online service, or a NAS.

Step 6. Qiling Backup allows customers to save their data to both a third-party cloud storage service and Qiling's own cloud storage service.
To back up data to a third-party cloud drive, select Local Drive, scroll down to add a Cloud Device, add your account, and log in.
Step 7. To start a backup, click "Proceed". Once the backup process is complete, the backup job will be displayed as a card on the left side of the panel. You can then manage the backup job by clicking on it.

Fix Windows 7 Backup Error with Four Possible Ways
- Solution 1. Delete the Schedule Keys in the Registry
- Solution 2. Remove the WindowsBackup File
- Solution 3. Delete the Task from the Task Scheduler
- Solution 4. Refresh User Feed Synchronization
If you're experiencing a Windows 7 backup error, there are several methods you can try to resolve the issue. You can use any or all of these methods, and one of them is likely to help you solve the problem.
Solution 1. Delete the Schedule Keys in the Registry
Looking for a solution to get rid of the Windows 7 backup error? It can work great for you when you follow these detailed steps, which can help you resolve the issue and find a way forward.
Step 1. To access the Task Scheduler settings, launch the Registry Editor and navigate to the following path: HKLM > SOFTWARE > Microsoft > Windows NT > Current Version > Schedule.
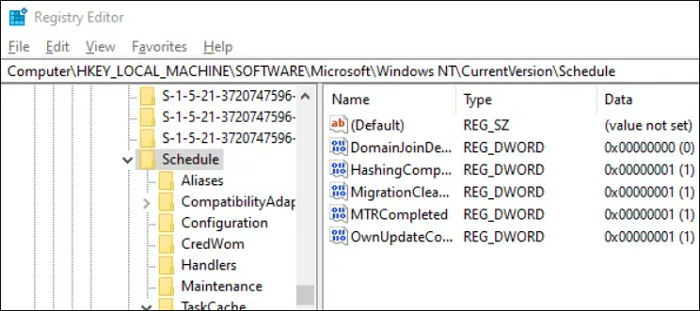
Step 2. Delete its sub-keys.
Step 3. To delete the Backup Task, open the Registry Editor, navigate to the specified key, delete the key, and exit the Registry Editor. Then, check if the Backup Task is working.
Solution 2. Remove the WindowsBackup File
It is possible that the Windows 7 Backup error has something to do with corrupted Task files. If any of the files end up getting corrupted, the task scheduler will have trouble running it. If you find it hard to locate the files mentioned above, you can delete the entire WindowsBackup file. Here are the steps you should follow in this regard.
Step 1. To access the Windows Backup folder, go to the C: drive, then navigate to the Windows folder, followed by System32, then Tasks, then Microsoft, and finally WindowsBackup.

Step 2. To set up Windows Backup again, go to the Backup and Restore control panel and follow the prompts to set up Windows Backup.
Solution 3. Delete the Task from the Task Scheduler
To delete files using Task Scheduler, follow these steps: 1. Open Task Scheduler, 2. Create a new task, 3.
Step 1. Open Task Scheduler.
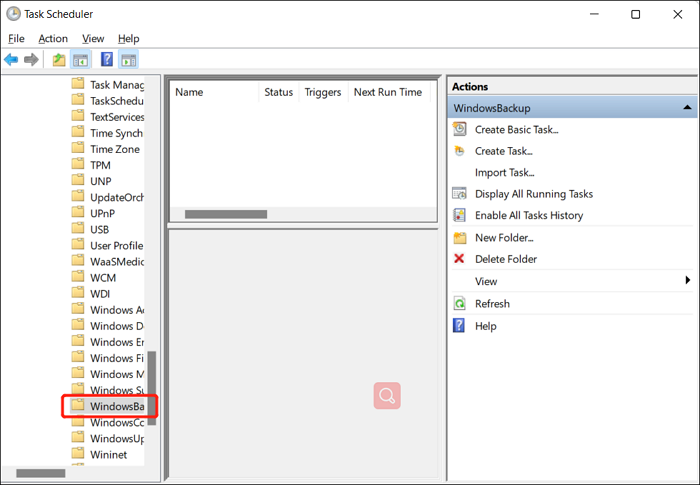
Step 2. To access the Task Schedule Library, navigate to Task Schedule Library > Microsoft > Windows > WindowsBackup.
Step 3. Delete both of the tasks and reset WindowsBackup.
Step 4. To troubleshoot the issue with the AutomaticBackup task, go to Task Manager and run it again to see if it is working properly.
Solution 4. Refresh User Feed Synchronization
To resolve the issue, you can try enabling and disabling the User Feed sync by going to the Data Management > User Feed Synchronization task in the system. This may help resolve the problem by restarting the sync process.
Step 1. To open PowerShell as an administrator on Windows, press the Windows key + X, and then select the PowerShell (Admin) option from the menu. This will open a PowerShell window with administrative privileges, allowing you to run commands and perform tasks that require elevated permissions.
Step 2. Type the "msfeedssync disable" command and tap Enter.
Step 3. Repeat the same process with the "msfeedssync enable" command.
Conclusion
The above-Before attempting to solve the Windows 7 Backup error, it's essential to create a Windows 7 backup to ensure you can undo any changes if needed. Qiling Backup Free is a highly recommended option that can also help with tasks like creating a complete system image or backing up files in safe mode.
FAQs
1. Why does my Windows 7 backup keep failing?
The backup on the disc may be missing or corrupted, and the issue might be caused by a faulty or incompatible drive, or malware/virus affecting the Windows 7 Backup.
2. How do I know if my Task Scheduler is working?
Right-To configure the Task Scheduler service, click on the Task Scheduler service, and then click on Properties. Ensure the startup type is set to automatic and the service status is Started. If the service is not running, click on Start.
3. What does Task Scheduler do?
The Task Scheduler enables automated tasks on a computer, allowing any program to run at a chosen time or in response to a specific event.
Related Articles
- Fixed Solutions: Can't Erase USB Drive on Mac [10 Ways]
- How to Fix IRQL_NOT_LESS_OR_EQUAL Error in Windows 10/8/7
- Quick Fix External Hard Drive Access Denied Error
- How to Boot from USB Ubuntu? [Full Guide in 2022]
- Does BitLocker Slow Down SSD? Yes, up to 45%
Many users wonder if BitLocker slows down SSDs, and if there's a way to disable it to enhance performance. If you're curious about this, keep reading for comprehensive answers to your questions. - How to Downgrade from Monterey to Big Sur [macOS 12 to 11]
To downgrade from Monterey to Big Sur, follow these three proven methods. Downgrading macOS Monterey becomes straightforward with these steps. If you lost some of your critical data while downgrading the macOS, Deep Data Recovery could be your great helper.