How to Downgrade from Monterey to Big Sur [macOS 12 to 11]
Prerequisites: Before Downgrading
Users experiencing battery drainage issues or third-party app problems after upgrading to Monterey may consider downgrading to Big Sur as a temporary solution until the new macOS is perfected.
To resolve the lagging and network connection errors on macOS 12 Monterey, users can try restarting their computer, checking for software updates, and ensuring their internet connection is stable. If these steps do not resolve the issue, they can consider downgrading to macOS 11 Big Sur. To do this, they would need to create a backup of their data, boot in Recovery Mode, and then use the Terminal to restore their system to the previous version. However, it's worth noting that downgrading can potentially cause data loss and other issues, so users should exercise caution and consider seeking professional help if needed.
- 🎒Create a backup.To avoid confusion when using Beta, it's a good idea to upload or transfer your important documents, files, and folders to a cloud service like iCloud or an external drive for safekeeping.
- ⚙️Check the Mac setting. To check elementary details about your Mac, select the Apple menu and choose About This Mac. You can also find this information in the General settings, where you can see additional details like repair coverage and warranty, and generate a detailed system report.
- 💽Enable the booting from the external drive option. You can allow booting from an external drive on a MacBook Pro, Mac Mini, or MacBook Air by using a feature called Boot Camp Assistant, which allows you to install Windows or another operating system on your external drive. This process involves creating a partition on your external drive, formatting it, and then installing the operating system on it. Once the installation is complete, you can select the external drive as the startup disk and boot from it.
If you're still unsure about downgrading, consider reading more about the comparison between macOS Big Sur and Monterey. This comparison may provide you with a better understanding of the pros and cons of each operating system, helping you make an informed decision about which one to use.
2023 Comparison: macOS Monterey vs Big Sur
Here's a brief summary: If you're running macOS Big Sur, you can upgrade to Monterey, which offers some minor updates and improvements, but no major changes. The main differences between the two are the addition of Universal Control, which allows you to control multiple Macs with a single keyboard and mouse, and some minor tweaks to the Notification Center and Safari. Overall, the upgrade is relatively minor and may not be worth it for everyone, but if you're looking for some new features and a slightly smoother experience, it's worth considering.
Then, read the following parts to learn how to downgrade the macOS version quickly with the below-mentioned three steps.
Downgrade from Monterey to Big Sur with Bootable USB
If your MacBook came with Big Sur preloaded, you can return to it by using the internet retrieval method. To downgrade from Monterey to Big Sur, you'll need a bootable USB drive, which you can create on your Mac. This process allows you to revert to the previous operating system, using the USB drive as a bootable medium.
Step 1. To transfer your data, you will need a USB drive or a device with USB C ports. If your USB drive is not USB C, you can use an adapter to convert it. Regardless of the format, you'll need a device with approximately 16GB of storage space.
Step 2. Install Big Sur.
Step 3. Look for the Mac Terminal by hitting the Spotlight symbol.
Step 4. Press the tab key to auto-complete the command, and then press Enter to execute it. This will open the root user's command line interface, where you can run commands with elevated privileges.
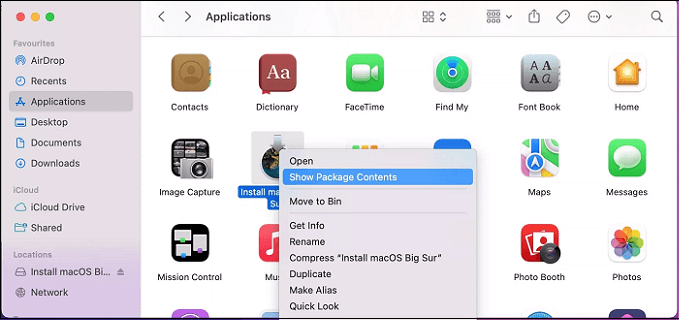
Step 5. To access the contents of the Big Sur installation package, right-click on the copy of Big Sur installed in the Finder window and select the "Show Package Contents" option from the context menu. This will allow you to view and interact with the individual components and files within the package.
Step 6. Choose the "Resources folder" after opening the Contents folder.
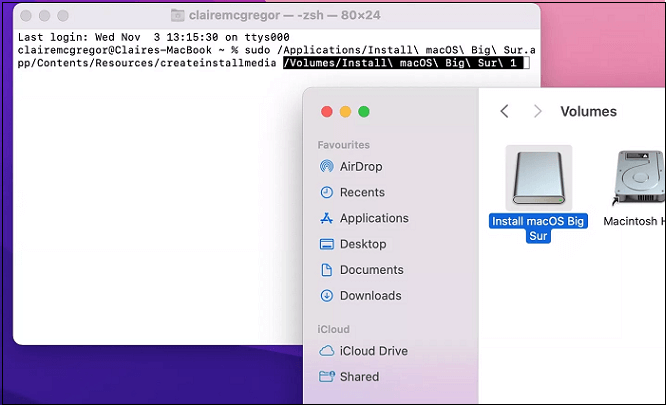
Step 7. "createinstallmedia" symbol needs to be discovered and dragged onto the Terminal window. The subsequent part of the location will quickly fill in:
![]()
Step 8. To access the "Go to Folder" option, click the Finder symbol, navigate to the "Go" menu at the top of the screen, and select "Go to Folder."
Step 9. Hit the return button after typing "/Volumes" in the search bar.
Plug in your USB drive, which will appear in the volumes window, and then drag the USB volume onto the Terminal application window to fill in the remaining path.
To downgrade your Mac, start by opening the Terminal app, which can be found in Applications/Utilities. Once Terminal is open, type `softwareupdate --list-full` and press Enter.
Step 1. Hit the "Return" key.
Step 2. Type the password, and hit the return button after that.
Step 3. You need to tap the return key by typing Y.
Step 4. If the Terminal needs permission to access files, hit the "OK" button to grant it permission.
To downgrade from Monterey to Big Sur, the procedure will begin, automatically deleting files on the USB drive before copying through the Big Sur installer files.
How to Downgrade macOS Monterey from Time Machine
Employing a Time Machine backup is one of the simplest ways to install an outdated macOS version, such as Big Sur. To downgrade macOS Monterey using a Time Machine backup, you must follow the steps below:
Step 1. Connect your Time Machine drive, then shut down or resume your Mac. This allows your Mac to automatically back up your data when it boots up.
Step 2. Boot the device into its Retrieval mode by holding Cmd + R for an Intel Mac. For Apple Silicon Macs, hold the Power button until "Loading Startup Options" appears, then choose "Options" to enter Recovery mode.
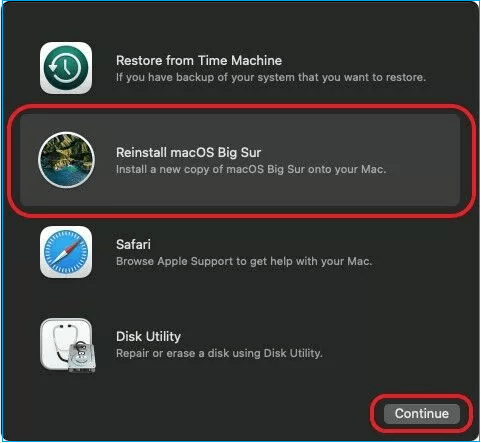
Step 3. When the macOS Utilities screen appears, select "Restore from Time Machine Backup" and click the "Continue" button.
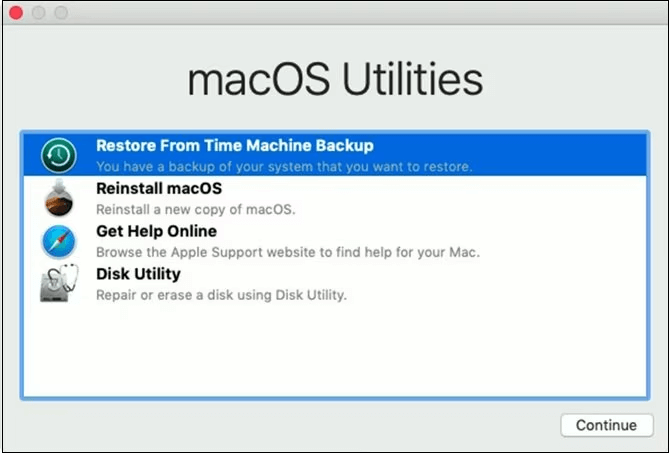
Step 4. Select "Continue" again on the next screen.
Step 5. You should choose the source of your restore. This will be the backup drive you plugged in ahead of time.
Step 6. Choose the desired backup, which you're willing to restore from, and you'll see which macOS version was used to generate that backup.
Step 7. To complete the reinstallation, follow the screen instructions carefully, and then retrieve your files from the generated Time Machine backup.
Downgrade Monterey and Install Big Sur in Recovery macOS
Here are the steps to install macOS Big Sur in one paragraph:
If your Mac has previously installed Big Sur, follow these steps to upgrade to the latest version:
Step 1. To restart your Mac in recovery mode, press the Shift + Option + Command + R keys simultaneously while it's turned off, and then press the power button to turn it back on. This will boot your Mac into recovery mode.
Step 2. To start, turn off your Mac and then press the power button to turn it back on. Immediately hold down the Command (⌘) + R keys on your keyboard.
Step 3. Go through the instructions on the screen to reinstall macOS 11 Big Sur on your MacBook.
If you've found a method to downgrade from Monterey to Big Sur, please share it on social media platforms like Facebook, Twitter, Instagram, and others, so others can benefit from your discovery!
How to Recover Lost Data When Downgrading macOS
To recover deleted files on Mac, it's possible to try using data recovery software, such as Disk Drill or Deep Data Recovery Wizard, which can scan the Mac's hard drive and attempt to retrieve deleted files. If you've already deleted the files, it's best to stop using the Mac to prevent overwriting the deleted data. If you're unable to recover the files, consider contacting a professional data recovery service for assistance.
A professional tool like Deep Data Recovery can help recover lost data by recuperating every file. It's designed to help recover data from file system errors, failures, and unintentional deletions, and its intuitive design allows even inexperienced users to retrieve deleted files quickly. The software is robust and simple-to-use, supporting several file types for recovery, making it a reliable tool for data retrieval.
- To recover trash on a Mac, you can start by checking the Trash bin, where deleted files are stored. If the file you're looking for is still in the Trash, you can simply right-click (or control-click) on it and select "Put Back" to restore it to its original location.
- The software can recover data from various difficult scenarios, including deleted files, formatted partitions, corrupted files, and even data loss due to physical damage or virus attacks. It can recover a wide range of file types, including videos, images, documents, music files, and emails, making it a versatile tool for data recovery.
- The tool generates a disk image of the hard drive, including poor sectors and potential for failure, to simplify protection and quick recovery processes.
- Retrieves data from the eliminated Mac partition.
Deep Data Recovery for Mac is the ultimate solution for businesses and service providers to retrieve lost data. To get started, simply download the software and follow the steps to recover your data.
Step 1. Search for lost files
To search for lost files on macOS Sierra, High Sierra, Mojave, Catalina, Big Sur, Monterey, Ventura, and Sonoma, select the disk location to search, such as an internal HDD/SSD or a removable storage device, and click the "Search for lost files" button.
Note: Before attempting data recovery, it's recommended to create a backup of your Mac by clicking "Disk Backup" from the sidebar to prevent further data loss. Once the backup is created, the software can then recover data from the backup, allowing your computer to write new data again.

Step 2. Go through the scanning results
Deep Data Recovery for Mac will immediately scan your selected disk volume and display the scanning results.

Step 3. Select the file(s) and recover
Select the desired files from the scan results, then click the "Recover" button to restore them.

Final Words
Downgrading from macOS Monterey to Big Sur quickly can be done in three ways. However, it's essential to note that beta versions of MacBook often malfunction due to bugs, which is why it's recommended to install them on a second device. If you're experiencing issues with the Monterey update, following the provided guidance can help resolve the problem.
The initial public releases of macOS, including the Beta version, may have bugs and minor issues. Despite this, you can still enjoy the features of macOS 12 Monterey, which Apple will soon update to fix the remaining problems. If you've lost data while downgrading to Big Sur, consider installing Deep Data Recovery for Mac.
Downgrade from Monterey to Big Sur FAQs
Follow the below-mentioned FAQs to downgrade from Monterey to Big Sur easily:
1. How to downgrade from Monterey to Big Sur without USB?
To downgrade from macOS Monterey to Big Sur on an Intel-based Mac, follow these steps. First, make sure you have a Time Machine backup of your data.
- Shut your MacBook down.
- To reset your Mac's System Management Controller (SMC), press and hold the power button until the computer turns off. Then, press and hold the power button again until you hear the boot chimes for the second time.
- To reinstall macOS, select the option to Reinstall macOS (or Reinstall OS X) and click Continue when the macOS utility screen has loaded.
- Go through the prompts, and opt for your startup disk.
- Hit the install button.
- After the installation is complete, retrieve your files from the backup. This ensures that your data is safe and can be restored in case something goes wrong during the process.
2. How to downgrade from Ventura to Monterey?
To downgrade from Ventura to Monterey using keyboard commands, follow these steps: Press the Command (⌘) + R keys to restart your Mac in Recovery Mode. Select your language and click on the arrow button. Select Disk Utility from the Utilities window.
- Turn your Mac off to process the downgrading.
- Hit the Power button.
- Quickly press the Shift + Option + Command + R.
- Type the password when prompted.
- Hit the continue button.
- Go through the on-screen instructions until when the reinstall macOS button appears.
3. Can I uninstall Monterey on my Mac?
You can't uninstall the existing OS, but you can install a new one by creating a bootable USB installer with the desired OS, booting from it, wiping the HDD, and then transferring your files from the backup.
4. How to install older versions of macOS or OS X separately?
To install older versions of macOS, download the version you need and install it using a bootable installer, isolating it from newer versions.
Related Articles
- Call of Duty Warzone Save Files (Everything You Need to Know)
- [Solved] Windows 7 Fail to Boot with 0x0000007B BSOD Error
- There Was an Error Connecting to the Apple ID Server on MacBook [Fixed👍]
- How to Connect PS4 Controller to PC? Follow A Full Guide
- Google Chrome Syne Keeps Pausing? Find Fixes Here
Google Chrome sync allows you to sync your bookmarks, history, and settings across all your devices, but some users experience a problem where the sync process keeps pausing. This issue can be caused by various factors, and to resolve it, several troubleshooting methods can be tried. - Google Chrome Windows 7&8.1 End of Support: What Should You Do
Google will stop supporting Chrome on Windows 7 and 8.1, but older versions will still be usable, though without new features and security updates. Meanwhile, Chrome 110 is expected to launch in early February for Windows 10 and 11 users.