How to Boot from USB Ubuntu? [Full Guide in 2023]
The easiest way to experience Ubuntu is to run it directly from your USB stick or DVD, and for those looking to boot from USB, this guide provides a helpful step-by-step process.
Running boot from USB Ubuntu is a seamless process that can be quickly done without hassle, requiring no technical skills and including all essential files, including system booting information.
Hey there! If you're new to booting from a USB Ubuntu drive, don't worry, I've got you covered!
How to Boot from USB Ubuntu?
Ubuntu on USB offers a convenient way to boot up devices without the need for installation. Simply connect the USB drive to your device and initiate the booting process with a few clicks, allowing you to start using Ubuntu without having to install it on the device itself.
Create Bootable USB
Step 1: To create a bootable Ubuntu USB drive, you will need a 4GB USB drive, Ubuntu Desktop 14.04, and an Ubuntu ISO file, which should be copied into the Downloads folder.
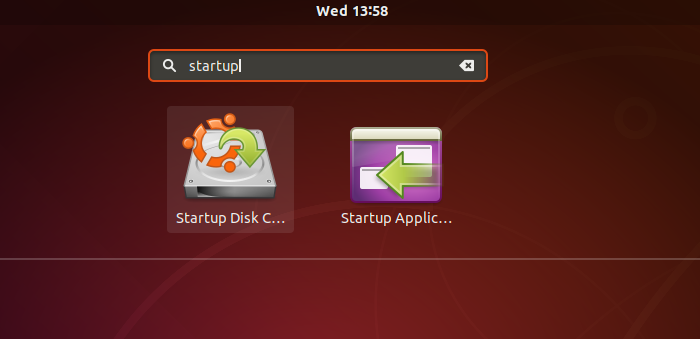
Step 2: In Ubuntu Desktop, go to Show Applications at the bottom left icon, and then look for Startup Disk Creator.
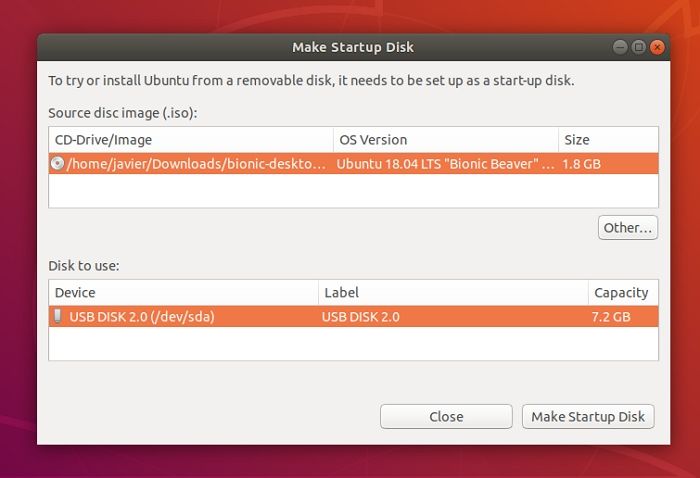
Step 3: Launch the application, which will automatically detect an ISO file and a USB drive when found. If you have multiple disks, select the one you want to make bootable.
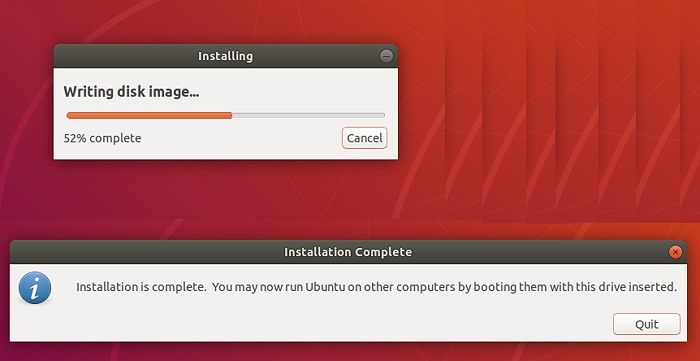
Step 4: To create a bootable Ubuntu USB drive, click on the "Make Startup Disk" option, confirm the action, and the writing process will begin. The progress bar will display the progress. Once complete, you'll have a bootable Ubuntu USB drive ready to use.
Bootable USB drives are not only useful for installing operating systems, but they also serve as a valuable tool for testing, repairing, or fixing a broken computer configuration.
Boot from USB
Step 1: To properly shut down your computer, first unplug all external devices from the computer, then turn off the computer itself, and finally unplug the power cord from the wall outlet. After ensuring the computer is completely powered down, let it sit in a cool, dry place for at least 30 minutes.
Step 2: Once done with it, you now have to insert the Ubuntu USB drive into your computer system and turn it on.
Step 3: If your computer system boots up the USB drive automatically after completing the above process, you're done.
Step 4: If you're unable to access the boot menu, go to the Boot Menu or BIOS/UEFI option and launch it. You can usually find this by pressing the F2, Del, or ESC key when your PC boots up. The information you're looking for should be available when your PC boots up.
- For Acer booting key is F9, F12, or Esc.
- For Asus booting key is F8 or Esc.
- For Compaq booting key is F9 or Esc.
- For eMachines booting key is F2.
- For Fujitsu, the booting key is F12.
- For HP booting key is F9 or Esc.
- For Lenovo booting key is F8, F10, or F12.
- For Samsung booting key is F2, F12, or Esc.
- For Toshiba booting key is F12.
Step 5: Once you enter the BIOS or UEFI, locate the Boot menu section, where you can change the order of the boot drive.
Step 6: Set the Ubuntu USB drive as the first boot drive in the BIOS settings, save the changes, and then restart the computer to boot from the USB drive.
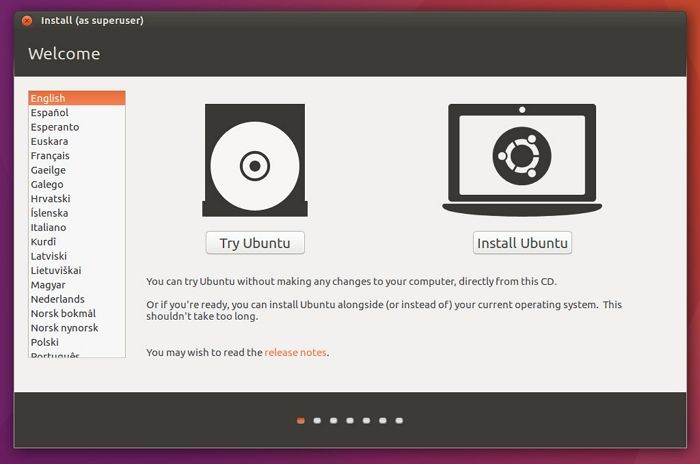
Step 7: To install Ubuntu, restart your PC, and it will boot into the Ubuntu from the USB drive. If it's your first time, set up Ubuntu, and it's ready to use.
Why Do You Boot from USB Ubuntu?
Booting from a USB Ubuntu installation is a quick and easy way to get a computer up and running. This process offers several benefits, including the ability to quickly access a fully functional operating system, restore a system to a known good state, and troubleshoot issues without affecting the host operating system.
- Install or upgrade Ubuntu: Using a bootable Ubuntu USB stick simplifies the process of installing or upgrading Ubuntu, eliminating the need for third-party sources to access the same.
- Easy testing: Ubuntu can be tested on a USB without modifying the host PC's configuration, providing a convenient way to experience the Ubuntu desktop without disrupting the original setup.
- Conveniently booting: Using a USB drive to boot into Ubuntu is a secure and convenient way to access the operating system on a borrowed machine or in an internet cafe. The process is straightforward and only requires a few clicks to set up, making it easy to get started.
Conclusion
Booting from USB Ubuntu is a quick and easy process that requires only a few clicks. This allows you to test the USB user experience and even boot Ubuntu on a borrowed machine or internet cafe without any issues. Follow the step-by-step process we provided to enjoy seamless access.
FAQs
Although we've covered the necessary details for booting from a USB Ubuntu installation, there are still some frequently asked questions that we'd like to address. This will not only expand your knowledge but also make the process smoother for you.
1. How do I download Ubuntu from USB?
To install Ubuntu on a computer, create a bootable USB using the Ubuntu ISO or setup file, then boot from the USB and install Ubuntu on the computer. This allows you to download Ubuntu from the USB.
2. Is an 8GB USB enough for Ubuntu?
8GB is sufficient for running Ubuntu efficiently, as most distributions can run smoothly from a USB drive of this size.
Related Articles
- [New Tutorial] Backup Game Saves on PS4 in Three Methods
- Bash Profile on Mac - One Post for All Information
- Mac Safe Mode | Boot Mac to Safe Mode in macOS 13/12/11 [ 2022 Guideline ]
- Fix Computer Slow after Windows 10 Update | Speed Up PC in 6 Ways
- How to Sync Two External Hard Drives in Windows 10 [Two Nice Tips]
If you're having trouble syncing two external hard drives in Windows 10, this article has got you covered. We'll present the two most efficient tools for the job, and with proper use, you'll never have to worry about data transfer issues again. - FIXED: System Image Recovery Failed [Updated 2023]
When a system image recovery failed error occurs, do not worry because you can solve this problem. In this article, you will learn how to fix the system image recovery failed error in every possible way. After reading this post, you can have an overview of the error.