Real Fixes: This app can't run on your PC in Windows 10
Symptoms of "This app can't run on your PC" Error
The "This app can't run on your PC" error message is a notorious issue in Windows 10, affecting various apps, including default Windows and third-party software. It can manifest in different forms, such as a pop-up error message, and may be caused by a range of factors, including compatibility issues, outdated software, or corrupted system files.
- The app is unable to run on your PC due to access denied. Creating a new administrator account should resolve the issue.
- This app can't run on your PC game error.
- This app can't run on your PC Windows Store error.
- This app can't run on your PC batch file may not function properly on your PC. To resolve the issue, ensure that you're running the batch file in administrator mode. If the problem continues, refer to the troubleshooting steps outlined in the provided post to troubleshoot and fix the issue.
- This app can't run on your PC due to conflicts with Kaspersky, Bitdefender, or Avast. To resolve this, uninstall and then reinstall the respective security tools.
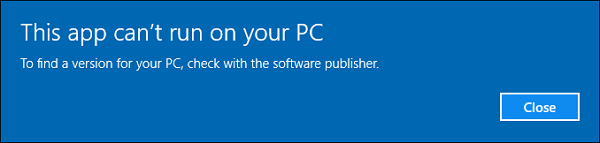
- This app can't run on your PC. Check with the software publisher. Most users are already familiar with this error message, and it affects them quite frequently.
Troubleshooting Steps to Fix "This app can't run on your PC" Error in Windows 10
This post has real fixes to help you solve your problem. Follow the tried and true fixes now!
Fix 1. Download the Right Version of the Programs
The most common reason for this error message is that you've downloaded the wrong program for your operating system, such as installing a 64-bit program on a 32-bit Windows system. To resolve this, double-check the program you're trying to install and ensure you have the correct setup files downloaded for your specific OS.
If you're running mostly 64-bit programs, it's recommended to upgrade Windows 10 from 32-bit to 64-bit without losing data. Before doing so, it's essential to back up all important files using a reliable file backup program, such as Qiling Backup, which allows for easy data backup under Windows 10/8/7.
Step 1. Click "File backup" button to initiate a backup.

Step 2. Local and network files will be displayed on the left side, allowing you to extend the directory to select which files to back up.

Step 3. To store the backup, select the desired location on your device, following the on-screen instructions provided by your device's operating system. This will guide you through the process of choosing a location to save the backup, such as an external hard drive, cloud storage, or a specific folder on your device.

Step 4. To encrypt the backup with a password, click on "Options" in the "Backup Options" section. This allows for various customization options for the backup process.

Set up a backup schedule and choose to initiate a backup at a certain event in "Backup Scheme".

Step 5. You can save the backup to a local disk, Qiling's online service, or a NAS.

Step 6. Qiling Backup allows customers to back up data to a third-party cloud drive and its own cloud drive, providing a convenient and secure way to protect their digital assets.
To back up data to a third-party cloud drive, select Local Drive, scroll down to add Cloud Device, add your account, and log in.
Step 7. To start a backup, click "Proceed" after initiating the process. Once the backup is complete, it will be displayed as a card on the left side of the panel. You can then manage the backup job further by right-clicking on it.

Fix 2. Create a New Administrator Account
If you're on a guest account, try switching to your administrator account. If you're already on your administrator account and the problem persists, create a new administrator account to fix the issue.
Step 1. To access the settings for your user account, start by typing "Settings" in the start menu dialogue box and clicking on "Accounts".
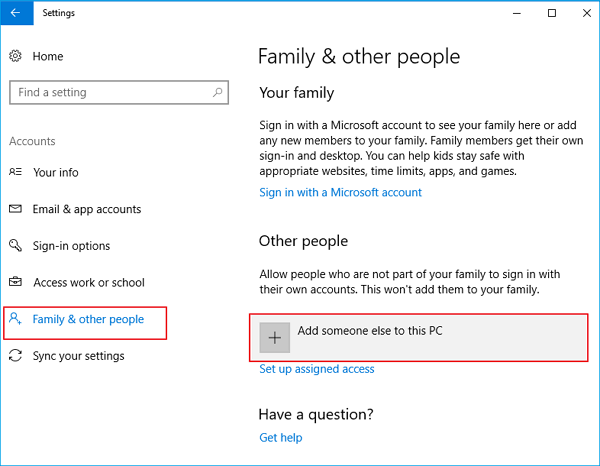
Step 2. To add a new user to your PC, click on the "Family and other users" option and select "Add someone else to this PC".
Windows will guide you through its wizard on how to create a new account. When the new window comes forth, click "I don't have this person's sign-in information".
Step 3. Windows will now prompt you to make a new Microsoft account after selecting the option "Add a user without Microsoft".
Enter all the details and choose an easy password that you can remember.
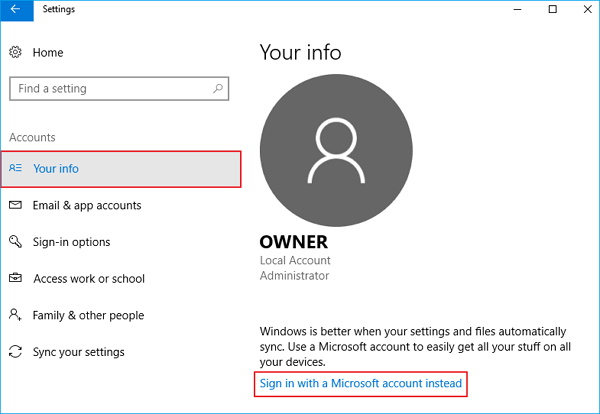
Step 4. Go to the "Settings" page, then click on "Accounts" and select "Your info". From there, choose the option to sign in with a Microsoft account instead.
Step 5. Enter your new username and password and click "Sign in".
If switching to a new administrator account solves your problem, you'll need to relocate your personal files and folders to this new account and use it from now on.
Fix 3. Enable App Side-loading
Step 1. To open the Windows Update settings, press the Windows key + I on your keyboard at the same time, and then click on "Update & security".
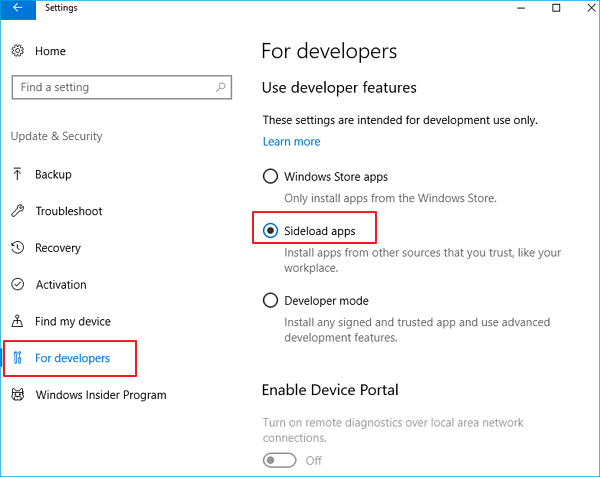
Step 2. To sideload apps on your device, click on the "For developers" option on the left side of the pane, and then select the "Sideload apps" option on the right side.
Fix 4. Disable SmartScreen
SmartScreen is a built-You're saying that the Windows 10 feature called "Windows Defender SmartScreen" can sometimes cause an error, so it might be best to disable it.
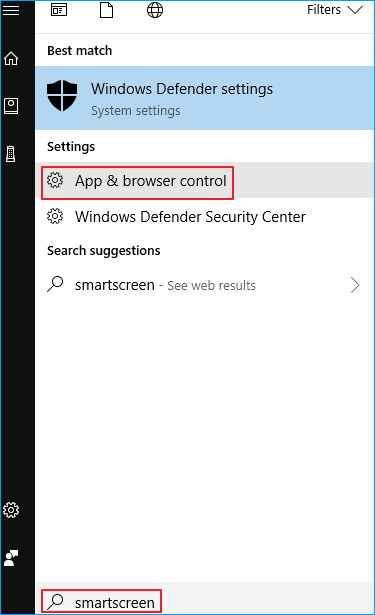
Step 1. To access the Smart Screen feature, press the "Windows + S" keys simultaneously, which will open a search box. Type "Smart screen" in the search box and click on "App & browser control" from the search results.
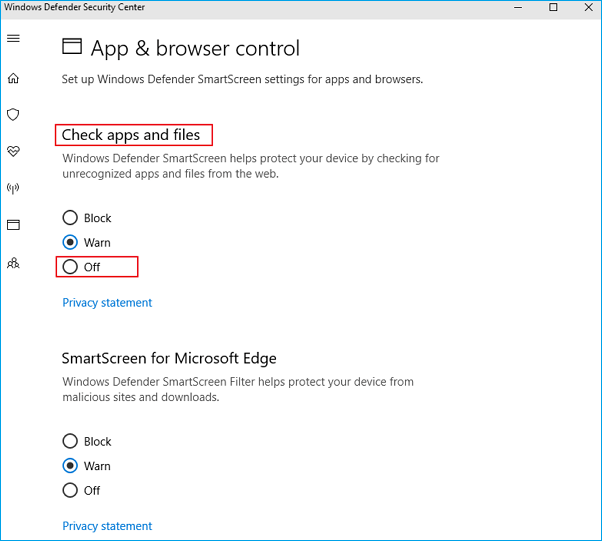
Step 2. Click the "Off" option under the "Check apps and files" category.
Step 3. To proceed, you need to provide administrator approval. Click "Yes" at the User Account Control window.
Step 4. Try reinstalling the app you were trying to install, and see if the notification appears again.
If SmartScreen filter is set to Warn, it can help prevent you from downloading viruses or malware. If it reappears, change your filter back to Warn status to maintain this protection.
Extra Fixes:
If the error still happens after you have tried one of the fixes above, you can still try the following solutions or ask us for help directly.
- Update Windows Store
- Disable Proxy or VPN
- Repair your registry
- Clear your browser cache
- Download the application again using a different web browser
- Perform a Windows 10 clean boot
Related Articles
- How to Recover Data from SD Card Formatted As Internal Storage
- How to Delete Apps on Chromebook
- How to Transfer Data from Xbox 360 to Xbox One
- Break Windows 10 Roll Back Limit - Roll Back to Windows 7/8 after 30 Days
- 2022 Official Ways to Find Camtasia License Key: How to Find Camtasia Product Key
How to find Camtasia license key? Once you've to reinstall Camtasia to another device or occasionally format the existing partition or disk, this article can teach you how to find Camtasia product key. - How to Find Chrome Account and Password
If you are thinking how to find a chrome account and password, then this article is for you. We will discuss about two different ways through which we can find a chrome account and password.