Windows 10 Backup Features - All You Need to Know
Windows 10 has a built-in backup feature called File History that allows you to automatically back up your files to an external drive or network location. This feature is easy to use and can be set up to back up your files at regular intervals, such as daily or weekly. You can also choose to back up specific folders or files, and even set up a backup schedule to suit your needs.
If you're just creating a backup of your computer, the built-in "Windows Backup and Restore" is probably overkill for most people.
Windows Backup is a built-in feature in Windows operating system that allows users to create backups of their files, folders, and system settings. It can be used to backup data to an external hard drive, network location, or a cloud storage service.
Why Backup Windows 10
In the event of a drive failure, virus or malware attack, drive theft, or accidental deletion, backing up your Windows 10 computer will allow you to restore it.
Creating a backup is crucial because it allows you to replicate the same data on other computers, which is particularly important for sensitive documents that you wouldn't want to lose.
Creating a backup of your Windows computer is a simple process that can be done on an external USB drive, hard drive, or third-party cloud services like Google Drive, OneDrive, or Box.
Instead of doing a full backup each time, you can turn on incremental or differential backups, which constantly back up all your data at a specified time and interval.
A backup of your Windows 10 PC is essential in case of unexpected events such as system crashes, hardware failures, or accidental file deletions. By creating a backup, you can ensure that your important files, settings, and programs are safe and can be easily restored in case of a disaster.
- Man-made/Natural disaster: Disasters can strike at any time, making it essential to create a backup of your computer. This can be done by saving your data on an external drive or in the cloud, providing a safeguard against data loss in case of an unexpected event. If your external drive is damaged, your files can still be recovered by accessing the backup from the cloud.
- Deleting a file or a registry file accidentally: Losing important files or registry settings is a common issue, often resulting from accidental deletion or corruption. However, by regularly backing up your computer, you can recover your files and settings in case of a problem. This allows you to restore your PC to its previous state, effectively undoing any unwanted changes or deletions.
- Malware or virus attacks: If your computer is infected with a virus or malware, you can restore it to a previous state without losing any data or settings by using a recent backup.
In Windows 10, there are several features that allow you to back up your computer, including File History, System Image Backup, and OneDrive. These features enable you to create copies of your files, system settings, and even a complete image of your hard drive, which can be used to restore your computer in case of a failure or data loss. By utilizing these backup features, you can protect your important files and settings, and ensure that your computer is always up-to-date and secure.
Windows 10 Backup Features
Windows 10 has a reliable backup feature that works flawlessly, allowing users to easily create a backup of their PC, which is a basic expectation from backup and recovery software.
Windows 10 offers several backup options for its users, including the built-in Backup and Restore tool, which allows users to create a system image and back up their files to an external drive or network location. Additionally, users can use the File History feature to back up their personal files to a network location or external drive, and the System Image Backup feature to create a full system image.
- Backup: Microsoft has a built-in backup tool that allows users to create backups of all their files without needing third-party software, and it's free. This tool, Windows Backup and Restore, offers features for both general and tech-savvy users to create easy backups on the go, which can be saved to a USB drive, external hard drive, or CD/DVD.
- File History: File History is a feature that automatically backs up library folders like Documents, Pictures, Videos, and Audio at a specified time, providing a convenient backup option, but it only backs up these specific folders and not a full system backup like the "Backup and Restore" feature.
How to backup your PC
To backup your Windows 10 PC, go to Settings > Update & Security > Backup, then select Add a drive or network location to choose where you want to save your backups. You can also set up automatic backups to run at a specific time.
Step 1. Connect your external drive or a USB flash drive to your computer.
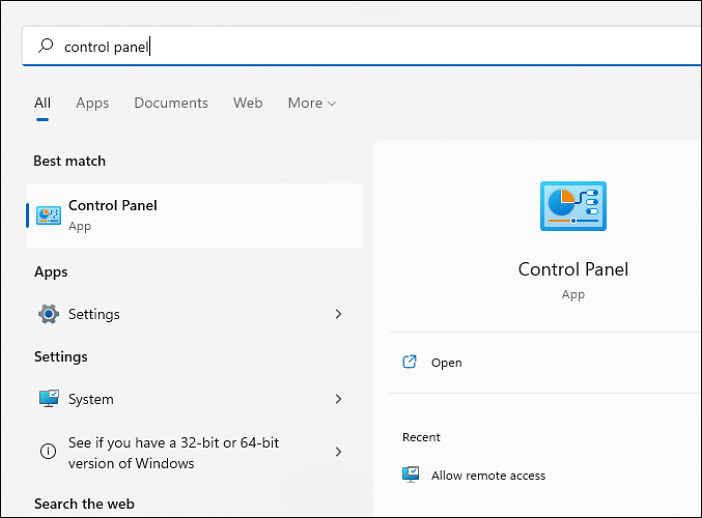
Step 2. To access the Control Panel, click on the magnifying glass icon located in the bottom left corner of the screen, which is typically found in the taskbar. From there, type "Control Panel" into the search bar, and select the relevant result that appears. This will open the Control Panel window, allowing you to access various system settings and tools.
Step 3. Open "Control Panel" from the results.
Step 4. To open the "System & Security" section in Windows, navigate to the Control Panel and click on it to open it. Then, locate the "System & Security" option and click on it to open it.
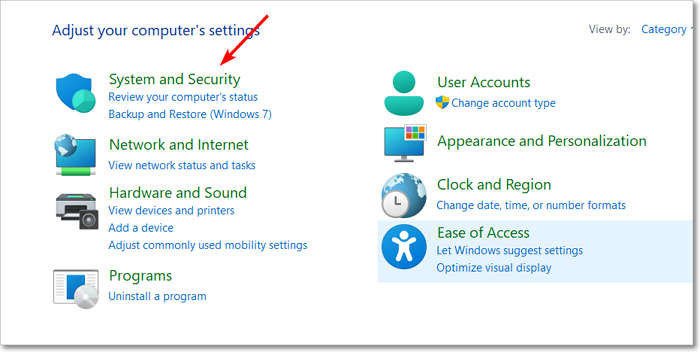
Step 5. Now select "Backup and Restore (Windows 7)."
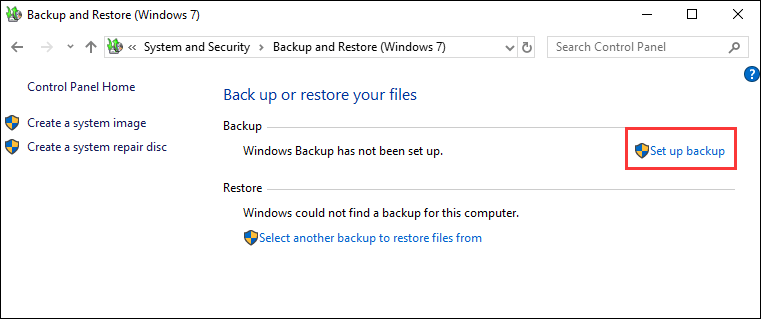
Step 6. To set up a backup, go to the "Backup" section and select "Set up backup." Next, choose the drive where you want to store the backup and click "Next."
Step 7. Select "Let me choose" to manually choose the folders you want to back up. This allows you to pick specific folders that contain your important files and documents. This option is recommended if you have specific files or folders you want to include or exclude from the backup. If you select "Let Windows choose (recommended)", Windows will automatically select the default folders to back up, which may not include all your important files.
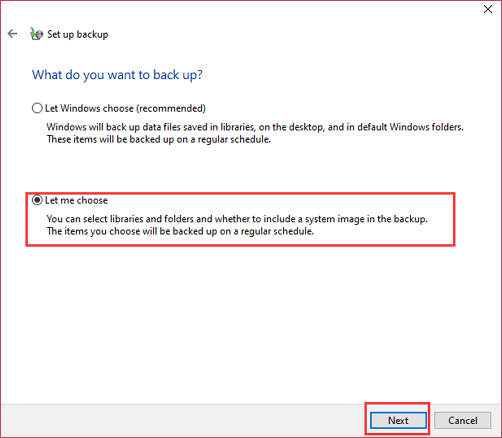
Step 8. Now, press the "Next" button.
Step 9. Select all the checkboxes under "Data Files" and choose the drive and folders you want to include from the "Computer" section.
Step 10. Click on the checkbox "Include a system image of drives: System Reserved. Windows 10 (C:)" and then click on "Next."
Step 11. On the next screen, click "Save settings and run backup."
Enable File History
Step 1. To start File History, click on the "Start" button on your computer, type "File History" in the search bar, and click on the "File History" app from the search results.

Step 2. To transfer files to an external drive, insert a USB drive or an external hard drive, then click on "Select drive" and choose the external drive. Click "OK" to confirm.
Step 3. To exclude folders, click on the "Exclude folders" option, then select "Add" to add the specified folders to the exclusion list.
Step 4. Now, select "Save changes" when done.
Step 5. Go back to the File History screen, and select Advanced settings.
Step 6. To save copies of files and set the interval for File History to run and backup files, click on "Save copies of files" and select the desired interval.
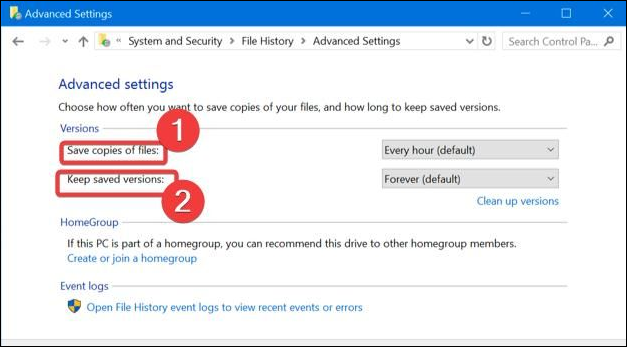
Step 7. In the "Keep saved versions" section, select the duration of how long the backup file should be stored on the external drive before being replaced, and click on "Save changes."
Step 8. Go back to the "File History" window, and select "Turn on" to enable File History.
Wrap Up
Windows 10 offers free in-built backup features, including the Backup and Restore tool and File History, which are capable of backing up most users' data.
Related Articles
- [Solved] What Happens If I Interrupt System Restore Windows 10?
- 20 Useful Keyboard Shortcuts That Every Mac User Should Know
- What Is Direct Memory Access and How to Enable DMA On Your Own
- Complete Guide of SATA Cable[Definition, Types, Usage & Differences]
- [6 Quick Fixed] Computer Turns On But No Signal to Monitor
If your computer turns on but there's no signal to the monitor, it's likely due to driver or power issues. Fortunately, there are 6 simple fixes that can resolve the problem and get you back to work quickly. By learning these fixes in detail, you can troubleshoot and resolve the issue, and also consider using a handy backup tool to prevent data loss on your computer. - How to Connect PS4 Controller to PC? Follow A Full Guide
Unleash the full potential of your PS4 controller on your PC by following our simple step-by-step guide. Pair your controller with your computer in no time and customize its settings to take your gaming experience to the next level.