How to Repair Windows 10 Using Command Prompt [3 Ways]
If you're experiencing issues with your Windows 11 or 10 computer, such as slow performance, frequent blue or black screens, or crashes, it's likely that your operating system needs to be repaired. This can be a frustrating experience, especially when your computer won't boot properly. In such cases, it's essential to take action and repair your Windows 11 or 10 operating system to get your computer back up and running smoothly.
If Windows 10 won't boot, you can try repairing it using CMD with DISM and SFC commands. If these commands don't work, you can seek help with Windows Repair services. If your PC is completely unbootable, you can recover data with bootable data recovery software.
Recover Data on Windows 11/10 with Bootable Data Recovery Software
If your PC fails to boot, you can recover essential files with Deep Data Recovery using a bootable USB Drive instead of repairing Windows 11/10.
If you successfully boot Windows, you still risk losing data from Windows repair. A data recovery tool can help you recover deleted files from various storage devices, including hard drives, USB drives, SD cards, and cloud platforms, and even recover deleted photos, videos, audio, music, and documents.
To recover data from a computer that won't boot, you can use Deep Data Recovery Pro with Bootable Media. This tool allows you to create a bootable media that can be used to access and recover data from a non-booting computer.
Step 1. Create a bootable disk
To create a bootable USB, you'll need to erase the existing data on the USB, so make sure to back up any important files to another device. Then, use Deep Data Recovery WinPE Edition to create a bootable disk on the empty USB. This will erase the data on the USB, but it will also allow you to boot from the USB and access the recovery software.
Connect a USB drive to your PC, then launch the Deep Data Recovery WinPE Edition software. Select the USB drive and click "Create" to create a bootable disk.
Step 2. Boot from the bootable USB
Connect a bootable disk to a PC that won't boot, and change the boot sequence in the BIOS settings by pressing F2 at startup. This often resolves the issue when the computer is restarted.
To boot your PC from a device other than the hard drive, press F10 to save and exit the BIOS settings. This allows you to select booting from a removable device, such as a USB drive, or a CD/DVD drive. This is typically done by selecting the "Removable Devices" or "CD-ROM Drive" option in the BIOS settings.
Step 3. Recover data from a hard drive that won't boot
When booting from a USB, you can run Deep Data Recovery from the WinPE bootable disk, allowing you to select the drive to scan for lost files.

Click "Scan" to start the scanning process.

After scanning, you can preview and recover data from the computer or laptop, saving the recovered data to another place to avoid overwriting.

How to Repair Windows 10 Using CMD [SFC Command]
Windows 11/10/8 has a built-in tool called Windows Troubleshoot that can quickly repair the operating system. To use it, you'll need to create a bootable USB with a Windows bootable disc or drive, which is particularly useful for a computer that won't boot.
To create a Windows bootable disk, you first need to blank a USB drive, which involves formatting it to remove any existing data, and then download a Windows operating system into the USB drive, effectively turning it into a bootable device that can be used to install Windows on a computer.
Before we start, here is an 8-In this video, we'll show you how to repair Windows 10 using the Command Prompt. We've identified three key moments in the process that you should be aware of. First, you'll need to open the Command Prompt as an administrator.
- 01:47 Using the DISM command
- 05:16 Reset Windows with command lines.
- 07:03 Run system restore with CMD.
How to Run CMD from Windows Bootable Disk
After you create a Windows bootable disk, we can start to repair Windows 10.
Step 1. Connect the Windows bootable disk to your computer.
Step 2. To turn on the PC, press the power button, and then press the Esc, F1, F2, F8, or F10 key to access the BIOS settings. If you're unsure how to enter the BIOS, you can refer to a link that provides instructions on how to do so.
Step 3. When you successfully enter the BIOS settings, move the connected USB drive to the top of the Boot menu.
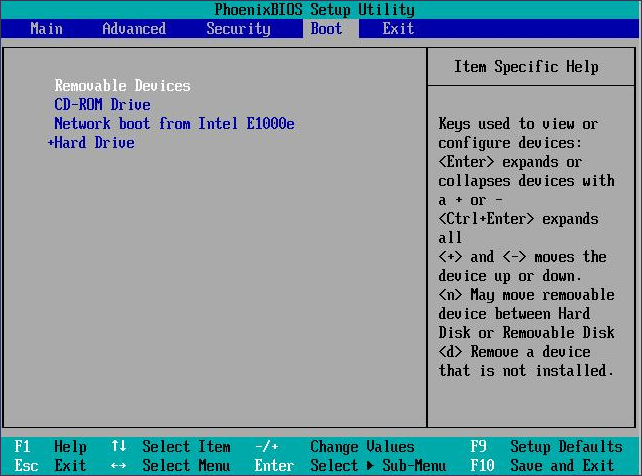
Step 4. Press the F10 button to save the changing setting and exit the BIOS.
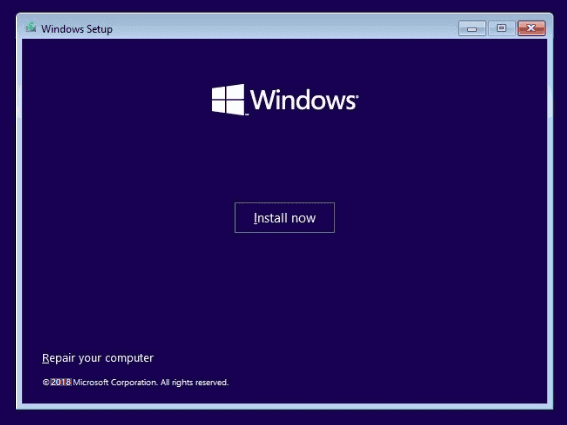
Step 5. On the Setup page, adjust all the settings as desired and then click the "Next" button.
Step 6. Click "Repair your computer".
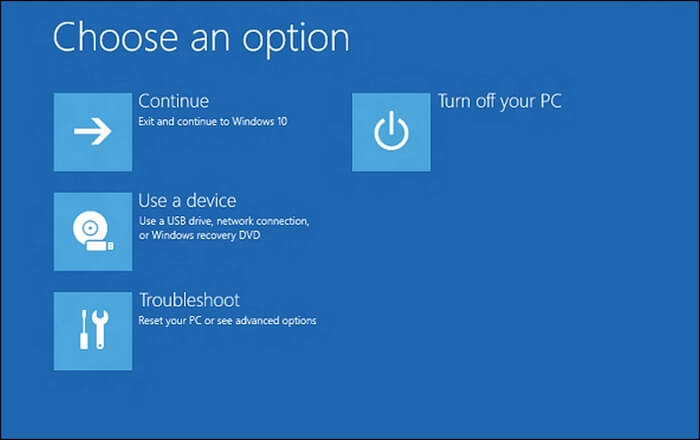
Step 7. Click the Troubleshoot button.
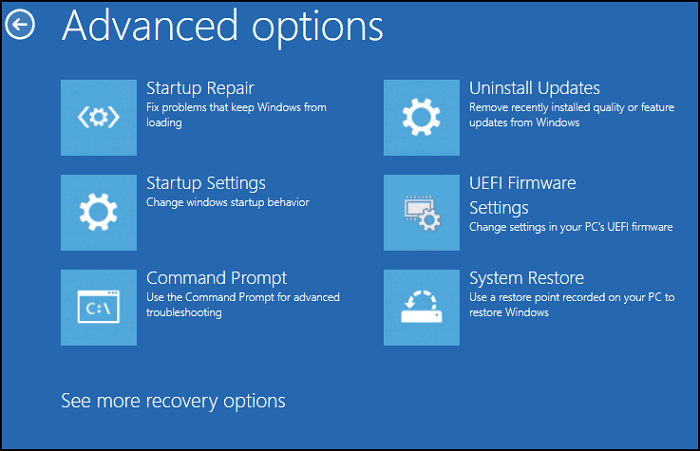
Step 8. Choose the Advanced Options button and click "Command Prompt".
Repair Windows 10 Using CMD [with SFC Command]
The System File Checker (SFC) is a tool in Windows 11/10 that scans and restores corrupted system files, allowing users to repair their system using the Command Prompt.
Step 1. Run CMD.
Step 2. Type in sfc /scannow, and press the Enter key.
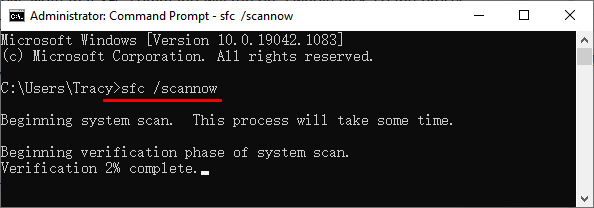
Step 3. Wait until the scanning is finished.
Note: When your System File Checker (SFC) is not working, you can try to fix it by following the steps provided in the link.
Repair Windows 10 Using CMD [with DISM Command]
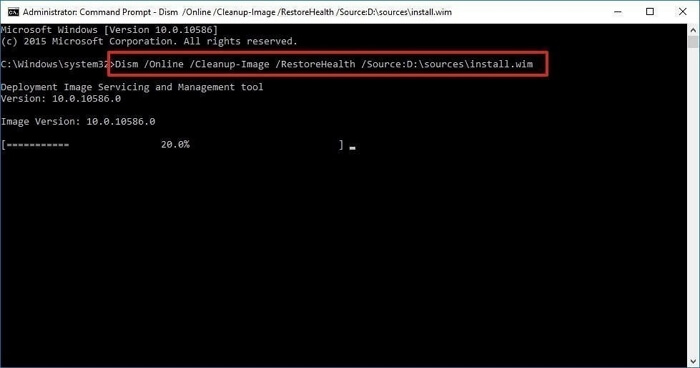
If you're experiencing issues with Windows that can't be resolved with the SFC command, you can try using the DISM command, which is short for Deployment Image Servicing and Management, to repair images on Windows 10/11. You can use this command in the Command Prompt to fix various Windows issues.
Step 1. Run CMD from a Windows bootable disk.
Step 2. To check if there are any corruptions in the Windows image, you can type `DISM /Online /Cleanup-Image /CheckHealth` in the Command Prompt. This command will scan the Windows image for any corruptions and provide a report on the results.
Step 3. Run the command DISM /Online /Cleanup-Image /ScanHealth to scan Windows images for any corruption.
Step 4. To fix Windows image corruptions, type `DISM /Online /Cleanup-Image /RestoreHealth /Source:repairSource\install.wim` in the Command Prompt. This command will restore the Windows image to a healthy state using the install.
Repair Windows 10 with Windows Repair Services
If you're unable to repair Windows 10 using the Command Prompt, consider seeking professional help from Qiling Data Recovery services. Their team can assist with various system issues without compromising your data.
Consult with Qiling data recovery experts for a one-on-one manual recovery service, which includes a free diagnosis. Afterward, we can offer various services tailored to your specific needs.
- Fix Windows boot issues, including BSOD
- Fix Windows error and configure Windows environment
- Restore the system when it fails to boot
- Optimize Windows computer to make it run quickly
Summary
If Windows 10 is experiencing issues, you can try using the Command Prompt to repair it with the SFC command and DISM command. If these commands don't resolve the problem, you can also consider resetting or restoring Windows to resolve some issues.
If you're repairing Windows using repair commands and risk losing important files, don't forget to back up your data. If you've already lost some files, consider downloading Deep Data Recovery to help recover them.
Repair Windows 10 Using Command Prompt FAQs
To repair Windows 10 using CMD, you can refer to the additional questions and answers in this part, which provide step-by-step guidance on how to troubleshoot and fix various Windows 10 issues using the Command Prompt.
How do I repair Windows 10 with command prompt?
You can repair Windows 10 using the Command Prompt (CMD) by running the SFC and DISM commands. These commands can help fix corrupted system files and restore the operating system to a stable state.
- 1. Entering the CMD windows.
- 2. Run the command `sfc /scannow` and press Enter to check and repair Windows 10 corruptions.
- 3. If the SFC command doesn't work, type in DISM / Online / Cleanup Image / CheckHealth to check for any corruptions.
- 4. To scan the corruptions of Windows images, type in `DISM /Online /Cleanup-Image /ScanHealth` in the Command Prompt.
- 5. To repair Windows image corruptions, type the command `DISM /Online /Cleanup-Image /RestoreHealth /Source:repairSource\install.wim` in the Command Prompt. This command uses the DISM (Deployment Image Servicing and Management) tool to scan and repair corrupted system files, and it uses the install.
How do I recover from Unbootable Windows 10?
Download Deep Data Recovery and create a bootable disk to recover data.
- 1. Launch Deep Data Recovery and create a bootable disk.
- 2. Boot from the bootable USB.
- 3. Recover essential data from a hard drive that won't boot
What is SFC and DISM command?
The System File Checker (SFC) and Deployment Image Servicing and Management (DISM) commands are used to troubleshoot system issues on Windows. SFC scans for and restores corrupted system files, while DISM repairs images on Windows.
Related Articles
- How to Fix Windows 10 Error Code 0xc00000e Without Data Loss
- How to Fix Error Message 'Word was Unable to Read Document. It May be Corrupt' Efficiently
- How to Fix File Explorer Won't Open in Windows 10 or Windows 11
- 5 Ways to Fix BSOD Error 0x00000133
- How to Fix 'Switch User' Option Missing in Windows 10/11
Fix the Switch User option missing in Windows 10 or 11. Check user accounts, policies, services, and system settings to restore switching. - How to Fix WAN Miniport Driver Issues in Windows OS [Updated 2023]
If you're experiencing issues with the Wan Miniport driver in Windows OS, we're here to help. Let us know how we can assist you in resolving this problem.