Auto Backup Outlook 2016 with Ease
About Outlook 2016
Windows Outlook 2016, introduced in Windows 10, offers a new mail and calendar experience across Office 365. The desktop version has improved with better cloud file support, deeper search, and a darker theme for brighter monitors. Attaching files to emails is also simplified with recently used items in the attach file dialogue. Additionally, Outlook 2016 supports groups and OAuth, making it easier to use. To ensure a seamless experience, it's essential to back up Outlook 2016 files, and doing so automatically would make things even simpler and more fabulous.
How to Back Up Outlook 2016 Automatically
The Personal Folders Backup Add-in, which was previously used to back up Outlook data, is only compatible with the 32-bit version of Outlook 2010 and is no longer available in later versions, including Outlook 2016.
To make an auto backup in Outlook 2013/2016/2019 happen, you can use the powerful file backup software Qiling Disk Master, which offers backup features that help you back up your Outlook, including PST files and categories like contacts, calendar, Inbox, and more.
There are mainly two ways to complete automatic Outlook backup:
Method 1. Auto back up Outlook with Personal Folder Backup Add-in
If you are using the 32-To automatically back up your Outlook 2010, use the Personal Folder Backup tool, a free add-in from Microsoft. This tool allows you to backup your important mail files with just a few clicks. To get started, download and install the Personal Folder Backup add-in on your computer, and then follow the next steps to set it up.
Step 1. Start Outlook 2010, on the "File" menu, click "Backup" > Click "Options".
Step 2. Select the PST files that you want to back up.
Step 3. To auto-backup Outlook 2010 files, set "AutoSave" in Outlook, and use the backup reminder to remind you to backup files daily or at specified intervals.
Personal Folder Backup can only save PST files, and you'll need a lot of space to store those backups.
Method 2. Auto back up Outlook 2016 with Qiling Backup
If you're using Outlook 2013/2016/2019 or want to selectively back up specific data like contacts or calendar, consider using Qiling Backup, a professional software that can automatically back up important data with its schedule backup feature. This tool supports backing up various types of data, including files, disks, emails, and even systems, with compressed files. You can also use it to create a recovery partition or set up an auto-backup plan for Outlook, making it easy to back up your PST, contacts, emails, or calendar. Whether you want to back up all of Outlook or just specific components, Qiling Backup can get the job done.
The PST file is the Outlook data file that contains all accounts, emails, archives, contacts, calendars, and more. To back up a PST, you need to know its location, typically saved in the Documents\Outlook Files folder. Alternatively, you can find the PST file by going to File > Account Settings > Data Files in Outlook. Backing up the PST file will save everything within an account, including emails, contacts, and calendars.
Step 1. Click "File" in Outlook.
Step 2. Go to "Account Settings" > "Account Settings".
Step 3. On the "Data Files" tab, click an entry, and click "Open Folder Location".
Once you've installed the backup software, you can specify the file location during the backup process, allowing you to choose where the backed-up data will be stored.
To automatically back up Outlook PST file with Qiling Backup:
Step 1. Open Qiling Backup and select "File backup" on the main window.
Step 2. Select the files to backup and select the backup destination.

Users can select specific files to back up by browsing the left pane and then click the browse icon to choose a destination for saving the file backup.
If you create a backup of your important files, consider storing the backup in a separate location, such as an external hard drive or cloud storage, to ensure it remains safe in case the original backup becomes corrupted or destroyed.

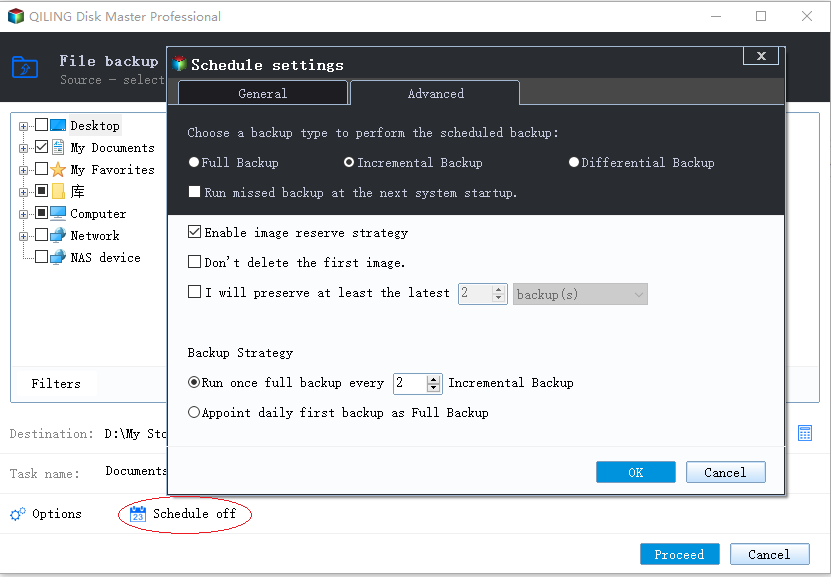
Step 3. Create a backup plan to automatically back up selected files.
Click "Schedule: Off" to create a flexible and automatic backup plan, which allows you to set up a schedule for your backups.
Set the automatic backup schedule by day, week, or month, and click "Save" to keep the changes.

You can also click "Backup options" at the left bottom to set more advanced parameters for the plan.

And the Image-A reserve strategy will help you to keep the backup image as per image retention rule.
Step 4. Click "Proceed" to execute your operation.
FAQs Related to Outlook Auto Backup
Here are some of the most concerned issues related to the auto backup of Outlook.
"How do I automatically back up my Outlook PST file?"
To automatically back up Outlook PST, you can use the backup add-in if you're using Outlook 2010, or a professional backup program like Qiling Backup for later Outlook versions.
"Does Outlook back up contacts automatically?"
To enable automatic backup of contacts in Outlook, set the auto backup feature. If using the backup add-in, contacts can only be backed up automatically by backing up the PST file. For sole contact backup, use Qiling Backup instead.
"Does File History back up Outlook?"
File History is a built-In Windows 8 and later, you can use the Backup feature to automatically back up a selected folder, including the Outlook folder, to another drive. This can be done by accessing the Backup setting in Windows.
Here are the detailed steps to back up Outlook via File History.
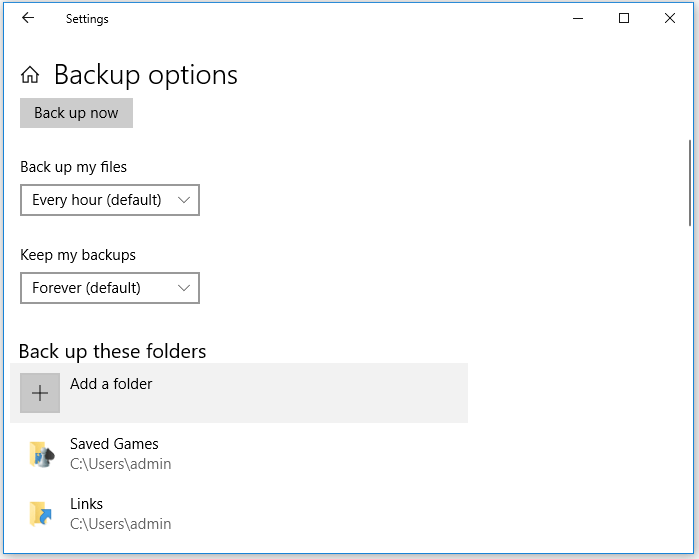
Step 1. Type backup settings in the search bar and choose "Backup settings" from the result.
Step 2. If you haven't turned on File History yet, you should click "Add a drive" to choose the drive you want to back up the Outlook files to.
Step 3. To back up your Outlook PST file, click on the "More options" button, then select "Back up these folders" and click on "Add a folder" to choose the folder containing your Outlook PST file.
Step 4. Set the backup interval under "Back up my files". Then Windows will automatically back up Outlook to the selected partition.
Although using File History is a viable option, it has some notable drawbacks. The backup process can slow down your computer performance, and the longest interval is only a day, which may be too frequent for many users. If you're looking for a more flexible and efficient solution, a backup utility like Qiling might be a better choice.
The Bottom Line
The way to back up Outlook PST depends on the version of Outlook you're using. If you have the 32-bit version of Outlook 2013, the built-in backup add-in is a suitable option. However, if you're using a different version, including the latest Outlook 2019, you may want to consider using Qiling Backup, which is compatible with most Outlook versions. This utility also allows you to back up a single category from Outlook, a feature not supported by the backup add-in or file history. Choose the method that best suits your needs.
Related Articles
- Free Download Qiling Backup Full Crack + Serial/Keygen
- How to Ghost a Hard Drive in 3 Steps
- Backup Computer to USB Flash Drive in Windows 10/8/7
- [Easy] How to Clone USB Drive to Another Windows 10
- How to Clone RAID Disk with RAID Cloning Software
- How to fix Macrium Reflect clone failed
- The Best Way to Backup Windows Server 2008 to NAS [2022 Tips]
Don't worry if you will back up Windows Server 2008 to NAS. Qiling Backup makes it easy to back up Windows Server 2022/2019/SBS 2008/11.10,8,7. Read this guide and back up Windows Server to NAS drive with a complete guide.