How to Back Up Computer Windows 7 Before Upgrading to Windows 10 (2 Ways)
Why Do you Back Up Windows 7 Before Installing Windows 10
Windows 10 is a personal computer operating system released by Microsoft as part of the Windows NT family, launched on July 29, 2015. It introduces a "universal Windows app" platform (UWP) that allows apps to be designed for both Windows 10 and Windows 10 Mobile without needing to be rewritten.
Windows 10, the latest operating system from Microsoft, offers a range of new capabilities, including support for virtual hard disks, USB 3.0, Trusted Platform Module 2.0, and near-field communication. The operating system received mostly positive reviews upon its release, with critics praising Microsoft's decision to provide a free upgrade to Windows 10, its user interface, and gaming features, but criticizing the privacy controls that allow Microsoft to collect data from users.
Windows 7 received positive reviews for its expanded multimedia support and improved security and reliability, but reviewers were concerned about data loss when upgrading to Windows 10, making it essential to back up your computer before upgrading.
Back Up Windows 7 PC Data Using Backup and Restore
To create a backup in Windows 7 with Backup and Restore, you can follow these steps: First, open Backup and Restore by searching for it in the Start menu or typing it in the Run dialog box. Then, click on "Create a system image" or "Create a backup" to select the files and folders you want to back up. Next, choose a location to save the backup, such as an external hard drive or a network location. After that, select the files and folders you want to include in the backup, and click on "Save changes" to start the backup process. Finally, wait for the backup to complete, which may take some time depending on the size of the files and the speed of your computer. Once the backup is complete, you can restore your files and folders if needed. This will ensure that your important data is safe and can be recovered if anything goes wrong during the upgrade to Windows 10.
Preparations:
- To connect an external hard drive to your Windows 7 PC, simply plug it into an available USB port on your computer. Your PC should automatically recognize the external drive and prompt you to format it if it's new.
- Your Windows 7 PC
- Your Windows 10 PC

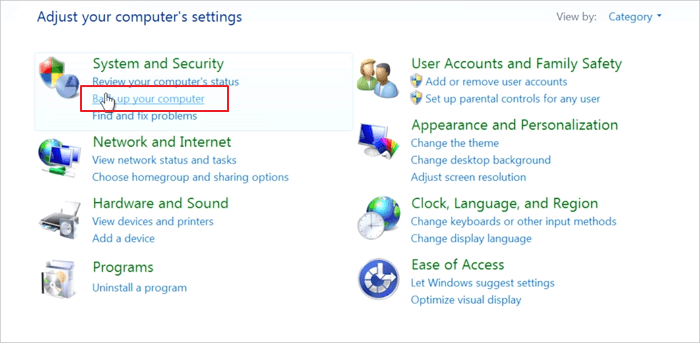
Step 1. To access the Backup and Restore feature, click the Start button, then navigate to "Control Panel > System and Security > Backup and Restore".
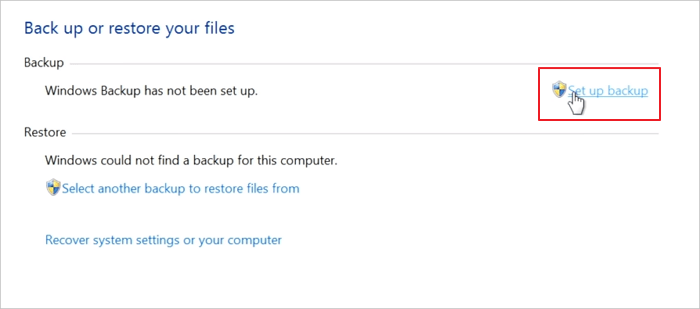
Step 2. Click "Set up backup".
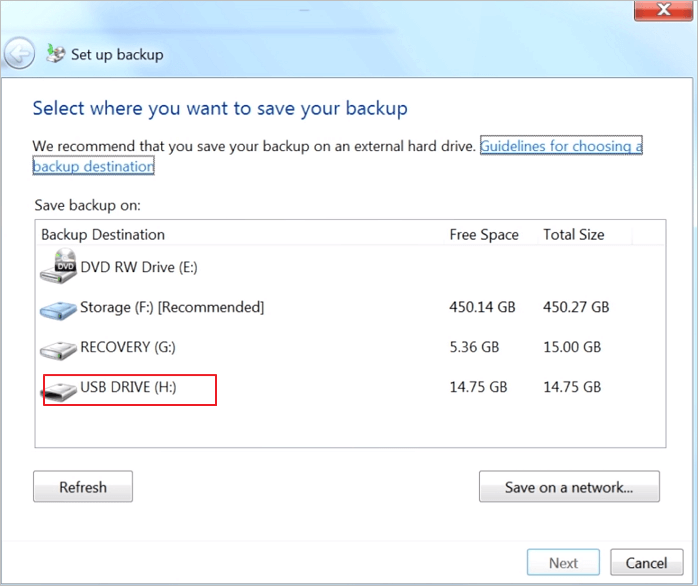
Step 3. Under "Backup Destination", select the external hard drive and "Next".
Step 4. Select "Let me choose" and click "Next".
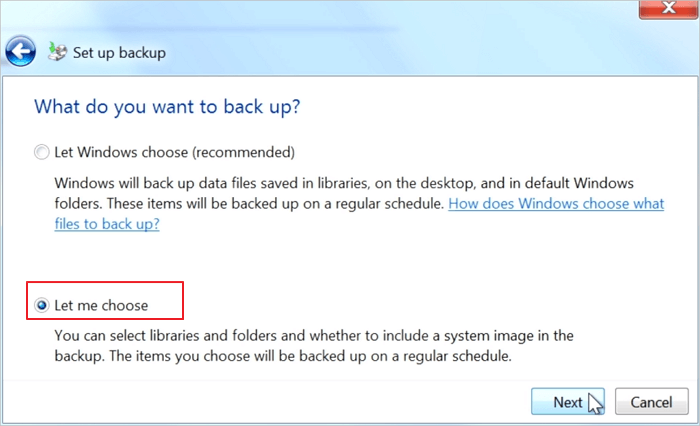
Step 5. Files under specific folders like Documents, Music, Pictures, and Videos will be automatically backed up. Follow the on-screen instructions to finish the backup process.
To restore Windows 7 backups to Windows 10:
- To connect the external storage device, first, ensure it's properly powered on. If it's a USB drive, simply insert the drive into an available USB port on your Windows 10 PC.
- Select the Start button, and then select "Settings".
- To update and secure your Windows 10, select "Update & Security > Backup > Go to Backup and Restore (Windows 7)".
- Click "Select another backup to restore files from".
- Select the backup created from your Windows 7 PC, and then click "Next".
- To select all files from a backup, check the "Select all files from this backup" checkbox and click "Next".
- To start restoring files to the Windows 10 PC, select the "Restore" option.
Back Up Windows 7 PC Data Before Installing Windows 10 with Software
The Backup and Restore feature in Windows 7 allows users to create backups of their important data, but it has some limitations. It can only back up files and folders on the same drive as the operating system, meaning users with multiple drives need additional backup and recovery tools to protect their data.
Qiling Backup is a comprehensive tool that offers a wide range of options for backing up data, including backing up specific files or folders, creating system backups, and scheduled backups, with excellent customer support.
Step 1. To initiate a backup, click the File backup button to backup your files.

Step 2. On the left, both local and network files will be shown, allowing you to browse and select the desired backup files from the extended directory.

Step 3. To store the backup, follow the on-screen instructions and select a location where you want to save the backup. This could be an external hard drive, a network drive, or a cloud storage service.

Step 4. To encrypt the backup with a password, click on the "Options" menu, then select "Backup Options" from the dropdown list. This will allow you to set a password for the backup.

To specify the backup schedule and start the backup at a certain event, click on the "Backup Scheme" option, which allows you to customize the backup process according to your needs. This includes selecting the timing and triggers for the backup to run.

Step 5. The backup can be stored on a local disk, Qiling's online service, or a network-attached storage (NAS).

Step 6. Qiling Backup allows customers to back up data to both a third-party cloud drive and its own cloud drive.
To back up data to a cloud drive provided by a third party, select Local Drive, scroll down to add Cloud Device, and then add and log in to your account.
Step 7. To start the backup process, click "Proceed" and the backup job will be presented as a card on the left side of the panel once it's finished. You can then right-click on the backup job to manage it further.

After the backup, you can restore image files with Qiling Backup on Windows 10.
Back Up Computer Windows 7 Before Installing Windows 10 FAQs
You have learned about the detailed process of backing up a computer in Windows 7 before installing Windows 10. You can read on if you still have problems getting additional help.
1. Will installing Windows 10 Delete everything from Windows 7?
Upgrading from Windows 7 or later to Windows 10 will preserve files, applications, and settings, but it's still a good idea to back up important data in case the upgrade doesn't go smoothly.
2. How long does it take to upgrade from Windows 7 to 10?
It takes about 45 minutes to 1 hour to complete the task, depending on your internet speed and computer.
3. How much does it cost to have Windows 10 installed?
Windows 10 will cost $119 for those not eligible for Microsoft's free upgrade, but users can also download the full version for free.
4. Can I restore Windows 7 backup to Windows 10?
Yes. To restore Windows 7 backup to Windows 10:
- Click the Start button, and then select Settings.
- Go to Start > Update and Security > Backup > Go to Backup and Restore (Windows 7).
- Click Select another backup to restore files.
- Choose the backup created from your Windows 7 PC, and then select Next.
- Select all files from this backup, and then choose Next.
- To restore files to a Windows 10 PC, click on the "Restore" button. This will initiate the file restoration process.
Conclusion
To create a backup image in Windows 7, use the built-in Backup and Restore tool or third-party software, and have an external hard drive or DVD burner ready. This will ensure you can install Windows 10 safely.
Related Articles
- What Is Disk Cloning and Why Is It Necessary
- How Can I Backup Files in Safe Mode
- Cloned SSD Won't Boot? Make Cloned SSD Bootable [5 Ways]
- 15 Best Backup Software Examples in 2022 Backup Tools List
- How Do I Uninstall Ubuntu and Install Windows 10?
I want to uninstall my Ubuntu and get Windows 10 backup, but how do I uninstall Ubuntu and install Windows 10? This article will tell you how to uninstall Ubuntu and install Windows 10 and offer a tool to help you. - How Do I Upgrade My Hard Drive Without Losing Data?
Searching for a way to upgrade a hard drive without losing data? Look no further. This short post provides the full guide to clone hard drive without losing any data by using Qiling Disk Copy.