[Unstable Wifi] How to Fix Wifi Keeps Disconnecting in Windows 11
Quick Navigation:
- 1. Does Windows 11 Have WiFi Issues
- 2. Why Does My WiFi Keep Disconnecting in Windows 11
- 3. 10 Methods to Fix Windows 11 WiFi Disconnection (Super Easy!)
- 4. Another 3 Solutions to Fix Unstable WiFi Problems (Advanced!)
Does Windows 11 Have WiFi Issues
Many Windows 10 users who updated to Windows 11 have been experiencing problems, including WiFi issues, despite the transition to the latest version.
Many Windows 11 users have been experiencing WiFi disconnections, which Microsoft is currently addressing.
WiFi connectivity issues in Windows 11 can be frustrating, but fortunately, there are fixes available to resolve the problem. Before diving into the solutions, it's worth understanding why WiFi keeps disconnecting in Windows 11. Once you're aware of the possible causes, you can try the available fixes to get your WiFi connection up and running smoothly again.
Why Does My WiFi Keep Disconnecting in Windows 11
If your WiFi keeps disconnecting in Windows 11, it's likely due to one of several common reasons. These include outdated WiFi drivers, interference from other devices or physical barriers, a faulty WiFi adapter, or a problem with your internet service provider.
File System Corruption: Users who have installed Windows 11 may experience WiFi disconnection errors due to file system corruption, but can resolve the issue by performing a clean install, as outlined in the article.
DNS issue: To resolve WiFi issues in Windows 11, ensure that DNS remains consistent, otherwise, you may need to set your current DNS.
Network Card Issues: Your system relies on a Network card to handle WiFi, which can be installed inside the device. Issues with this card can also lead to WiFi disconnections.
TCIP and DHCP Problems: In Windows 11, WiFi issues can occur due to misinterpreted DHCP and TCP/IP settings caused by connections to multiple WiFi devices.
The above-The listed reasons are some of the common causes of WiFi Issues in Windows 11, and in the next section, you will see how to fix Windows 11 WiFi disconnection issues.
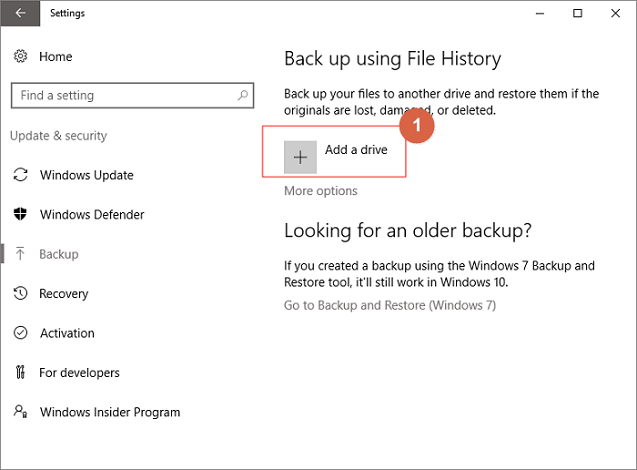
Windows 11 File History allows users to create automatic file backups and system backup images. This feature can be enabled by setting up a File History drive, which can be an external hard drive or a network location.
Many people agree on the importance of backup in data security, but struggle to choose a specific backup software to use.
10 Easy Methods to Fix Windows 11 WiFi Disconnects Frequently in Windows 11
When you have come across the Windows 11 Wifi disconnection problem, you can try the 10 methods below, all of which are pretty easy.
- 1. Turn On/ Off Airplane Mode
- 2. Forget and Reconnect to WiFi Network
- 3. Connect Automatically to WiFi Network
- 4. Set WiFi Network to Private
- 5. Enable WLAN AutoConfig Service
- 6. Update the WiFi Driver
- 7. Adjust the WiFi Power Management Settings
- 8. Change Power Plan Settings
- 9. Reset Network Settings
- 10. Run Network Troubleshooter
Method 1. Turn On/ Off Airplane Mode
To fix the WiFi problem in Windows 11, simply toggle the Airplane mode on and off, which will automatically restart your WiFi connection, resolving the issue. This can be done by going to Settings, then Network & Internet, and finally toggling the Airplane mode switch. Alternatively, you can also do this by pressing the Windows key + I to open Settings, then clicking on Network & Internet, and finally toggling the Airplane mode switch. This simple solution can resolve WiFi connectivity issues in Windows 11.
Step 1. To open the Action Center in Windows 11, press the Windows key + A key combination on your keyboard. This will open the Action Center, where you can view and interact with various system notifications and settings.
Step 2.To enable the Airplane mode, simply toggle the Flight mode button. This will disable all wireless communication and enable the Airplane mode.
Step 3. To disable Airplane mode, toggle the Flight mode button again. This will turn it off.
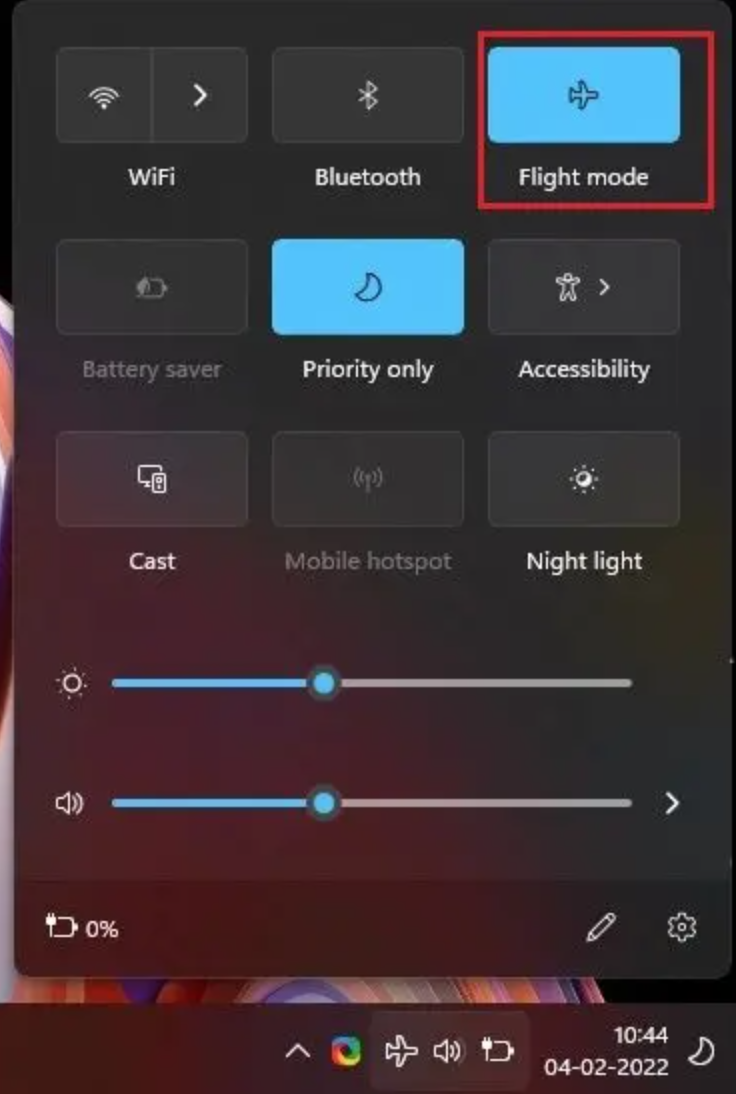
I've turned off your WiFi. Now try using your WiFi and see if the problem persists or not.
Method 2. Forget and Reconnect to WiFi Network
To resolve the issue, simply disconnect from your WiFi network and then reconnect to it. This simple step can often resolve connectivity issues.
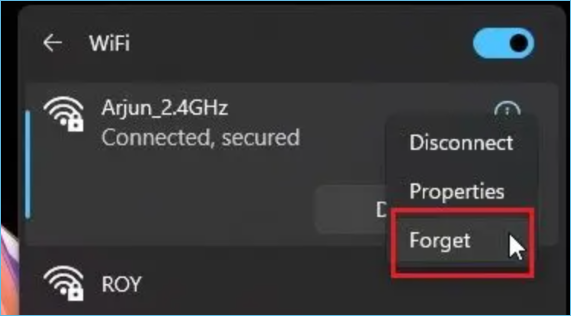
Step 1. Open the action center using Windows + A key.
Step 2. Click next to your connected WiFi icon.
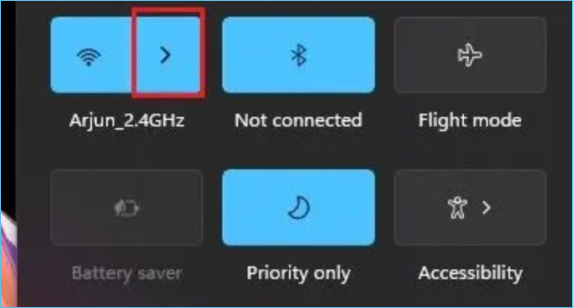
Step 3. Now, Right-click on your connected WiFi and click on Forget.
Step 4. Once forgotten, reconnect to WiFi again.
Method 3. Connect Automatically to WiFi Network
If your WiFi won't connect even when it's nearby, it might be due to WiFi settings. To resolve this, you need to allow Windows 11 to connect automatically to the WiFi network. To do this, follow the steps below.
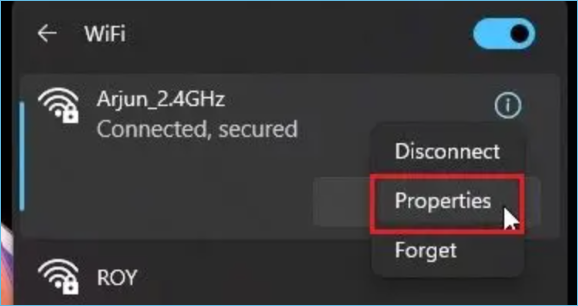
Step 1. To troubleshoot WiFi issues, go to the action center (Windows + A) and click the arrow next to your WiFi, which should be labeled as "Wi-Fi" or "Not connected".
Step 2. Click on WiFi Properties.
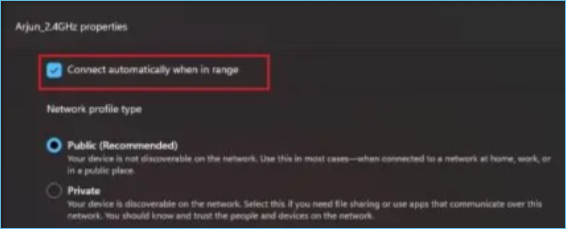
Step 3. Enable the "Connect automatically when in range" option.
Method 4. Set WiFi Network to Private
To ensure your computer's safety, it's recommended to set your Public WiFi network to private in Windows 11, as it's vulnerable to threats. To do this, follow these steps:
Step 1. To disconnect from WiFi, go to the action center (Windows + A) and click the arrow next to your WiFi, then click on the "Disconnect" option.
Step 2. Click on WiFi Properties.
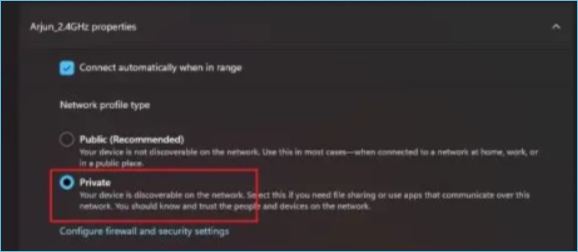
Step 3. Set WiFi availability to Private.
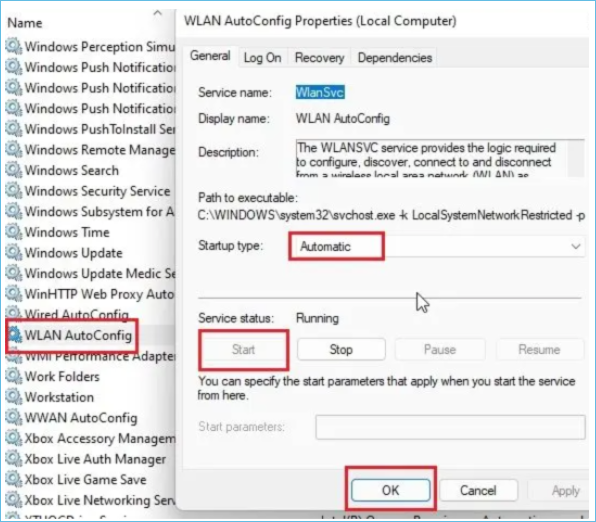
Method 5. Enable WLAN AutoConfig Service
To ensure smooth WiFi usage in Windows 11, make sure WLAN AutoConfig Services is enabled. This service handles your WiFi operations and is essential for proper WiFi functionality.
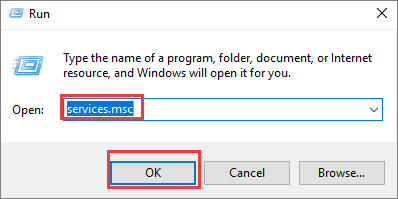
Step 1. Press the Win + R key to open the Run window, type services.msc and press the OK button.
Step 2. To configure the WLAN AutoConfig service, select it from the menu and double-click on it. This will open the service's properties window, where you can configure various settings such as the service startup type, log settings, and more.
Here, you have to change its Startup type to Automatic. Once done, click the Start button and hit the OK button in one paragraph shortly
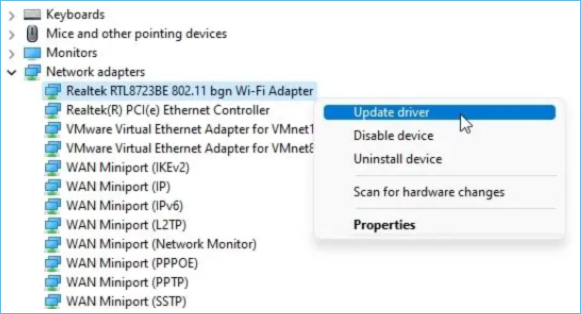
Method 6. Update the WiFi Driver
Updating your WiFi driver to the latest version is a best practice that can resolve problems with WiFi in Windows 11. To do this, follow these steps:
Step 1. Press the Windows Key + X button on your keyboard to open the Device Manager.

Step 2. Expand your Network adapters, select your WiFi drivers, and right-click on them.
To update the WiFi drivers, select the "Update driver" option, then choose "Search for updated drivers from the internet," and follow the prompts to complete the update.
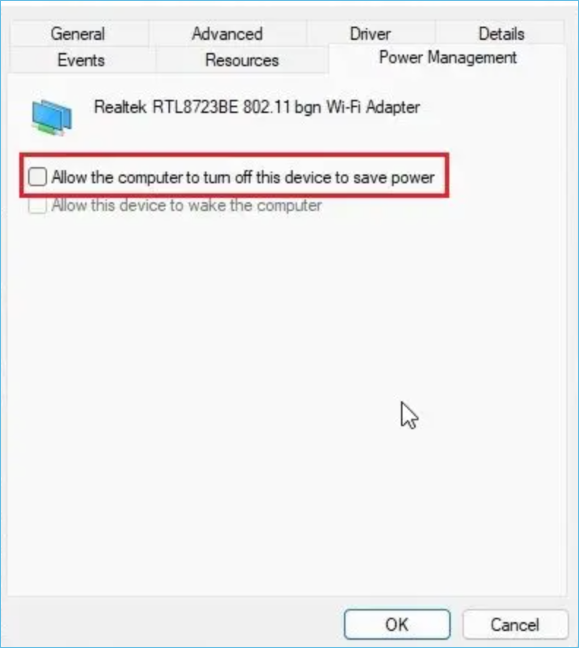
Method 7. Adjust the WiFi Power Management Settings
To disable the "Save power by turning off the Wi-Fi adapter after a period of inactivity" option in Windows 11, follow these steps: Go to Settings > Network & Internet > Wi-Fi > Advanced options. Look for the "Save power by turning off the Wi-Fi adapter after a period of inactivity" toggle switch, and toggle it off. This will prevent Windows from turning off your Wi-Fi adapter after a period of inactivity, which may help resolve WiFi disconnection issues.
Step 1. To access the Device Manager, press the Windows Key + X button on your keyboard, which will bring up a menu. From this menu, select the Device Manager option to open the Device Manager window.
Step 2. Open the properties of your installed WiFi drivers.

Step 3. Move to the Power Management tab > Uncheck the "Allow the computer to turn off this device to save power" option > Hit the OK button.
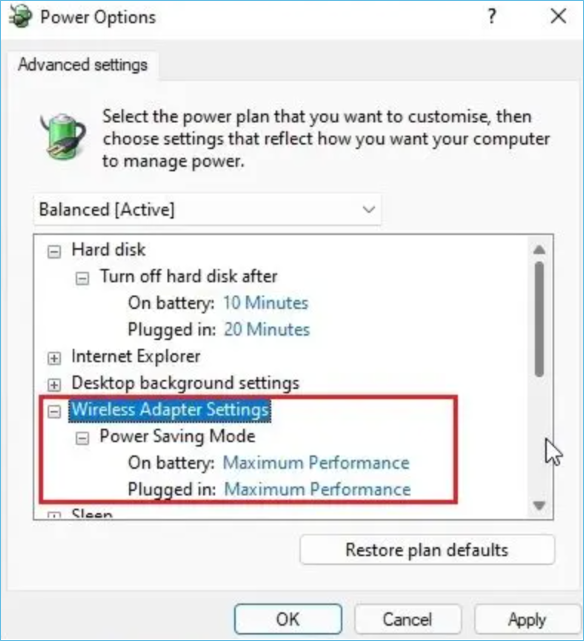
Method 8. Change Power Plan Settings
To change your power plan settings for maximum Windows 11 computer performance, you can follow these steps:
Step 1. To edit the power plan on Windows 11, you can search for "Power plan" in the search bar, and then select the "Edit power plan" option from the search results. This will allow you to customize the power settings for your device.

Step 2. Choose the "Change advanced power settings" option from the list.
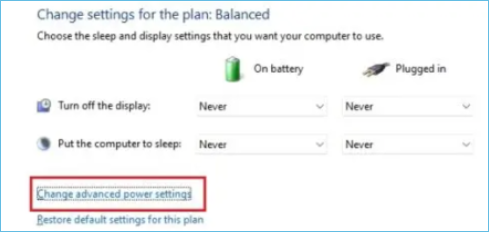
Step 3. To optimize the Wireless Adapter settings for maximum performance, go to your device's settings, look for the Wireless Adapter settings, and change the settings to maximum performance. Then, click the OK button to apply the changes.
To resolve the issue, you can try uninstalling the problematic driver, restart your system, and then reinstall the driver. Once done, restart your system, and check if the issue persists or not.
Method 9. Reset Network Settings
If you've tried all the previous steps and still can't connect to the internet, you can try resetting your network settings. This is a last resort, but it might resolve the issue. To do this, go to your device's settings, look for the option to reset network settings, and follow the instructions to complete the reset.
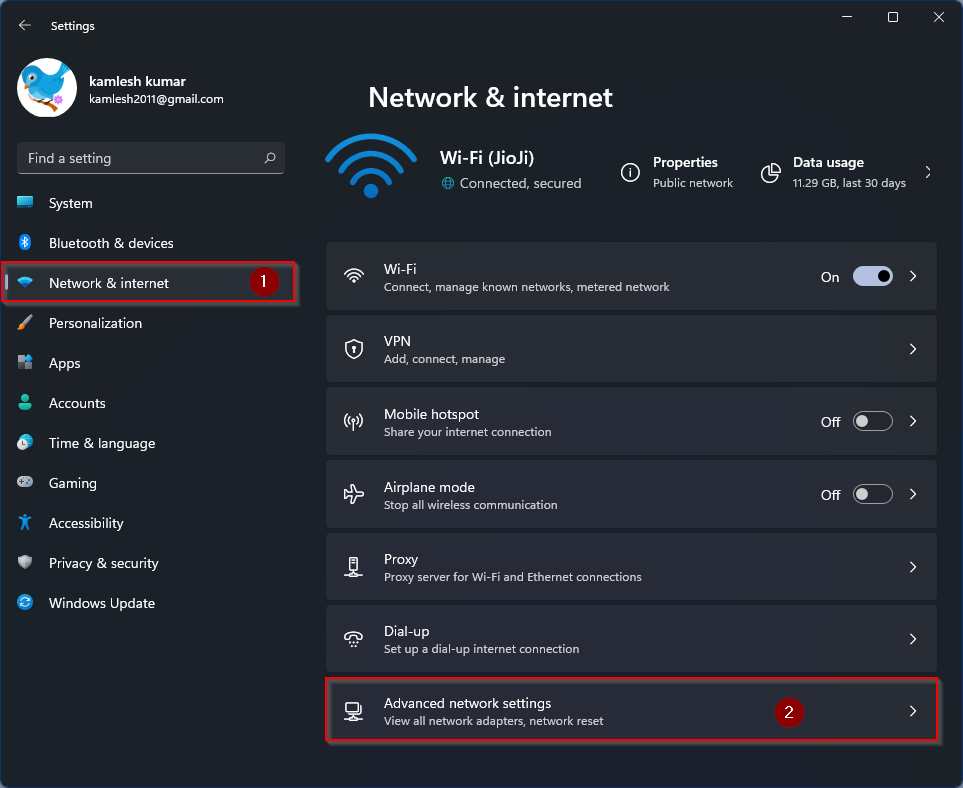
Step 1. Open Windows Settings using Windows + I shortcut key.
Step 2. To access advanced network settings, click on the "Network & Internet" option and select "Advanced network settings".
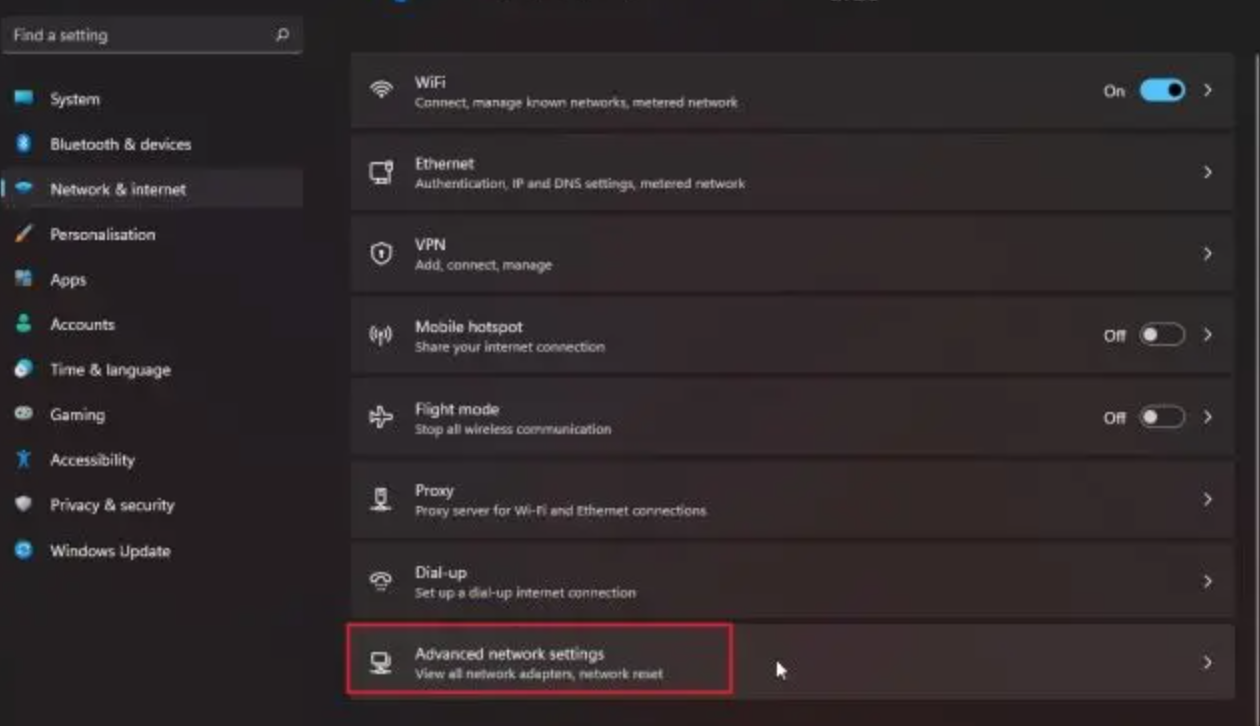
Step 3. Hit the "Network reset" option.
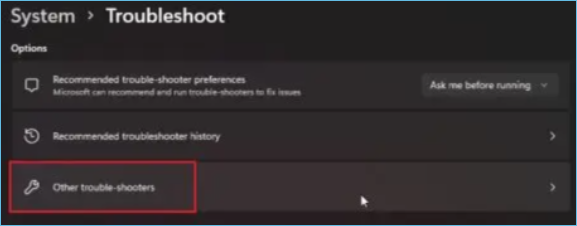
Method 10. Run Network Troubleshooter
The network troubleshooter in Windows 11 is a useful tool that can help you identify and fix issues with your internet and connectivity. To run the troubleshooter, go to Settings, click on System, scroll down to Troubleshoot, and click on Other troubleshooters. Click on
Step 1. Press Windows Key, search for troubleshooting and open Troubleshoot settings.
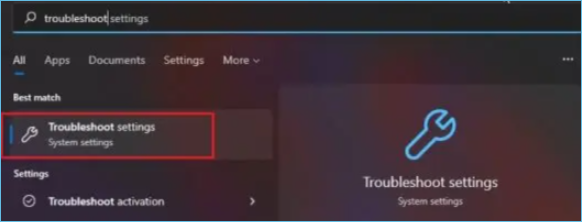
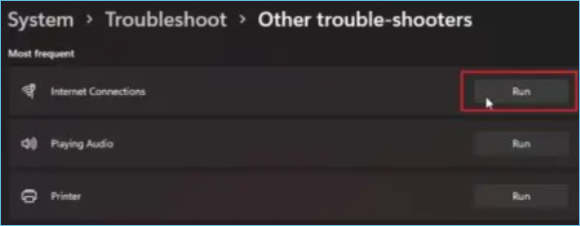
Step 2. Select "Other troubleshooters"
Step 3. Run the Internet Connections troubleshoot.
Try Another 3 Advanced Solutions to Fix Unstable WiFi Problems in Windows 11
If you're experiencing WiFi issues in Windows 11, try the simple fixes first, such as restarting your router, checking your internet connection, and updating your WiFi drivers. If these don't resolve your issue, you can try the advanced methods.
- 1. Reinstall the Network Adapter
- 2. Install the Lasted Windows 11 Build
- 3. Perform a Repair Install (Clean Install)
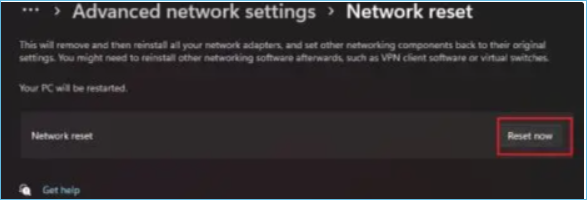
Advanced Method 1. Reinstall the Network Adapter
If your Windows 11 WiFi is experiencing disconnection issues, it may be due to improper Network Adapter settings. In this case, reinstalling the Network adapter can resolve the problem. To do this, follow the guide below.
Step 1. Open Windows 11 Settings.
Step 2. To access advanced network settings in Windows, open the Settings app, navigate to Network & Internet, and click on Advanced network settings.
Step 3. Click on the Network reset option from the More settings section.
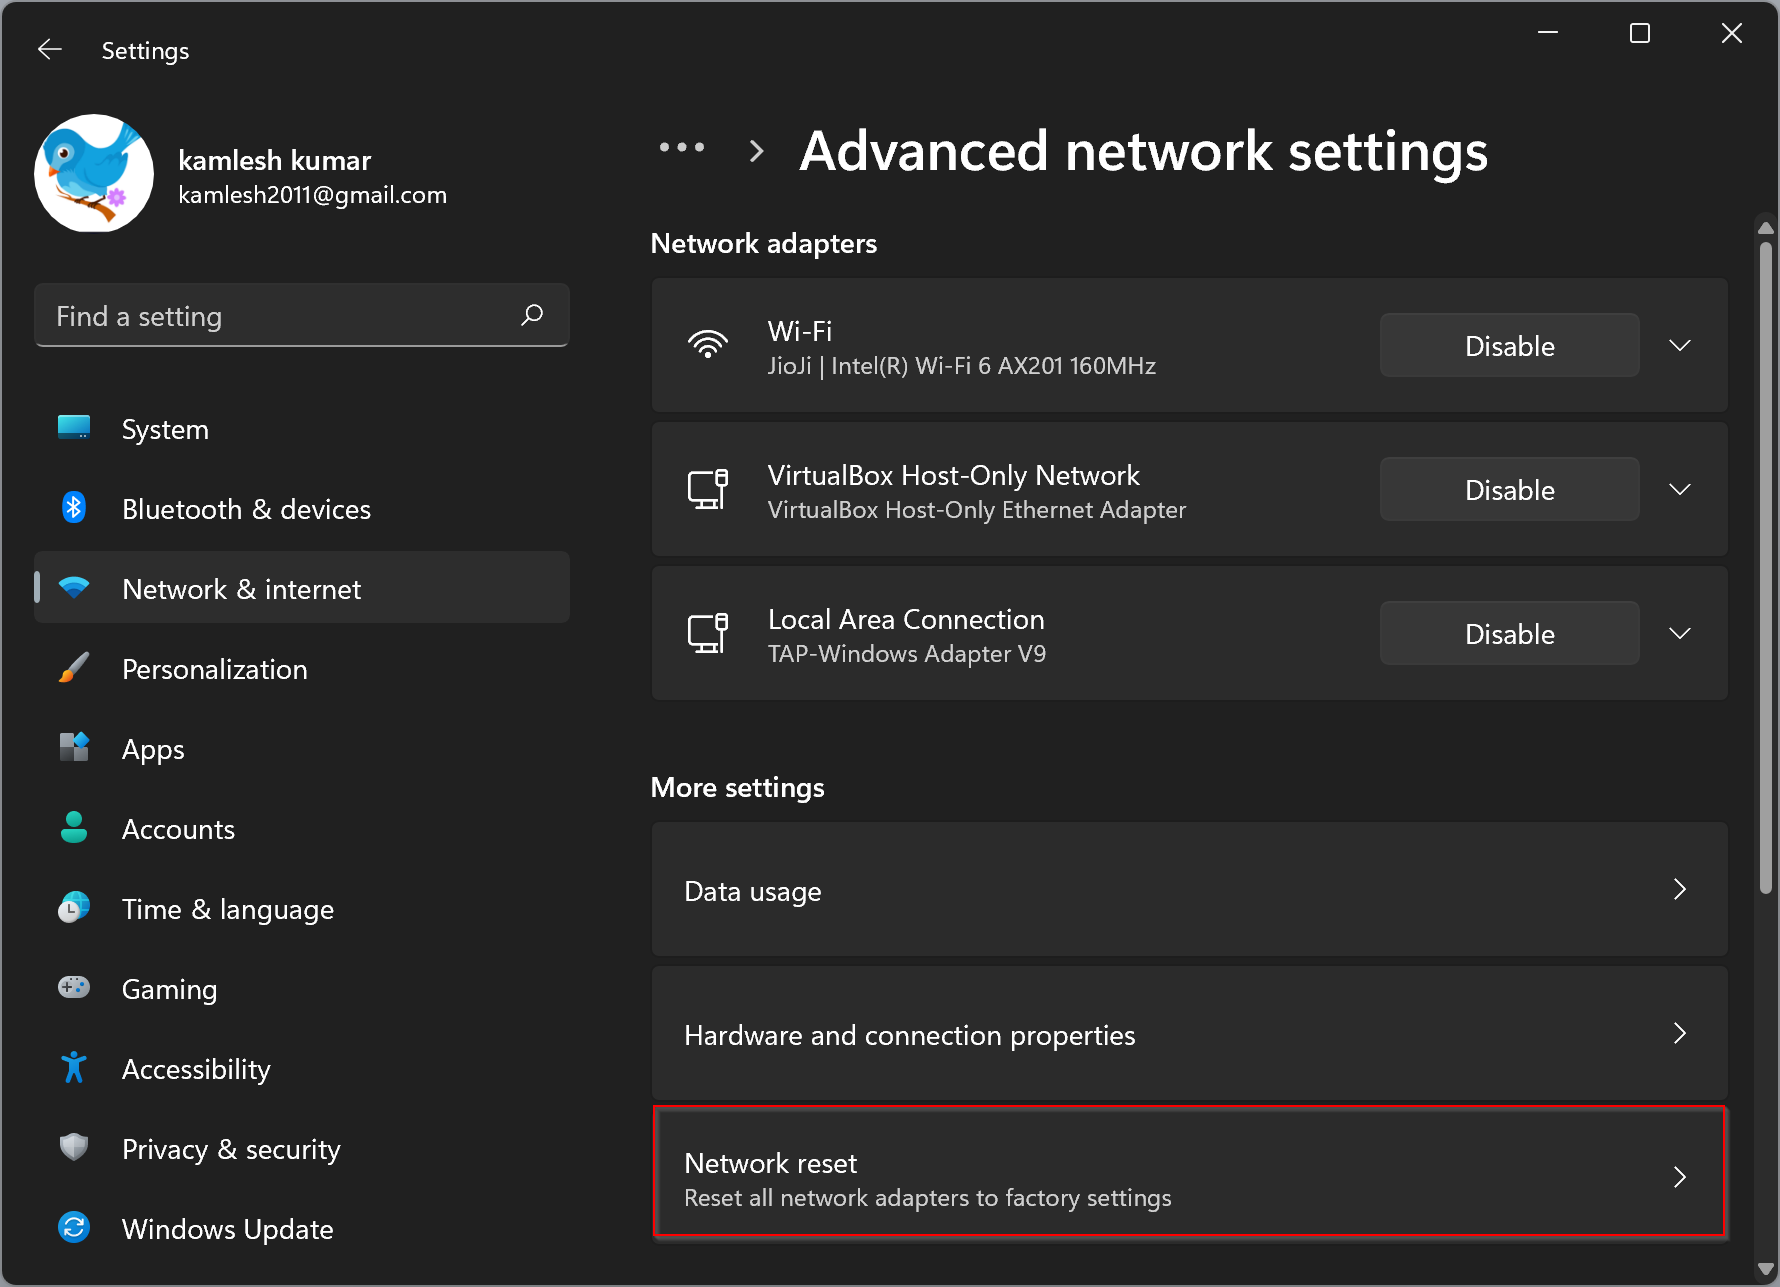
Step 4. Click the "Reset now" button. This will automatically remove and then reinstall network adapters.
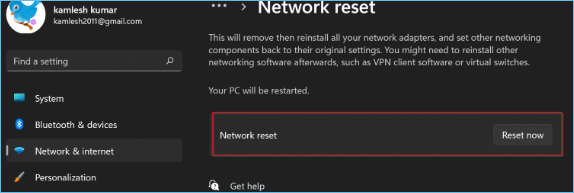
Wait for your computer to restart, then you will see that your network adapters have been reinstalled.
Advanced Method 2. Install the Lasted Windows 11 Build
To resolve WiFi keep disconnecting issues on Windows 11, updating the operating system to the latest build can be a solution, as running an older Windows 11 build may also be a contributing factor.
Follow these steps to install the latest Windows 11 build:
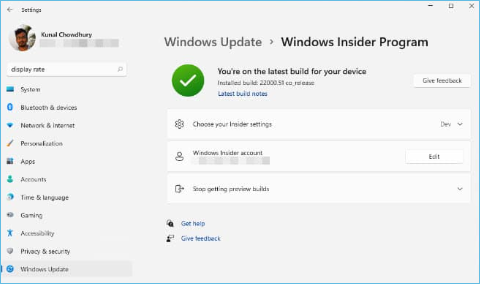
Step 1. Go to Windows 11 settings.
Step 2. Click on Windows Update from the Settings menu.
Step 3. Click on check for updates from the Windows Update.
The tool will check for any updates to your current Windows 11 version and display the results, indicating whether you are already on the latest build or not.
Advanced Method 3. Perform a Repair Install (Clean Install)
If nothing has worked for you, you may need to clean install your Windows 11, but make sure to create a complete backup of your existing data and files before doing so.
Qiling Backup
Before you clean install Windows 11, create a backup of your files, disks, partitions, etc. using the simple-to-use and reliable software Qiling Backup. This will ensure that your important data is safe and can be easily restored later.
You can follow the step-by-step guide below to create a backup of your data by using Qiling backup tool before performing a repair install.
Step 1. To initiate a backup, click the File backup button to backup your files.

Step 2. On the top, both local and network files will be shown. You can extend the directory to select the backup files.

Step 3. Follow the on-screen instructions to choose a location to store the backup.

Step 4. In the Backup Options, you can click Options to encrypt the backup with a password. This allows you to customize the backup process by selecting additional options that suit your needs.

To specify the backup schedule, click on the "Backup Scheme" button and select the desired backup schedule and start the backup at a certain event.

Step 5. The backup may be stored on a local disk, Qiling's online service, or NAS.

Step 6. Qiling Backup allows customers to back up their data to both a third-party cloud drive and Qiling's own cloud drive.
To back up data to a cloud drive, select Local Drive, scroll down to add Cloud Device, and then add and log in to your account provided by the third party.
Step 7. Click Proceed to start the backup process, and once it's completed, the backup job will be displayed as a card on the left side of the panel. You can then right-click on the backup job to manage it further.

Now, follow the below steps to perform a repair install:
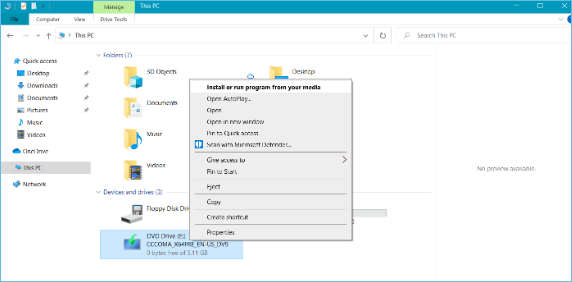
Step 1. Double-click on the mounted Windows 11 ISO setup file to open the Windows 11 setup. This will initiate the setup process, allowing you to install Windows 11 on your computer.
Step 2. Click Next on the Windows 11 setup and agree to the license terms.

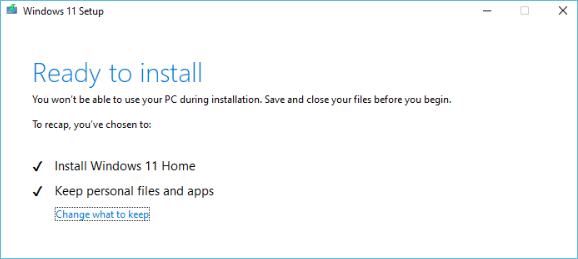
Step 3. Windows 11 shows you that it is ready to Install. Click on the Install button.
Step 4.The system will restart and display the Windows 11 installation screen.

Step 5. Wait for the process to complete.

Once the process is complete, Windows 11 will be repaired and installed on your computer, and you can restore the backup you created with Qiling Backup software. This should resolve any WiFi issues you were experiencing, and you should now have a fully functional computer with a working WiFi connection.
Windows 10 Backup and Restore provides a comprehensive solution to protect your system, data, and applications. With built-in tools like File History, System Image Backup, and Backup and Restore (Windows), you can create backups of your files, system, and applications, ensuring that your important data is safe in case of system crashes, hardware failures, or other disasters.
Preparation is key, and it's best to be prepared for the worst. Windows 10 offers backup and restore options, so it's essential to know what to back up and how to do it.
Closing Words - Backups are Always Concerned in Fixing Any Windows-related Problems
When working on Windows-related issues, it's essential to have a current backup of your data to prevent any potential fixes from accidentally deleting or corrupting your existing files.
Before performing Windows 11 repair or clean installation, it's essential to create a backup of your data to avoid losing it during the process. Many users have experienced data loss during Windows repair and clean installation.
Qiling Backup is a user-friendly tool that simplifies the process of creating a backup of data, allowing users to easily restore their backed-up data at any time with just a few clicks.
Related Articles
- Windows 10 File History VS Time Machine: Which One to Choose?
- Everything About S Mode in Windows 11
- Guideline: Backup Specific Folders to OneDrive on Windows 10/11
- Stop OneDrive Backup in Windows 11
- [2023 Best Tip] How to Backup Stardew Valley Saves
To backup Stardew Valley saves, start by finding the saves location, then create a copy of the entire folder on another disk. Next, use backup software like Qiling Disk Master Pro, which offers an incremental backup function, to regularly back up the files. This method ensures all your game data is safely backed up. - How to Backup Windows 10 Before Upgrading to Windows 11✅
Are you looking to install the latest Windows 11 OS on your PC? If so, follow our step-wise guide on how to backup Windows 10 before upgrading to Windows.