(1+1>2 Solution) How to Use/Set up SSD as Boot Drive and HDD Storage
Quick Navigation to successfully set up SSD for boot drive and HDD for storage:
| Workable Solutions | Step-by-step Troubleshooting |
|---|---|
| 1. For Old Computer |
Step 1. Migrate OS from HDD to SSD...Full steps Step 2. Format HDD for data storage only...Full steps |
| 2. For New Computer |
Step 1. Clean install Windows 11/10 with ISO...Full steps Step 2. Initialize and partition HDD for use...Full steps |
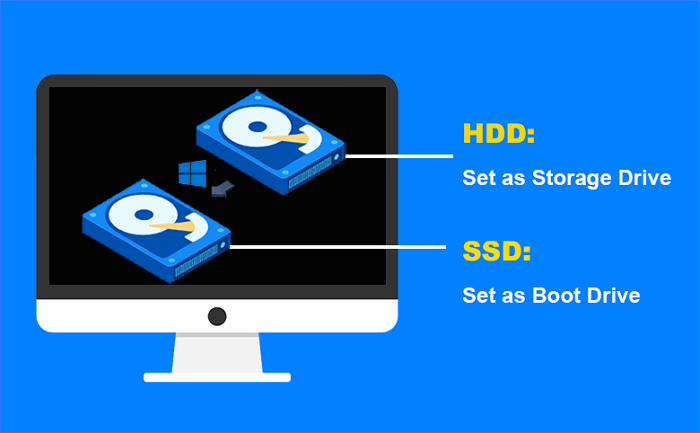
Using a hard drive (HDD) and solid-state drive (SSD) together can be a great way to optimize your computer's performance. Consider setting up a dual-drive system, where the SSD is used for your operating system (OS) and programs, and the HDD is used for data storage. This setup allows your OS and programs to load quickly from the SSD, while your data is stored on the HDD, which is more affordable for larger storage capacities. This configuration is often referred to as a "hybrid" setup and can provide a good balance between performance and cost.
Benefits of Using SSD for OS and HDD for Storage
- Cost-effective
- Accelerated Windows startup time
- Less wear and tear of SSD
- Ensured data safety on a crashed PC
There are three main benefits to using an SSD for your Windows boot and HDD for saving personal files. This setup allows for faster boot times, improved overall system performance, and increased storage capacity for personal files.
This setup allows users to utilize the speed of a solid-state drive (SSD) for their operating system and applications, while still utilizing the larger storage capacity of a hard disk drive (HDD) for data storage, making it a cost-effective solution for those seeking both speed and storage.
Using a separate storage drive for files and documents can help prolong the life of your SSD by reducing the likelihood of it becoming full and needing to be replaced. This setup allows the SSD to remain dedicated to storing the operating system and applications, minimizing the risk of it becoming overloaded and extending its lifespan.
Having a separate SSD for your operating system and applications keeps your personal files and data on a separate drive, making it more secure and easier to back up and restore in case of a system failure or hardware issue. This allows you to simply reinstall your OS and apps on a new SSD without losing any important data.
Using an SSD for your operating system and a separate HDD for storage is the most effective way to utilize the benefits of both drive types, and investing in an SSD with at least 250GB of storage is the recommended approach if budget allows. (Experienced users could try to enable SSD Cache in Windows 10/11 on a smaller SSD)
When it comes to storage options, the age-old debate between Solid-State Drives (SSDs) and Hard Disk Drives (HDDs) continues. While HDDs have been the traditional choice for storing data, SSDs have gained popularity in recent years due to their faster read and write speeds.
If you're considering upgrading your storage for gaming or improving performance, you might be wondering whether to choose a Solid-State Drive (SSD) or a Hard Disk Drive (HDD). The post provides guidance on this decision, helping you make an informed choice based on your specific needs and goals.

How to Set Up SSD as Boot Drive on Old and New Computers
The process for upgrading a computer from a hard disk drive (HDD) to a solid state drive (SSD) can be approached in two ways depending on the computer's current configuration. If the computer is already running with a configured operating system on the HDD, the simplest method is to clone the HDD OS to the SSD using a tool like Qiling Backup. This approach allows for a direct transfer of the existing operating system and data to the faster SSD without requiring a clean installation.
- For old PC: Migrate OS from HDD to SSD Without reinstalling Windows 10/11
- For new PC: Clean install Windows 11/10 on SSD with ISO
Let's take a look at how to implement each method.
Method 1. Migrate Windows 11/10 OS from HDD to SSD
Qiling Backup is a Windows backup software that covers disk/partition, operating system, files, and emails, and is also a top-notch HDD to SSD cloning software recommended by users and review websites.
Upgrading to a Solid-State Drive (SSD) is a hassle-free process that preserves all your settings and files, eliminating the need to reinstall your operating system. It's a quick and easy transition that will make your computer run faster and smoother, with millions of satisfied customers worldwide who can attest to its effectiveness. Try it now and experience the benefits of an SSD for yourself!
Step 1.Open Qiling Backup and click on the "Tools and utilities" page, where you can select from various functions available.

Step 2.Qiling Backup will automatically select the boot and system partition, you just need to choose the target disk and click "Next".
To successfully clone or migrate a disk, it's essential that the partition style of the source disk and the target disk are the same, typically both being either MBR (Master Boot Record) or GPT (GUID Partition Table). This ensures that the operating system and other software can properly read and write data to the target disk, avoiding potential compatibility issues.
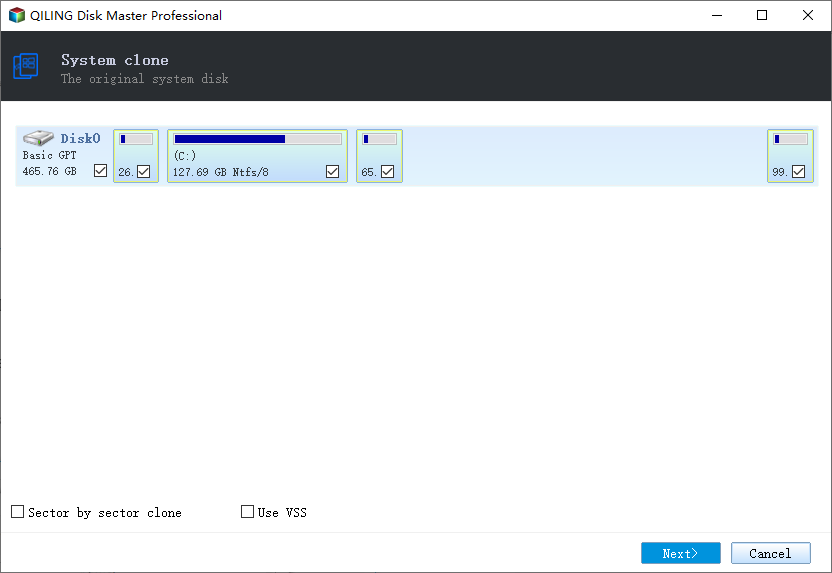
The system clone will completely erase all data, so it's essential to back up your data beforehand to prevent any losses.

Step 3.If you want to clone your system to an SSD, you can choose "optimize for SSD" in the advanced options.

Step 4. Click "Proceed" to start cloning.
Method 2. Clean Install Windows 11/10 on SSD with ISO
For those without an old operating system copy to transfer from a hard drive, a new operating system can be manually downloaded and installed on the device, and then the solid-state drive (SSD) can be set as the primary boot drive. This can be done through Microsoft's official website, which provides links to create an installation assistant or media.
To create a Windows 11/10 installation USB drive, use Qiling OS2Go, a capable software that simplifies the process, requiring only an 8GB or larger USB flash drive to save the ISO image of the desired Windows version.
Step 1. To use Qiling OS2Go, first install it on your Windows computer. Then, plug in a USB drive or external hard drive that has enough storage space.
Step 2. To create Windows installation media, choose the "Windows Install Drive Creator" tab, select the desired Windows versions (11, 10, or 8.1), and optionally choose a local ISO file. Once set, click the "Create" button.
Step 3. To erase the disk, select the disk you want to erase from the list, then click "Erase" and confirm the action by clicking "Continue". This will delete all data on the selected disk.
Step 4. Qiling OS2Go will start to create the Windows Installation media, which may take a while to download the ISO file, depending on your OS and network condition. Once the progress reaches 100%, the USB drive should be bootable.
Step 5. To start the Windows installation process, insert the Windows Installation media into your computer and begin the setup.
How to Build HDD as Storage Drive
You can use the SSD as your boot drive and the HDD as your storage drive, allowing you to keep your operating system and programs on the faster SSD and store your files and data on the larger HDD. This setup can provide a great balance of speed and storage space. To set up your HDD for storage, you can simply connect it to your computer and format it. You can then use it to store your files, photos, and other data.
Method 1. Format a Used HDD for Data Storage Only
The first thing you'll need to do is format the drive. This can be done in a number of ways, but we recommend using the Windows Disk Management tool.
Step 1. Right-click on the Start menu and select 'Disk Management.'
Step 2. To format your HDD, navigate to the Disk Management console, right-click on your HDD, and select 'Format', then follow the prompts to format the drive as NTFS.
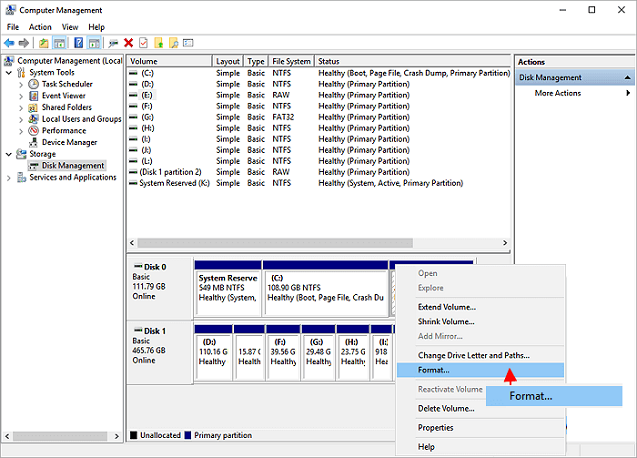
Step 3. Repeat the steps to format all available hard drive partitions.
Now that your drive is formatted, you can use it just like any other drive on your system, storing files, installing programs, and doing anything else needed, just keep in mind that HDDs are a lot slower than SSDs.
Method 2. Initialize and Partition a New HDD for Use
To initialize a new hard drive, start by connecting it to your computer and ensuring it is recognized by your operating system. Next, open the Disk Management utility (usually found in the Control Panel or by right-clicking on the Start menu and selecting "Disk Management"). In the Disk Management window, locate the new hard drive and right-click on it. From the context menu, select "Initialize" to make the hard drive usable by your computer.
Step 1. Connect a new hard drive to your computer using an external USB enclosure or port, or connect it internally if your computer case has an empty drive bay.
Step 2. To access the Disk Management tool, turn on your computer and open the Control Panel. From there, navigate to Administrative Tools and select Disk Management.
Step 3. Right-click on the new hard drive and select Initialize Disk.
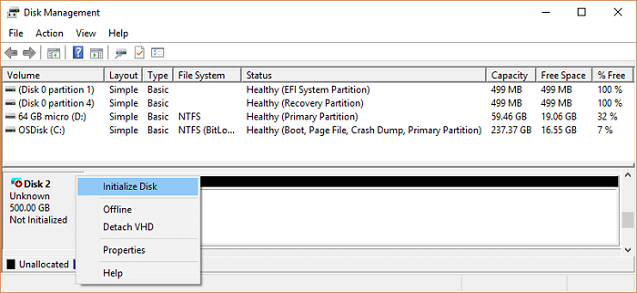
Step 4. You can choose between MBR and GPT depending on your needs. Here are some key differences between the two: MBR is older and only supports 4 primary partitions, while GPT supports up to 128 partitions and is more modern.
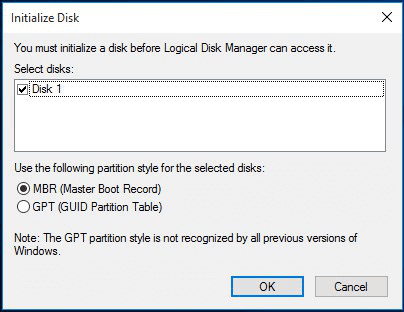
Step 5. Click OK to initialize the hard drive.
Your new hard drive is now ready for use. You can create partitions and store data on it, just like any other hard drive. That's all there is to it. Now you know how to set up your SSD and HDD for specific use. Thanks for reading, and we hope this was helpful.
Related Articles
- 2022 Fix: Windows 11 Cumulative Update Failed to Download and Install
- How to Disable Windows 10 Update in Every Way (Windows 11 Supported)
- How to Upgrade Windows 7 to Windows 11 with 2 Options
- Solution: Windows Could Not Find the Recovery Environment
- How to Use File Sync in QILING disk master Software
File Sync is an utility that has been designed to be easy to use and quick to update two folders in two different places. - Full Backup vs Differential Backup
Full backup vs differential backup, there are both similarities and differences between them, in this article, you may get a brief idea about them.