2022: How to Installl Windows 11 on M.2 SSD (with Pictures)
Benefits of Installing Windows 11 on M.2 SSD
Microsoft's Windows 11 operating system is optimized to run smoothly on high-performance SSDs, such as M.2 SSDs, making it ideal for gaming, programming, video editing, and other resource-intensive activities. Installing Windows 11 on an M.2 SSD can significantly boost your productivity and overall user experience.
In this post, we'll cover:
- 1. Initialize a new SSD for use
- 2. Method #1. Clone Windows 11 to M.2 SSD Without installing
- 3. Method #2. Clean Install Windows 11 from USB
- 4. Clone vs. Clean Install: Which Suits You Better
How to Initialize a New M.2 SSD for Use
This procedure of initializing SSD is optional in this case, only when the M.2 SSD you got is newly bought and is labeled as unknown and not initialized when connected to a computer. For example:
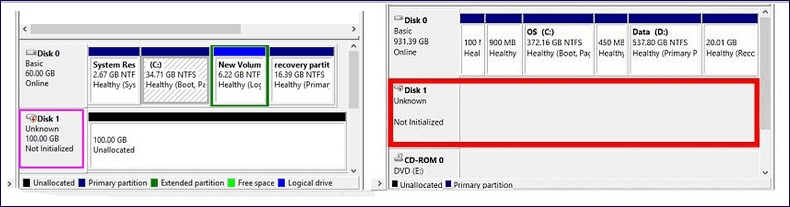
To initialize your M.2 SSD for Windows 11 installation, follow these steps:
Step 1. To install an M.2 SSD, you need to insert it into the correct slot, which depends on the type of M.2 SSD you have. If it's a PCIe model, you'll need to insert it into a PCIe slot, while a SATA M.
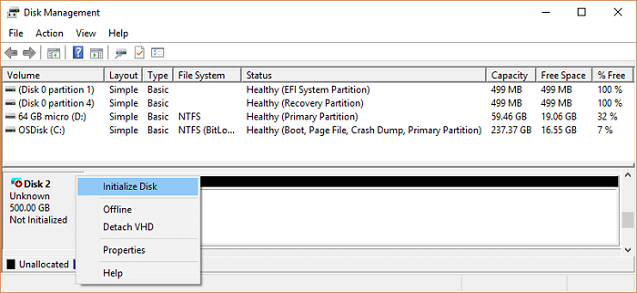
Step 2. To access Windows Disk Management, go to This PC > Manage > Disk Management for Windows 8.1 and later, or My Computer > Manage > Disk Management for Windows 7, and locate the new M.2 SSD shown as not initialized.
Step 3. Right-click on the not initialized SSD, and choose "Initialize Disk".
Step 4. To initialize the disk, select the correct disk from the list in the Initialize Disk dialog box, then click "OK" to confirm the default partition style, or choose a different partition style (GPT or MBR) if desired.
How to Clone Windows 11 to M.2 SSD Without Installing
- To replace an old Windows 11 boot drive with a new M.2 SSD, first, back up all important files from the old drive to an external storage device. Then, shut down the computer and disconnect all power cables.
- The process of upgrading your computer's storage involves installing an M.2 SSD on your desktop PC motherboard or using a connection cable/case on a laptop, which enables faster data access and storage.
Replacing a hard drive with an M.2 SSD can be tricky, especially when it comes to transferring the Windows 11 installation. Unlike regular file transfers, you can't simply copy and paste system files, as Windows restricts manual copying due to system protection. This means you'll need to find an alternative method to move your current Windows installation to the new, faster drive.
If you need to replace your HDD with a Solid-State drive but don't know how to install the OS on the new drive, consider using Qiling Backup. This professional Windows backup software offers clone and system clone features that set it apart from competitors, making it a great choice for your needs.
Qiling Clone - Your Reliable HDD to SSD Cloning Software
- The software offers two cloning modes: Disk Clone Mode and Partition Clone Mode, allowing users to choose the best approach for their specific needs.
- System Clone is a tool designed specifically for Windows operating systems, particularly for users migrating from an older PC or hard drive to a newer one, including Windows 11, 10, 8.1, 8, and 7.
- The software supports all types of physical hard drives, including HDD, SSD, M.2 NVME SSD, M.2 PCIe SSD, and SATA M.2 SSD, for both source and destination directions.
- Upgrading a hard drive or transferring a Windows operating system can be done without reinstalling the OS or programs by using a tool like Qiling Disk Master. This allows for a seamless transfer of the operating system and installed programs to a new hard drive, saving time and effort.
To clone Windows 11 to an M.2 SSD using Qiling M.2 SSD cloning software, follow the guide. First, prepare the M.
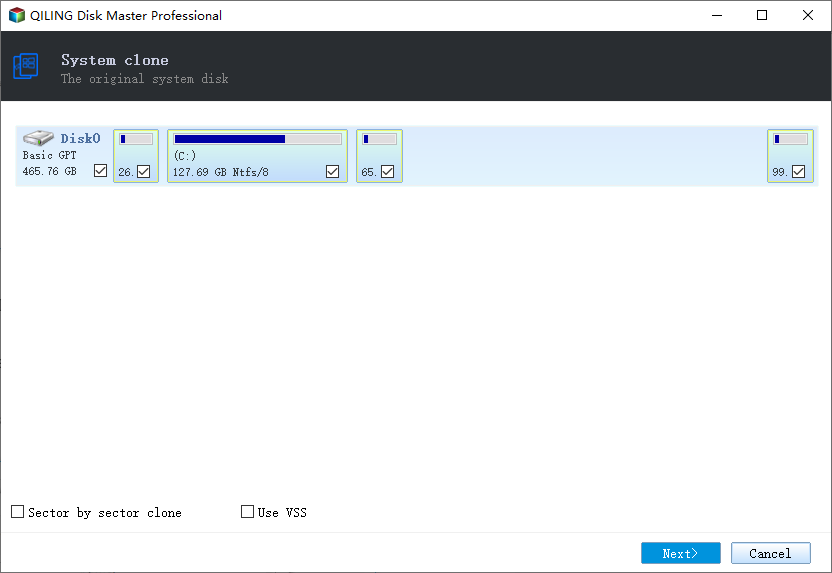
Step 1.Open Qiling Backup and click on the "Tools and utilities" page, where you can select from various functions available.

Step 2.Qiling Backup will automatically select the boot and system partition, so you just need to choose the target disk and click "Next" to proceed.
To ensure a successful disk cloning process, it's essential to verify that the partition style of the source disk and the target disk are the same. This means that both disks should have either a Master Boot Record (MBR) or a GUID Partition Table (GPT) style. If the source disk has an MBR style and the target disk has a GPT style, or vice versa, the cloning process may fail or result in a corrupted target disk.
Be aware that a system clone will completely erase all data, so make sure to back up your data beforehand to prevent any loss.

Step 3.If you want to clone your system to an SSD, you can choose "optimize for SSD" in the advanced options.

Step 4. Click "Proceed" to start cloning.
How to Install Windows 11 on M.2 SSD from USB
- Applies to: Clean install Windows 11, reinstall Windows 11
- It requires: An external flash drive or pen drive
The standard procedure for manually installing Windows 11 on M.2 SSD and booting Windows 11 from M.2 SSD is as follows:
- 1. To install Windows 11 on your computer, you'll need to create a bootable USB drive with the installation media. This can be done using the Media Creation Tool provided by Microsoft. The tool will allow you to download the installation files and create a bootable USB drive.
- 2. Download the Windows 11 installation files from Microsoft's website, selecting the desired edition and architecture (32-bit or 64-bit) of Windows 11.
- 3. Connect the USB drive to your computer, then copy the contents of the Windows 11 ISO file to the drive.
- 4. Disconnect the USB drive and reboot your computer. During boot, enter your BIOS or UEFI settings, set your M.2 SSD as the primary boot device, save the changes, and exit BIOS.
47% of users are willing to manually install Windows 11 using either the Windows 11 Installation Assistant or Windows 11 Installation Media, which can be downloaded from the Microsoft download page.
To simplify the process of downloading the latest Windows 11 update version, we recommend using Qiling OS2Go, an automatic Windows 11 downloader software that can greatly speed up the process.
The tool features three useful Windows 11/10/8.1/8/7 options to put a Windows OS to external storage, allowing users to easily move their operating system to an external device.
- To create a portable version of Windows on a USB flash drive or external drive, you can use a tool like Rufus or Windows To Go. Rufus is a free, open-source utility that allows you to create a bootable USB drive from an ISO file, while Windows To Go is a feature in Windows 8 and later versions that enables you to create a portable version of Windows on a USB drive.
- Create a Windows Installation Assistant drive by selecting a wanted Windows version
- To create a Windows Media Creation drive, select a desired Windows ISO file. This will allow you to create a bootable USB drive that can be used to install Windows on a computer.
To create a Windows 11 Media Creation drive to install Windows 11 on an M.2 SSD, start by downloading the Windows 11 Media Creation Tool from Microsoft's official website. Once downloaded, run the tool and select the "Create a bootable media" option.
Step 1. To install Qiling OS2Go on your Windows computer, plug in a USB drive or external hard drive that is large enough.
Step 2. To create Windows installation media, choose the "Windows Install Drive Creator" tab, select the desired Windows version (Windows 11, 10, or 8.1), and optionally select a local ISO file. Then, click "Create" to proceed with the installation media creation process.
Step 3. To erase a disk, select the disk you want to erase in the Disk Utility app, then click the "Erase" button. You will see a safety warning message, and you will need to click "Continue" to confirm that you want to erase the disk. This will delete all data on the selected disk.
Step 4. Qiling OS2Go will then start creating the Windows Installation media, which may take a while to download the ISO file, depending on your OS and network condition. Once the progress reaches 100%, the USB drive should be bootable.
Step 5. To begin the Windows installation process, insert the Windows Installation media, which can be a USB drive or a CD/DVD, into your computer. Once the media is recognized, you can start the installation process by following the on-screen instructions.
Clone Windows 11 vs. Clean Install Windows 11: Which Suites You Better
Both system clone/system migration and Windows reinstallation methods can be helpful if you want to put Windows 11 on an M.2 SSD for faster boot performance. However, only the most suitable method is the best.
Use a disk/partition clone method when:
- To replicate the exact configurations of a PC on another computer, you can use a tool called "Clonezilla" or a similar disk imaging software. This will allow you to create an exact copy of the original PC's hard drive, including all operating system settings, installed programs, and user configurations.
- Carrying out multiple installations of the same system OS and configurations on many computers is a common task in IT and system administration.
- Restoring a hard drive to its original settings involves returning it to its factory default state, essentially erasing all data and settings that were previously installed. This process can be useful when a hard drive is being reused or repurposed, or when a user wants to start with a clean slate.
- Migrating important data and hard drive contents to a new disk is a crucial process that involves transferring all relevant information from the old disk to the new one, ensuring that the data is safely stored and accessible. This process is often necessary when upgrading to a new computer or replacing an old hard drive, and requires careful planning and execution to avoid data loss and ensure a smooth transition.
Use a Windows Clean Install when:
- Troubleshooting problems with the current computer's operating system.
- Eliminating malware and other security threats.
- To upgrade to a new Windows OS version without any issues, it's recommended to create a system image or backup before starting the upgrade process. This will ensure that you can revert back to the previous version if anything goes wrong.
- You experience low-performance challenges even after uninstalling some programs.
Qiling software products, including Qiling Backup and Qiling OS2Go, offer assistance in various ways, helping users navigate their needs.
Related Articles
- How to Change Android SD Card to A Bigger One in Windows 10/8/7
- Change Backup Location Windows 7: Manage Backup File & Space Saving
- Seagate One Touch VS. Seagate Expansion: Which is Better
- [Detailed Guide] How to Factory Reset HP Laptop
- How to Turn on or off Bitlocker to Go in Windows 11
In Windows 11, you can easily enable Bitlocker to Go to protect your data and use it with a password or recovery key, and also turn it off if needed. - What Is Block Level Backup and How to Use It?
Block-level backup and file-level backup are two different approaches to backing up data. While file-level backup involves copying entire files, block-level backup involves copying only the changed blocks of data.