How Do I Create and Use Windows Restore Point in Windows 10/8/7 [Beginners' Guide]
Windows Restore Point is a feature that allows you to create a snapshot of your system at a specific point in time, enabling you to revert back to that state if something goes wrong. Having a Restore Point can be useful if you're about to install a new driver, software, or make significant changes to your system, as it provides a safety net in case things don't go as planned. To create a Restore Point, you can follow the steps outlined on this page, which includes instructions for Windows 10, 8, and 7.
Creating a Windows Restore Point is the best solution to protect your OS and computer from OS update failure or computer crash error. This reliable method allows you to revert back to a previous state if something goes wrong, ensuring your system remains stable and secure. Let's get started!
PAGE CONTENT:
- What Is Windows Restore Point
- How to Create a Restore Point in Windows 10/7
- How Do I Restore (Windows 10) Computer to an Earlier Date (Use Restore Point)
- Windows Restore Point vs Windows OS Backup, Which Is Better
- How to Backup Windows (10) OS with Windows Backup Software
What Is Windows Restore Point?
A Windows Restore Point is a backup image of Windows OS, configuration, and settings, allowing you to restore the system to an earlier date when the restore point was created. Also known as a System Restore Point, it provides a snapshot of the system at a specific point in time, enabling users to revert to a previous state if needed.
More details about Windows Restore Point:
| Windows Restore Point Content | Backup Frequency | Supported Windows OS |
|---|---|---|
|
Once a day by default |
|
What Does Windows Restore Point Do:
- Undo unwanted system changes - such as to revert Windows to an earlier date.
- Protect OS from system crash, like Windows 10 update failure.
- To restore a computer from a Windows 10 BSOD (Blue Screen of Death) error or boot failure, you can try the following steps: 1) Restart your computer in Safe Mode, 2) Run a System File Checker (SFC) scan to check for corrupted system files, 3) Run a System Restore to a previous point when the computer was working properly, 4) Check for and remove any recently installed software or drivers that may be causing the issue, 5) If none of the above steps resolve the issue, you can try a System Reset or a Refresh, which will restore the computer to its original settings. If still unable to resolve the issue, you may need to seek further assistance from a professional.
- Save Windows from application crash, virus attack.
- To recover applications or lost files from a previous restore point, you can open the Control Panel, click on "System and Security," and then click on "System" and the "System Protection" tab. From there, click on "System Restore" and select the restore point you want to use, following the on-screen instructions to complete the restoration process. Alternatively, you can use the built-in Windows feature called "System Restore" to restore your system to a previous state, making sure to back up your important files and data before attempting to restore your system.
To protect your computer and installed applications, you can create a Windows Restore Point. This process is straightforward, and we'll use Windows 10 as an example. To create a Windows 10 restore point, you can follow these steps below. By creating a restore point, you'll be able to revert back to a previous state of your system in case something goes wrong.
How to Create a Restore Point in Windows 10/7
Solution Source: support.microsoft.com
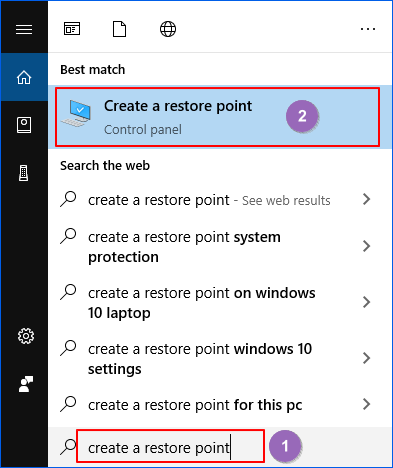
Step 1. Press Windows + S keys, type create a restore point in the search box.
Click to open it in the control panel.
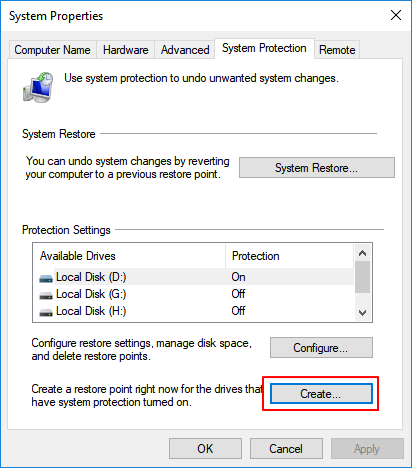
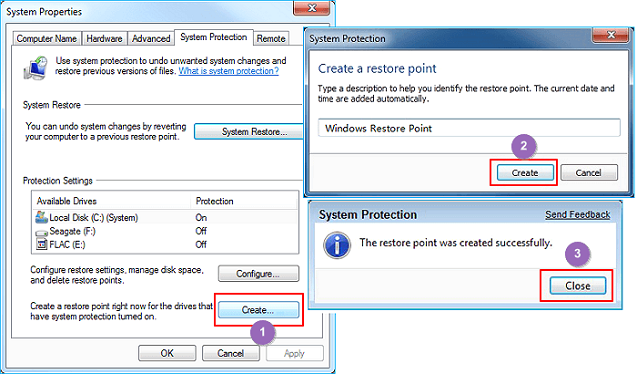
Step 2. On the System Protection tab, click "Create".
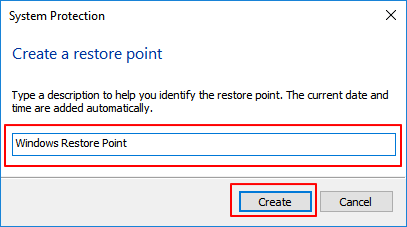
Step 3. Type a description of the restore point and click "Create".
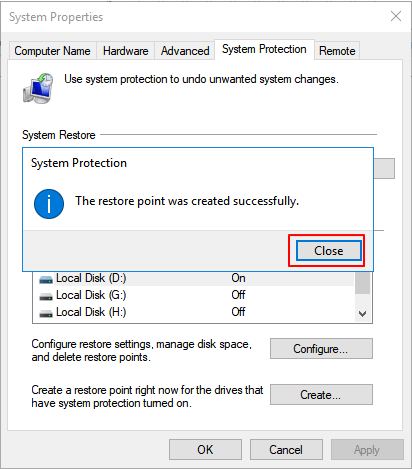
Step 4. Click "Close" when System Protection pops up a note, saying "The restore point was created successfully".
To create a Windows Restore Point in Windows 8/8.1, you can use the built-in system restore tool, which is accessible through the Control Panel. You can also use third-party software to automate the process and make it easier to manage.
As for Windows 7, follow the tips below to create the restore point:
1. To access the System settings in Windows, click on the "Start" button, then select "Control Panel", followed by "System and Security", and finally "System".
2. Go to the System Protection tab > click "Create".
3. Name the restore point, click "Create".
4. Click "Close" when Windows tells restore point was created successfully.
After creating a restore point on your computer, you can perform a System Restore or revert Windows 10/7 to a previous date at any time. To do this, follow the tutorial guide that explains how to use the restore point.
How Do I Restore (Windows 10) Computer to an Earlier Date
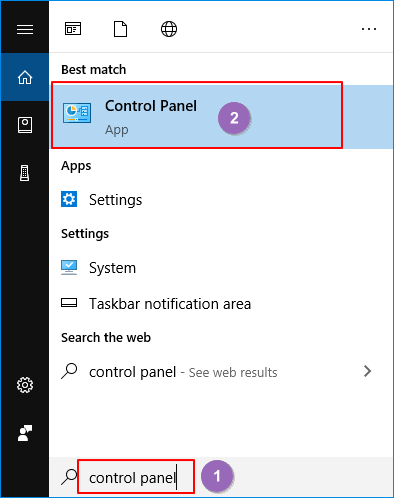
Step 1. Press Windows + S keys, type control panel in the search box, and click to open it.
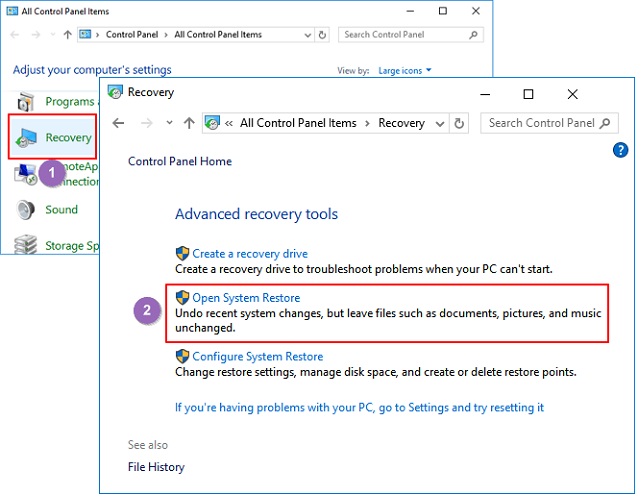
Step 2. On Control Panel, click "Recovery" > "Open System Restore".
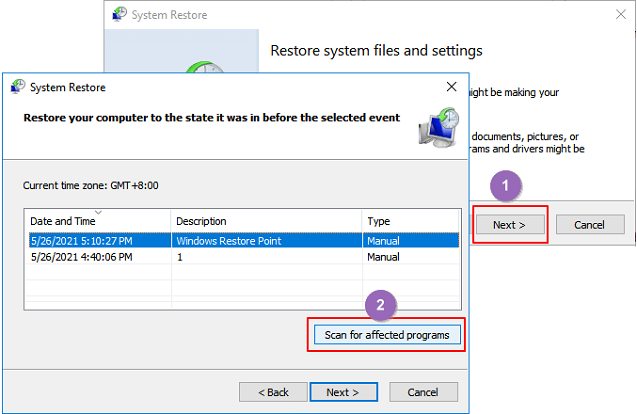
Step 3. Click "Next" on the Restore system files and settings window.
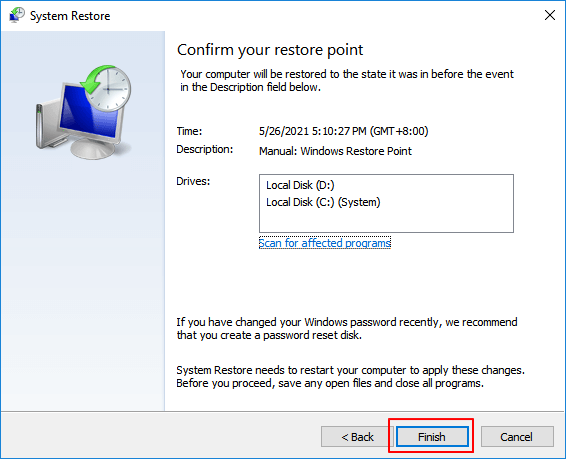
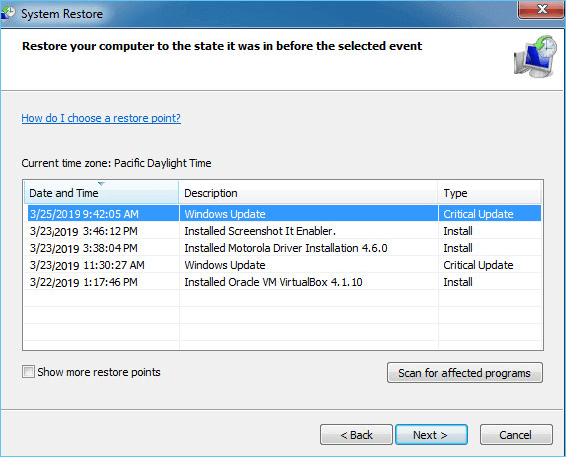
Step 4. Select the latest or an earlier Windows restore point that you created on an earlier date, and then click "Scan for affected programs".
Step 5. If you see a list of items that will be deleted if you use the selected restore point.
Back up your affected items to an external hard drive first.
Step 6. Then, click "Close" > "Next" > "Finish".
How to Undo System Restore in Windows 10/8/7
The ways to undo System Restore vary by Windows Operating System, but you can follow specific methods on your Windows OS for a guide.
Windows Restore Point vs Windows OS Backup, Which Is Better? Pros & Cons
To protect your data, applications, and Windows system, you can create a backup of your Windows OS using a third-party Windows system backup software, providing an easier solution.
Windows Restore Point and Windows OS backup are two distinct solutions that serve different purposes. While Windows Restore Point allows you to create a snapshot of your system at a specific point in time, enabling you to revert to that state in case of an issue, Windows OS backup provides a complete and recoverable copy of your entire operating system, including all installed applications, settings, and data. The key difference lies in their functionality: Restore Point is a quick recovery solution for minor issues, whereas OS backup offers a more comprehensive and secure way to safeguard your system against major problems or data loss.
| Which Is Better | Windows Restore Point | Windows OS Backup |
|---|---|---|
| Pros |
|
|
| Cons |
|
|
According to the comparison table, Windows OS backup is better because it saves space on the C drive and won't be removed even after configuration changes.
Qiling Backup is a reliable Windows backup software that provides assistance with data protection and recovery.
Your Effective Backup Software
- Avoid System Restore Point Not Working
- Fix System Retore Failed & Did Not Complete error.
- Back up your Windows OS, apps, and C drive files easily with a simple backup process that takes only a few clicks.
- Clone OS - Migrate OS to HDD/SSD, Clone and upgrade hard drive.
Bonus Tip: How to Backup Windows (10) OS with Windows Backup Software
#1. Back Up Windows 10 OS:
Step 1. To backup only Windows 10 on your computer, choose the "System backup" option on the "Backup and recovery" page.
Step 1. Connect the external hard drive to your computer and make Windows recognize the drive. Then, launch Qiling Backup and click "System Clone" to proceed with the backup process.
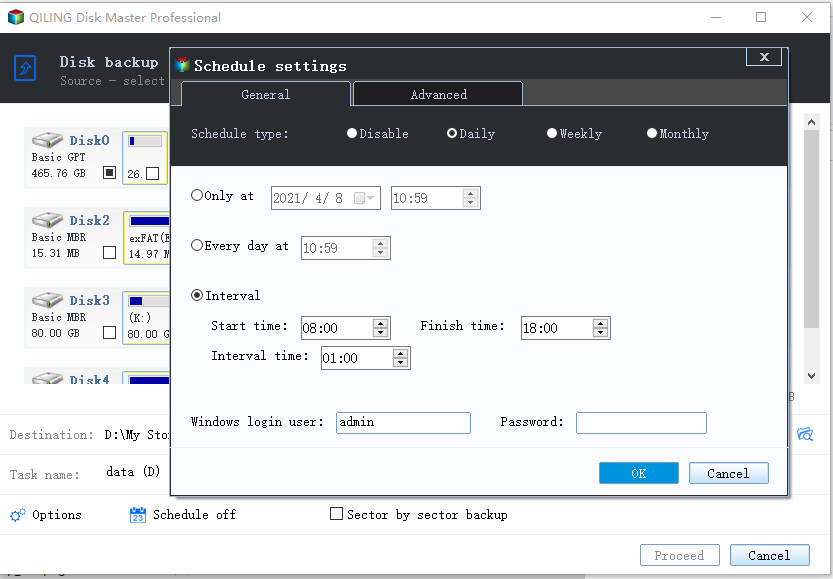
Step 2. In the next window, you can customize your own Windows 10 backup by choosing a backup location (such as an HDD, USB hard disk, network drives, or cloud drives) and adding a plan name and text description to it.

To enable automatic Windows 10 backups, go to the "Schedule" section and set a time for daily, monthly, or event-based backups, and also choose when to start the backup during system startup, shutdown, user logon, or log off.
Step 3. Once all the basic settings were made, click "Proceed". This will initiate the creation of a full Windows 10 backup, protecting your system from unexpected disasters.
To backup Windows 10, connect an external storage device to your computer, then click the "Browse" button in the "Destination" area and select the connected hard disk or other supported backup locations.
#2. Restore Windows 10 To An Earlier Date via OS Backup Image
If you need to revert Windows OS to a previous state, you can apply a Qiling Backup and restore the system with the OS backup image.
Step 1. Open Qiling Backup, click the "Recovery" button on System Backup column.
Or click "Browse to Recover" to select the system backup you created in advance.

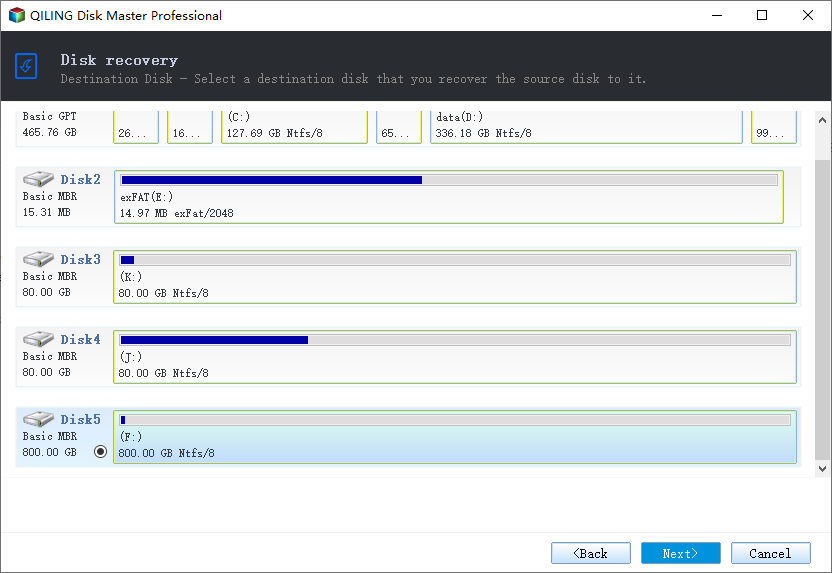
Step 2. Choose one History version of the backup image, after confirming the contents, click the "Next" button.
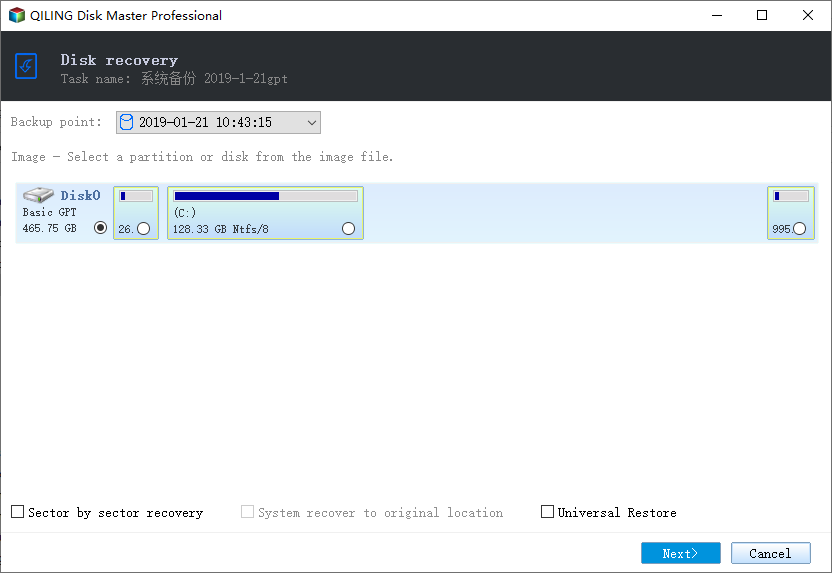
And select the target location to restore your Windows.
Step 3. Then click "Proceed" to start backup recovery.
Wait for the process to complete, restart your computer, and then you should be able to run Windows OS on your computer again.
You May Also Be Interested: FAQs About Windows Restore Point
This page explains what a Windows Restore Point is and how to create and use it. We have also compiled a list of frequently asked questions related to Windows Restore Point, providing answers to common doubts.
1. How do I find an earlier restore point? [View restore points Windows 10]
- Press the Windows key + R keys, type rstrui in the Run dialog, and click "OK".
- If you didn't perform System Restore, click "Next".
- If you had previously done a System Restore, you should select the option to choose a different restore point and click "Next".
- All the Windows restore points you've created will be listed with a date and time created, description, and type information.
2. Where does Windows 10 save the restore point?
The Windows 10 restore point is located in the root directory of the system drive, specifically in the "System Volume Information" folder.
To view it:
- To access the View Tab in File Explorer Options, follow these steps: Open the Control Panel, then navigate to the "Recover" section. From there, select "File Explorer Options" and click on the "View" tab.
- Uncheck "Hide protected operating system files" and click "Apply".
- To access the System Volume Information folder, go to File Explorer, navigate to the C: drive, and the folder will be visible.
- Right-click on the folder > Properties > Security > Advanced.
- To get access rights, click "Continue", then "Add", type the username, and click "OK".
- Check "Full control" under Basic permissions > "OK".
The System Volume Information folder is located in the root directory of the C drive.
3. Will System Restore Delete My Files?
System Restore takes a snapshot of some system files and the Windows registry, saving them as Restore Points. This process affects some programs and files, while others remain unaffected. A form can be used to list the programs and files that are impacted, as well as those that are not.
- Installed Windows programs
- System files
- Registry settings
- Windows Updates
- Desktop saved files and folders
System Restore reverts the OS and all files on the C drive to an earlier date, potentially deleting files created or edited after that date.
Related Articles
- Windows 10 Backup and Restore - Full Solutions to Protect System, Data and Applications
- [Solved] Upgrade or Clone PS3/PS4 Hard Drive to a Larger Drive
- How to Clone C Drive to SSD in Windows 10
- How to Backup Windows 10 with [1] Qiling Backup and [2] File History
- [Solved] This Application Was Unable to Start Correctly (Error Code: 0xc000007b)
- HiDrive vs Google Drive: Ultimate Comparison in 2024🏆
The debate between HiDrive and Google Drive ultimately comes down to a single choice. To help you decide, we've thoroughly compared both options in this post, weighing their features and benefits to determine which one is better suited to your needs. Read on to the end to discover the best choice for you.