Solution: How to Securely Wipe Free Space on SSD
PAGE CONTENT:
- Reasons Why You Want to Wipe SSD
- Is It Safe or Good to Wipe Free Space SSD
- How to Securely Wipe Free Space on SSD? (When Trim Is On & Off)
Reasons Why You Want to Wipe SSD
Your deleted files may still linger on the free space of your SSD, making them vulnerable to being recovered by others. To maintain your digital security, it's essential to wipe the free space to ensure that all deleted data is completely erased and cannot be restored. This safeguards your sensitive information and prevents unauthorized access.
Wiping free space on an SSD can be a good practice to maintain its performance and longevity. This is because, unlike traditional hard disk drives, SSDs do not have physical heads that can move around to read and write data.
- Prepare the SSD for another user
- Resell the SSD
- Clean up SSD for other use or purpose
- Remove Malware or Virus on the device
Is it Safe or Good to Wipe Free Space?
Wiping free space on an SSD is completely safe, as long as you don't need to recover any deleted data. This process doesn't affect the stored data, and you can proceed with it without worrying about any potential risks.
By performing wipe-You can prevent third parties from accessing your private information or data by using a free space SSD, but you don't need to wipe the free disk space continuously to maintain security. This will only increase the wear and tear of the SSD and reduce its lifespan.
Now that we've established that wiping free space on an SSD is not harmful, let's take a closer look at how it works. Wiping free space on an SSD involves rewriting the entire drive, including the free space, with new data.
How to Securely Wipe Free Space on SSD?
If you're looking for a solution on how to wipe free space on an SSD, this section has can help!
Wiping free space on an SSD can be a straightforward process if the right tools are used, making it a quick and hassle-free task for most users.
To wipe free space on an SSD, you need to consider whether the TRIM function is enabled or disabled. If TRIM is enabled, you can use the built-in Disk Cleanup tool or third-party software to delete free space. However, if TRIM is disabled, you'll need to use a specialized tool like DBAN or a low-level disk wipe software to securely erase the free space.
Bonus Tip: How to Check If TRIM Function is enabled or disabled?
To enable TRIM on Windows 7 and above, go to the Device Manager, find your SSD under "Disk drives," right-click on it, and select "Properties." In the Properties window, click on the "Policies" tab and select "Enable TRIM.
Step 1: Go to "Start" menu on your PC and search for "Command Prompt."

Step 2: Right-click on the "Command Prompt" shortcut and chose the "Run as Administrator" option.
Step 3: Now, run the fsutil behavior query disabledeletenotify command in the "Command Prompt" window.
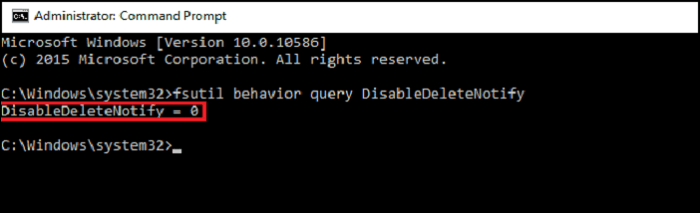
Here, you will see two results! If you see disabledeletenotify = 0, then it means that the TRIM function is enabled, and if you see disabledeletenotify = 1, then it means that the TRIM function is disabled. If the TRIM function is enabled, it means that the system will automatically disable the TRIM function when a notification is received, and if the TRIM function is disabled, it means that the system will not automatically disable the TRIM function when a notification is received.
Now that you know how to check the status of the TRIM function, it's time to understand how solutions work under each situation.
Solution 1: If TRIM Function is Enabled
If the TRIM function is enabled, the SSD will automatically wipe free space, maintaining its performance. When you delete a file, Windows sends an instruction to the SSD to erase its contents, allowing it to maintain its speed.
Solution 2: If TRIM Function is Disabled
If the TRIM function is disabled, you'll need to manually wipe free space on your SSD. You can use a third-party partition manager tool like Qiling Partition Master to manage your disks. This tool allows you to merge partitions, delete partitions, migrate your OS, adjust partitions, and optimize your SSD with 4k alignment, among other functions.
To wipe SSD-free space using Qiling Partition Master Tool, follow these steps: First, download and install the software on your computer. Next, launch the tool and select the SSD drive you want to wipe.
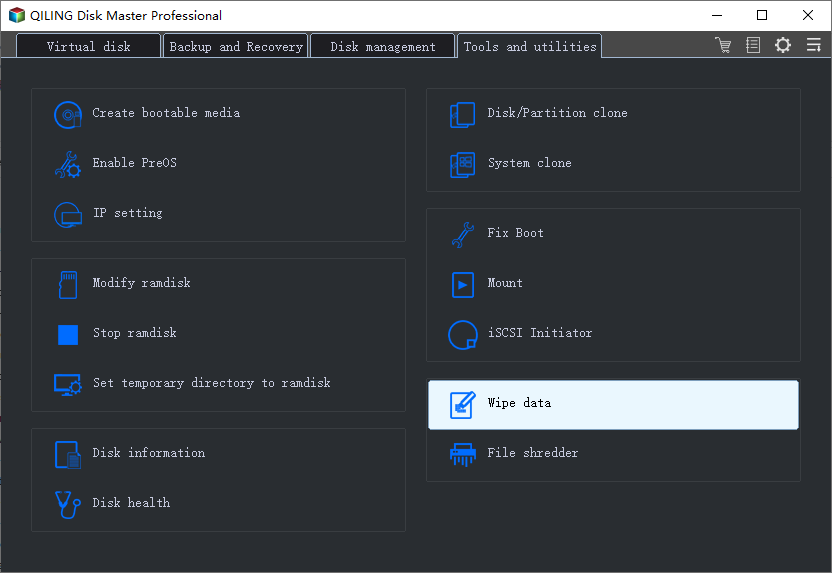
How to Wipe SSD When TRIM Is Disabled
Qiling Partition Master is a powerful partition magic tool that can help you wipe free space SSD in just a couple of minutes, making the data unrecoverable. This software is a great choice for sanitizing your SSD and recovering its performance. With it, you can erase data on SSD permanently, making it a reliable solution for your disk-related needs.
To learn more about how Qiling Partition Master works, check out the step-by-step guide below on how to wipe free space SSD with this tool! The process involves using Qiling Partition Master to securely erase free space on an SSD, ensuring that any sensitive data is completely removed. This guide will walk you through the specific steps to follow with the tool to achieve this.
The first option is to wipe all data. This will completely erase all data on your device, including photos, contacts, and apps. The second option is to wipe cache partition.
Step 1. Launch Qiling Partition Master, and choose "Wipe Data".
In the new window, set the time for which you want to wipe your partition.
Step 2. Click the partition you want to erase data from, and click "Proceed".

To wipe free space on an SSD using Qiling Partition Master Tool, you simply need to delete files and then run the tool's overwriting process, which will take longer due to the additional step, taking into account the SSD's capacity.
Have You Wiped Out Your SSD Yet?
Wiping the free space on a solid-state drive (SSD) is a simple and quick process that safely removes all recoverable data, making it ideal for reselling or repurposing the drive. This ensures that any deleted data is completely erased, providing peace of mind for users looking to reuse their SSD.
Qiling Partition Master Tool is a helpful tool that makes wiping free space on an SSD a hassle-free process. With it, you can wipe free space SSD in just a few clicks and also backup the whole disk before the cleanup. This tool will definitely prove to be a valuable assistant when it comes to managing your disk space.
Related Articles
- 4 Ways to Clone and Copy SD Card to External Hard Drive in Windows 11/10/8/7
- Best Windows Schedule Backup Software for Automatic Backup
- How to Create EXT2/EXT3 Based Linux Partition from Windows
- How to Format a Bootable USB Drive in Windows 10
- 2022 Top 3 USB Format Tools For Mac Are Here to Help
- 3 Ways to Fix Convert to Dynamic Disk Greyed Out
- How to Install A New CPU on A Motherboard? [Fresh Guideline]
With the recent releases of new CPUs from Intel and AMD, many users are looking to upgrade their processors to take advantage of the improved performance.