BitLocker Recovery Screen: How to Fix It After Windows Booting
What Causes BitLocker Recovery Mode?
Windows OS integrates a BitLocker feature that protects the drive from data theft or unauthorized access. However, when turned on, it may ask for a recovery key that you don't remember, causing inconvenience.
The BitLocker recovery Screen usually triggers when -
- 💻Your system's hardware changes
- 🔨Your PC is in BIOS
- ❌You have installed a faulty update
If you're stuck on the BitLocker recovery screen due to forgetting the recovery key, don't worry - we've got you covered. This guide provides 8 working fixes to help you bypass the recovery screen and get back to using your computer. So, read on until the end to find a solution that works for you.
| Workable Solutions | Step-by-step Troubleshooting |
|---|---|
| 1. Bypass the Recovery Screen |
|
| 2. Change the Boot Way |
|
| 3. Revise the Program or Disk |
|
| 4. Disable Startup Options |
|
| Recover BitLocker Encrypted HDD | When your encrypted hard disk suffers significant data loss, you should recover data...Full steps |
How to Fix BitLocker Recovery Screen After Booting?
The BitLocker recovery screen can appear for various reasons, preventing access to your Windows system. However, you can bypass it by implementing workarounds, but before doing so, ensure you safeguard all your data.
| ✍️Note: Before suggesting methods, it's essential to note that some can be used in a Windows account, while others are specific to Windows Recovery. If your Windows C Drive is encrypted with BitLocker, you'll only have access to options within the Recovery methods. |
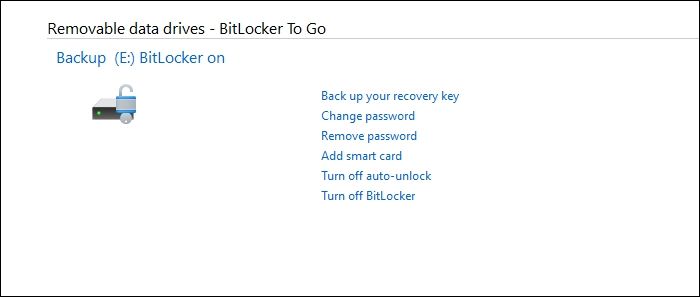
Method 1. Suspend BitLocker Protection
Here's how to suspend BitLocker protection on your Windows PC in one paragraph:
Step 1. To open the Control Panel in your Windows system, you can follow these steps. First, click on the Start button located at the bottom left corner of your screen.
Step 2. Once the Control Panel is opened, go to its "System and Security" section.
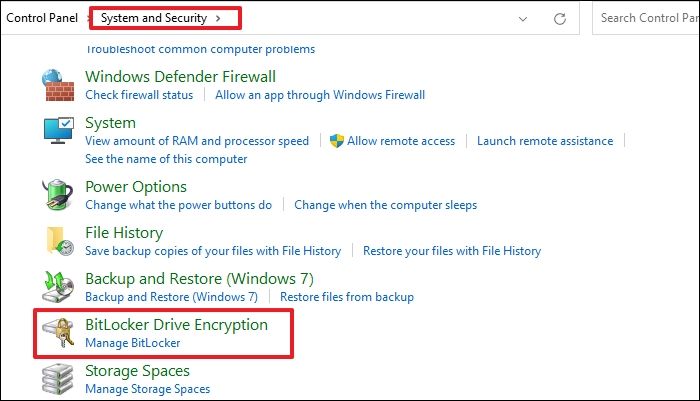
Step 3. To temporarily disable BitLocker on a Windows device, click on the "BitLocker Drive Encryption" option and select "Suspend Protection". This allows you to bypass BitLocker's encryption for a short period, but it will automatically resume once you're done.
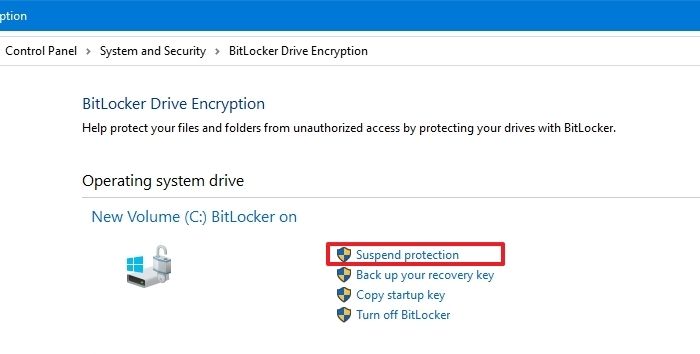
The BitLocker recovery screen will no longer appear when you restart your Windows system.
Method 2. Enter the BitLocker Recovery Key
Entering the correct recovery key on a USB drive can bypass the BitLocker recovery screen for most users.
Therefore, we recommend checking your USB drive to see if you can bypass the screen. If you're unable to find the BitLocker recovery key, contact your administrator for assistance.
When setting up BitLocker, the system may prompt you to save and print your recovery key, which is associated with your Microsoft Account. This is a precautionary measure to ensure you can recover your encrypted data in case of an issue. You might want to explore this option further.
How to Solve Bitlocker Keeps Asking For Recovery Key?
If Bitlocker is continuously asking for the recovery key in an unusual manner, it may be experiencing some issues with the encryption process. This could be due to various reasons and it's recommended to read more about the possible causes and solutions.
Method 3. Switch to the Legacy Boot
To avoid the BitLocker recovery screen, you can try switching your system's BIOS mode from UEFI to Legacy. This might resolve the issue and allow you to access your Windows system without encountering the recovery screen.
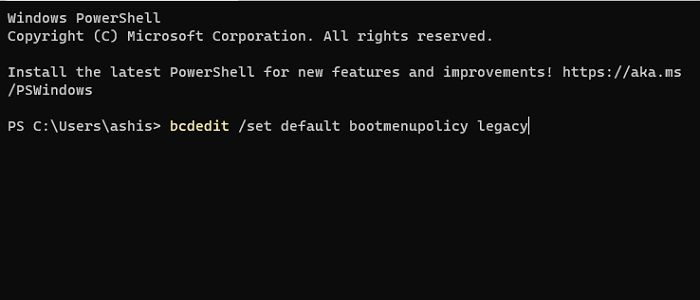
Here are the steps to change your Windows system's BIOS mode to Legacy in one paragraph:
Step 1. Press the Windows + R keys simultaneously to open the Run utility.
Step 2. Type cmd in the Run's search box and press "Enter" to open it on your PC.
Step 3. Copy-paste the below-mentioned command into the Command Prompt app and press Enter.
Step 4. Restart your system and check whether the BitLocker recovery screen is still appearing. If it's not, then the issue was likely resolved by the restart.
bcdedit /set default bootmenupolicy legacy
Method 4. Uninstall the Newly Inserted Hardware
If you've recently changed your system's hardware components, try reverting them and see if the BitLocker recovery screen still appears. This might resolve the issue.
How to Get, View, Remove Windows 10 Update
Windows 10 is the latest operating system from Microsoft, and viewing history updates or removing updates are key features related to it.
Method 5. Remove the Protectors from the Startup Disk
If you're unable to log into your computer after entering the correct BitLocker recovery key, try using the Command Prompt utility to unlock BitLocker instead.
Manage-sde is a command-line tool for advanced users to use additional options not displayed in the BitLocker control panel.

To disable BitLocker on a Windows system, use the command "manage-bde -off < drive letter >" in the Command Prompt, replacing "< drive letter >" with the actual drive letter of the drive you want to disable BitLocker on. For example, if you want to disable BitLocker on the C: drive, you would type "manage-bde -off C:".
Step 1. On the BitLocker recovery screen, press "Esc" and click "Skip this drive" at the bottom right corner.
Step 2. To proceed, select the "Advanced" tile on the next screen and click the "Command Prompt" option.
Step 3. Once Command Prompt is opened, copy-paste the below command into it and press "Enter":
manage-bde -unlock D: -password
Note: To replace "yourpassword" in the command, you would enter the password you have added to your drive as additional security.
Step 4. Execute the below-listed command in the console and press the "Enter" key to disable protectors:
manage-bde -protectors -disable D:
Step 5. Restart your Windows and check if the BitLocker recovery screen still appears. This will help determine if the issue persists after a system reboot.
Let us learn more ways to bypass BitLocker Recovery screen. What's more, don't forget to mark this passage by sharing it on Facebook, Twitter, or SNS.
Method 6. Reset Your Forgotten BitLocker Pin
To reset the BitLocker recovery key, follow these steps:
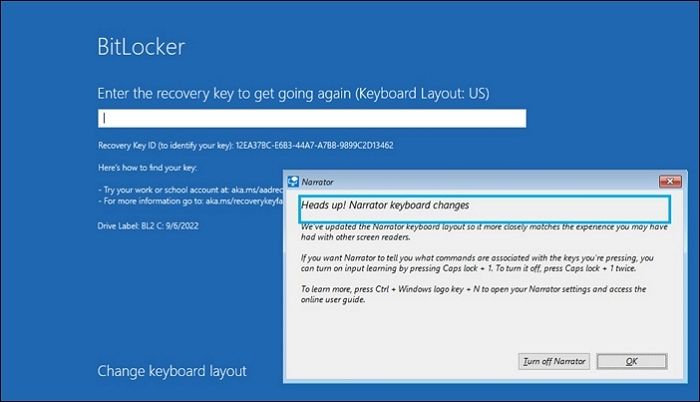
Step 1. Press the "Esc" key on your keyboard once you're on the BitLocker recovery screen.

Step 2. You'll now see the recovery key ID on the screen. But it'll only be there for a few minutes. So note it down somewhere or take a picture before it goes away.
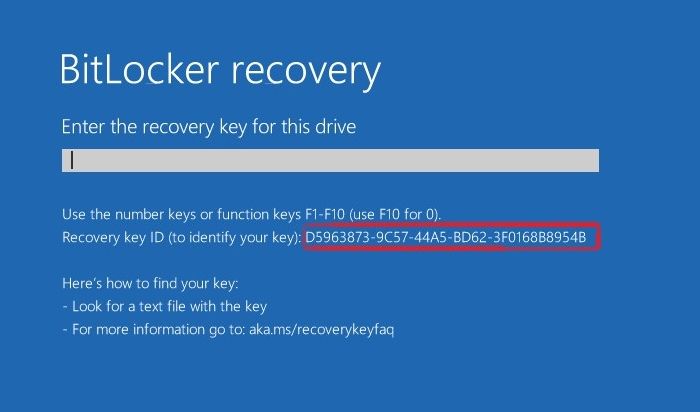
Step 3. Once you've noted the recovery key ID, contact your system administrator and provide it to them.
Step 4. Your administrator will now find the recovery key based on your provided recovery key ID.
Method 7. Turn Off Auto-Unlock Option
Windows comes with Auto-Enabling BitLocker recovery screen can cause it to constantly display the BitLocker recovery screen, even when the device is unlocked. This can be problematic as it may lead to user inconvenience.
To resolve the issue, check if the Auto-unlock option is enabled on your Windows system. If it is, consider disabling it by following these steps.
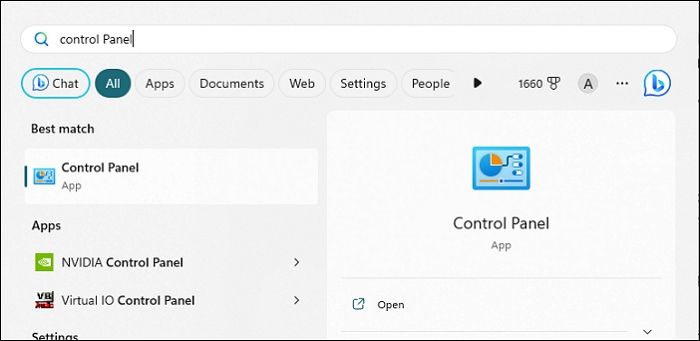
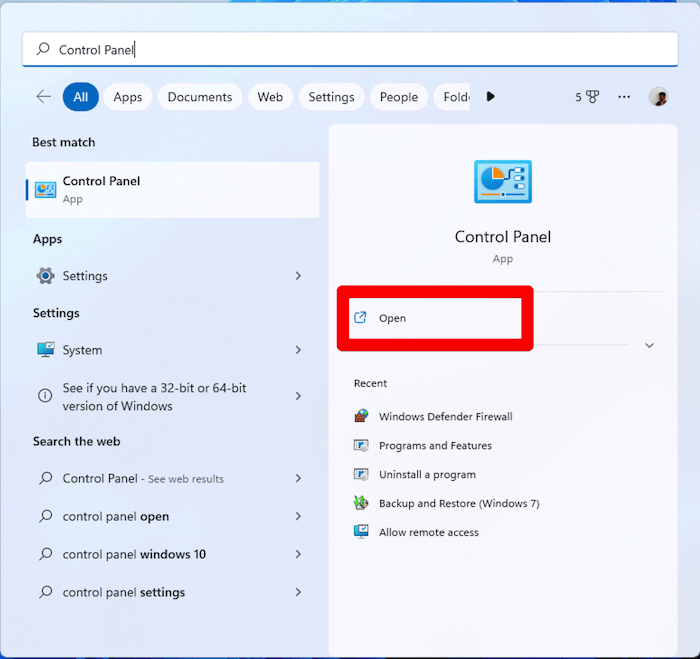
Step 1. To access the Control Panel on Windows, open the "Windows Search Box" by pressing the Windows key and type Control Panel. This will open the Control Panel window, allowing you to manage various system settings and features.
Step 2. To open the Control Panel on your system, select the "Control Panel" option from the Best match section. This will launch the Control Panel application on your computer.
Step 3. To access BitLocker Drive Encryption, go to the Control Panel's "System and Security" section and click on "BitLocker Drive Encryption".
Step 4. To turn off auto-unlock in BitLocker Drive Encryption, click on the "Turn off auto-unlock" option in the window.
LEARN MORE
If you've formatted an encrypted drive and lost access to its contents, there may be hope for recovery. If you still have the encryption key, you can try using data recovery software specifically designed for encrypted drives. This software can scan the drive and attempt to recover your files, even if they've been formatted.
Method 8. Enable or Disable Secure Boot
Some users have reported bypassing the BitLocker recovery screen by enabling and disabling the Secure Boot on their system. To troubleshoot this issue, try enabling and disabling Secure Boot on your system and check the issue's status. You can do this by following the steps to enable and disable Secure Boot.
Step 1. To bypass the BitLocker recovery screen, press the Esc key on your keyboard and then click Skip this drive.
Step 2. On the next screen, click the "Troubleshoot" option and select "Advanced options".
Step 3. To enable Secure Boot, go to the UEFI Firmware Settings page, then navigate to the "Boot" section, and look for the Secure Boot option.
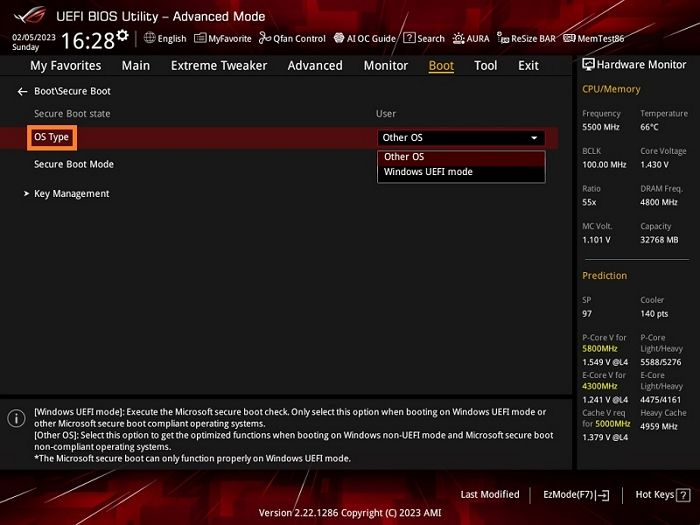
Step 4. Set Secure Boot to another available option. If it was already enabled, try disabling it and see if the issue persists.
Recover Data from BitLocker Encrypted Hard Drive
If your encrypted hard disk suffers significant data loss, the best course of action is to use top-notch data recovery software to recover your data. Deep Data Recovery is a reliable tool that can decrypt your hard drive and retrieve your lost data.
This data recovery software is highly recommended due to its ability to recover deleted files and data from various storage devices, including hard drives, solid-state drives, and USB drives, with a high success rate. Its user-friendly interface and advanced algorithms make it easy to use, even for those without technical expertise.
- The redesigned user interface simplifies starting a recovery session, eliminating the need for technical expertise.
- The software can thoroughly scan the device without causing any damage to the original data.
- This software is compatible with almost all Windows operating systems, including Windows 11, 10, 8, 7, Vista, and XP.
Now follow the steps:
Step 1. Choose the encrypted drive to scan
Launch Deep Data Recovery and you will see the BitLocker encrypted drive displayed there.

Step 2. Select and preview scanned files
The software initiates a quick scan for deleted files and an advanced scan for more lost files, completing the process, after which you can use the "Filter" feature or search function to quickly locate the lost files.

Step 3. Recover lost files from BitLocker encrypted hard drive
After previewing the file, click the "Recover" button to restore deleted or lost files from a BitLocker encrypted partition on Windows. You can choose a cloud storage and click "Save" to save your recovered files.

Conclusion
The BitLocker recovery screen can be frustrating when you're unable to access your Windows system due to not knowing the recovery key. This can be a significant issue, especially if you're unable to retrieve the key.
In this guide, we shared some working ways to bypass the BitLocker recovery screen asking for the BitLocker recovery key, which hopefully helped you resolve the issue. If one of the listed workarounds was successful, please let us know which one worked for you.
BitLocker Recovery Screen FAQs
The BitLocker recovery screen is a feature that allows users to recover their encrypted data in case they forget their password or experience other issues. It can be accessed by clicking on the "Recover" button on the BitLocker recovery screen, which will prompt the user to enter the recovery password or key. If the user has a recovery password or key, they can enter it to access their encrypted data.
1. How Do I Get Out of the BitLocker Recovery Screen?
If you're constantly getting the BitLocker recovery screen when turning on your Windows computer, you might want to suspend the BitLocker protection in Control Panel.
2. How To Get the BitLocker Recovery Key With the Key ID?
On the BitLocker recovery screen, press the Esc key to see the recovery key ID, which can be used to retrieve the Recovery Key.
3. How Do I Start My Laptop Without the BitLocker Recovery Key?
To start a laptop without the BitLocker recovery key, you can either disable BitLocker in the Control Panel or enable/disable Secure Boot. This allows you to log in without needing the recovery key.
4. How To Remove BitLocker from BIOS?
If you're stuck at the BitLocker recovery screen, you can bypass it by directly accessing your system's BIOS from there. To do this, restart your computer and immediately start tapping the F2 key (or F1, F12, or Del, depending on your system's BIOS key) to access the BIOS settings.
Step 1. Press the Esc key and click the "Skip this drive" option at the bottom left corner to skip the current drive and proceed with the installation.
Step 2. Click "Troubleshoot" and select the "UEFI Firmware Settings" option on the next screen.
Step 3. To access the UEFI firmware settings, click the "Restart" button to restart your computer. This will allow you to enter the UEFI firmware settings.
Step 4. Once in the BIOS or UEFI, go to the Security section and look for the TPM State option.
Step 5. To disable BitLocker, navigate to the "TPM State" menu and use the arrow keys to select it. Then, disable it. This action will also render BitLocker inoperable.
In case you're already logged in to your computer, follow the below path to enter your system's BIOS or UEFI and disable it:
To access the UEFI Firmware Settings from the Settings app, go to Recovery, then Restart Now, and select Troubleshoot. From there, choose UEFI Firmware Settings.
Related Articles
- 3 Ways to Fix USB Device_Descriptor_Failure Error in Windows
- How to Choose and Set the Roku SD Card Format [2024 Best Ways]
- Guide on Best Allocation Unit Size for Gaming [2024 New]
The best allocation unit size for gaming is a matter of debate, with some arguing for 4K and others for 64K. However, most experts agree that a 64K allocation unit size is the best for gaming, as it provides a good balance between performance and storage space. A free online tool can be used to set the allocation unit size for gaming, and this article provides a step-by-step guide on how to do it. - BitLocker Recovery Screen: How to Fix It After Windows Booting
If you're stuck on the BitLocker recovery screen, you can try to bypass it or enter the recovery key to regain access to your system. This is crucial as without the key or bypass, you won't be able to recover data from the system. - PC Stuck on BIOS Screen - How to Fix?🔥
7 ways to fix a PC stuck on BIOS screen - PC Turns On, but No Display or Power to Keyword [Fixed]
If your PC turns on but shows no display or power to the keyboard, try unplugging all peripherals, pressing the power button for 30 seconds, and then plugging everything back in. If that doesn't work, try booting in safe mode, checking for loose connections, and updating your BIOS. If the issue persists, consider resetting your PC to its factory settings or seeking professional help.