[Quick Steps] How to Enter Startup Repair Windows 10 in 2024
Quick Steps to Enter Startup Repair on Windows 10:
- 1. Go to the Settings app by pressing Win+I.
- 2. Go to Update & Security and select Recovery.
- 3. Click on Restart Now under Advanced Startup.
- 4. Click Troubleshoot > Advanced Options > Startup Repair.
When a computer startup issue is detected, the Startup Repair tool automatically diagnoses and identifies the cause of the problem by analyzing startup log files.
The Startup Repair tool in Windows 10 diagnoses and attempts to automatically fix startup problems, and if that's not possible, it can help diagnose and repair more complex issues. This tutorial will guide you through the process of entering Startup Repair and using the Windows 10 boot repair tool.
QUICK NAVIGATION:
- Awake Startup Repair from Settings
- Run Startup Repair from Desktop
- Run Startup Repair When You Can't See the lock screen
- Run Startup Repair from BIOS
Way 1. Awake Startup Repair from Settings
If you can access the Settings app on your computer normally, you can enter Startup Repair by going to Settings > Update & Security > Recovery > Restart now under Advanced startup, then selecting Troubleshoot > Advanced options > Startup Repair.
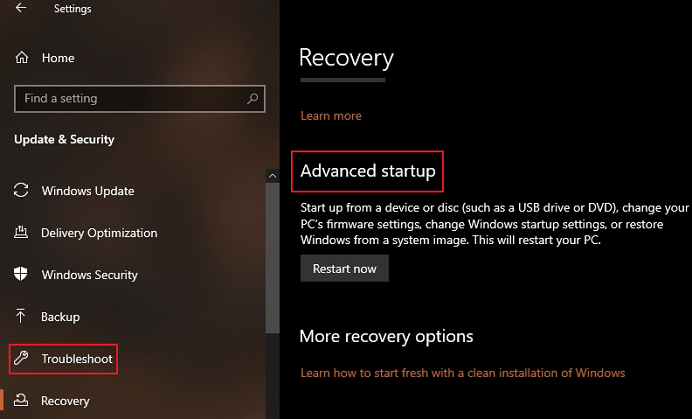
Step 1. To access the Settings app, press the Win+I buttons on your keyboard.
Step 2. To update Windows 10, go to the "Update & Security" section and select the "Recovery" tab.
Step 3. Under Advanced Startup, you need to click on Restart Now.
Step 4. To resolve the issue, go to the next window and select Troubleshoot, then Advanced Options, and finally Startup Repair.
Way 2. Run Startup Repair from Desktop
Startup Repair can also be accessed from the Windows 10 power options menu, which can be accessed from the Start menu on your desktop. To run the Startup Repair tool using this method, simply follow the tutorial below.

Step 1. To turn on your computer, click on the Start sign on your computer and click the Power button. This will initiate the boot-up process.
Step 2. Hold down the Shift key and click on Restart.
Step 3. The computer will restart and see the Troubleshoot boot menu.
Step 4. Go to Advanced Options > Startup Repair.
Way 3. Run Startup Repair When You Can't See the lock screen
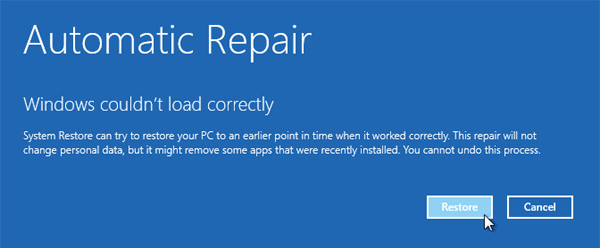
If you're unable to see the lock screen, you can try booting your computer in Safe Mode, booting from a USB drive, or using System Restore to take your computer back to a previous point when it was working properly. If none of these methods work, you can try using the System File Checker tool to scan and replace any corrupted system files. If the issue persists, you can try resetting your computer to its original settings. If you're still having trouble, you can try resetting your computer's BIOS settings to their default values. If none of these methods work, you may need to seek further assistance from a professional.
Step 1. To shut down your Windows 10 system, turn it on, and then immediately turn it off again before the loading screen appears.
Step 2. Repeat this operation 3-5 times. And the Startup Repair tool should be awakened.
Step 3. After Windows 10 fails to boot, you will see a message saying "Windows 10 failed to boot and is now running Startup Repair".
Way 4. Run Startup Repair from BIOS
If you've tried all three methods to enter Startup Repair and it still doesn't work, you'll need a Windows 10 installation disk. To get one, access another working Windows 10 PC and create an installation disk. Once you have it, you can use it to run Startup Repair.
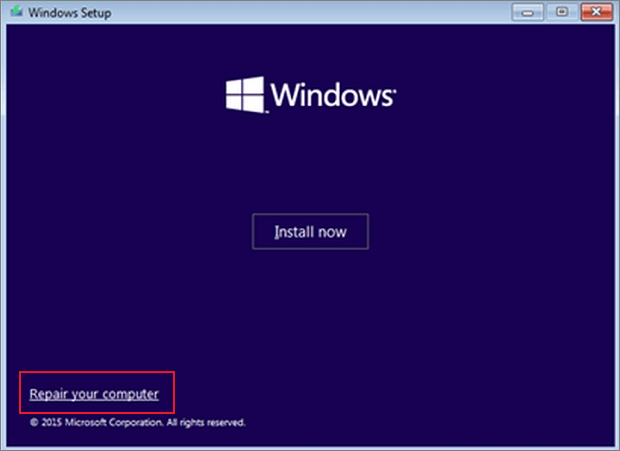
Step 1. To boot from a USB drive, you need to enter your computer's BIOS settings and set the first boot device to your USB drive. This is usually done by pressing a key like F2, F12, or Del when your computer is first starting up, and then navigating through the BIOS menu to find the boot settings.
Step 2. To start, connect the installation USB to the PC you want to start.
Step 3. Power on the computer and wait for the Windows 10 installation screen to appear.
Step 4. After that, select the Windows 10 edition, language, etc.
Step 5. Lastly, click on Repair your computer to access Startup Repair.
Bonus tip. Restore Data with Qiling Disk Master
Qiling Disk Master Free is a data backup-and-restore program that allows you to back up all your files and restore them when needed, also creating a bootable rescue disk for file recovery in case of system failure.
This tool allows for customizable data saving, enabling users to back up and restore data to an external hard drive or cloud storage, with support for Dropbox, OneDrive, and Google Drive.
Main Features of Qiling Disk Master:
- Free Windows restore software you can use
- Support full, incremental, and differential backup modes
- Back up more than 1000 types of files
- Automatically backup data daily/weekly/yearly
- Create and restore image to a different computer
How to Enter Startup Repair Windows 10 FAQs
Still, have doubts? Here we give you some frequently asked questions related to this topic. Check the answers now!
1. How do I run Startup Repair in Windows 10?
You can run Startup Repair in Windows 10 using one of four methods, regardless of whether you can access your desktop normally or not. Try each method one by one to see if it solves your problem.
2. How to repair Windows 10 from BIOS?
To access the Command Prompt on a Windows PC using a USB drive, first set up your BIOS to boot from the USB drive. Then, follow the on-screen instructions to access the Command Prompt via the Repair Computer option, Troubleshoot, Advanced Options, and Command Prompt.
Related Articles
- How to Open Files With No Extension in Windows 10/11? [Updated 2024]
- How to Enable Windows Defender on Windows 11/10/8
- Five Things You Need to Do Before Windows 10 Update
- How to Factory Reset PS4 [2024 Complete Guide]
- Where and How Do I Find or Recover Origin Password
Origin requires a username and login details to create an account. To create an account, a mail address and password are needed. Users can buy online games using their account details. If a password is lost, access to the account is blocked. This blog post aims to help find or recover the Origin password and continue playing. - How to Find QuickBooks Product Key or Serial Number [6 Ways] - Qiling
This page introduced ways to help you find the missing QuickBooks product keys. Follow solutions to find your lost QuickBooks serial number or product key successfully.