How to Mount a Disk on Mac [Step-by-Step Tutorial in 2023]
If you want to expand the storage capacity of your Mac, consider using an external disk, which is a cost-effective way to add more space for media libraries, backup files, documents, and more.
To use an external disk on a Mac, you need to mount it first, which allows you to access and utilize its storage space. This process involves connecting the external disk to your Mac, and the operating system will automatically detect and mount it, making it available for use. You can then access the disk in the Finder, where you can copy files to and from it, or use it as a storage location for your Mac. The mounting process is usually seamless and happens automatically, but if you need to mount a disk manually, you can do so by using the Disk Utility app or by going to the Finder and selecting the disk from the sidebar.
Mounting an external disk allows the system to provide a mount point to the drive, enabling access to information stored on it. This is necessary for the system to read and utilize the data from the external drive.
If your external hard drive is not mounting on your Mac, you won't be able to use it. To fix this, you'll need to mount the disk, which allows your system to access it. To mount a disk on your Mac, you can follow these steps: First, plug in your external hard drive and make sure it's properly connected. Next, click on the "Go" menu in the top menu bar and select "Utilities.
Preparation Before Mount a Disk on Mac
If your Mac's storage isn't updating after deleting files, consider using external disks to increase storage capacity. Before mounting an external disk on your Mac, ensure you've backed up your data, formatted the disk correctly, and selected the right file system for your Mac. You can use the built-in Disk Utility app to erase and format the external disk, choosing the APFS or Mac OS Extended (Journaled) file system. Additionally, consider using a disk with a high storage capacity and a reliable brand to ensure smooth performance and minimize the risk of data loss.
- Check the disk for errors: If you're experiencing issues with your Mac's disk, check for errors using Disk Utility to ensure it's not corrupted, which can cause system disruptions.
- Eject the disk if it's already mounted: If the external hard drive files are not showing on Mac, eject it, then reconnect it to fix the issue.
- Connect the disk to the Mac: To complete the process, connect the external disk to your Mac and ensure it can be detected and mounted normally.
How to Mount a Disk on Mac [3 Tested Mothods]
After checking and ensuring the disk works normally, you can follow the 3 tested methods to mount a disk on Mac. Let's take a look:
1. Mount a Drive Using Disk Utility
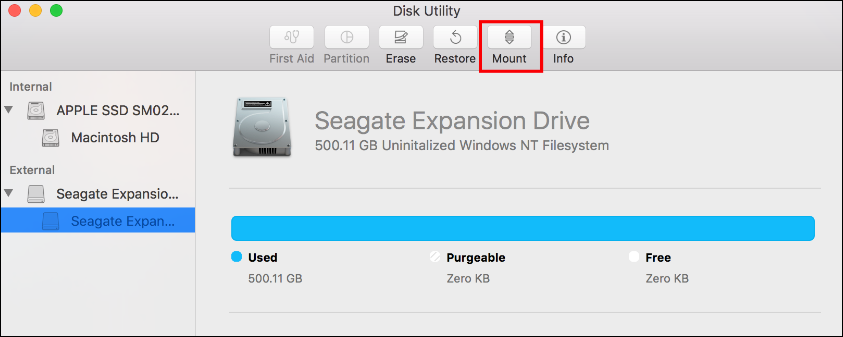
To mount a disk on a Mac using Disk Utility, follow these steps: open Disk Utility, select the disk you want to mount from the list on the left, click the "Mount" button, and then click "OK" to confirm. This will make the disk accessible and allow you to read and write files to it.
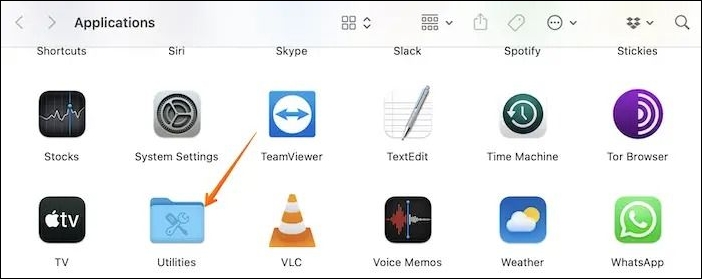
Step 1. To open Disk Utility, navigate to "Applications>Utilities>Disk Utility" or boot your Mac into Disk Utility mode.

Step 2. Choose the volume you wish to mount.
Step 3. Select the "Mount" button.

When unmounting a disk on a Mac, users may encounter the error code 69888, which can be caused by various factors such as corrupted disk permissions, file system issues, or other system problems. This error can prevent the disk from being safely unmounted, leading to potential data loss or system crashes.
Couldn't Unmount Disk 69888 on Mac | Top 6 Methods
On a MacBook Pro/Air, if you encounter the "couldn't unmount disk 69888" error, it typically occurs when attempting to partition, reformat, or delete a disk.
2. Force Mount an External Drive Using Terminal Command
You can force mount a disk on a Mac using the Terminal command. To do this, first, open the Terminal app, then type the command "diskutil list" to get the disk's identifier. Next, type "diskutil mountDisk /dev/diskX" (replace X with the disk's identifier), and press Enter.
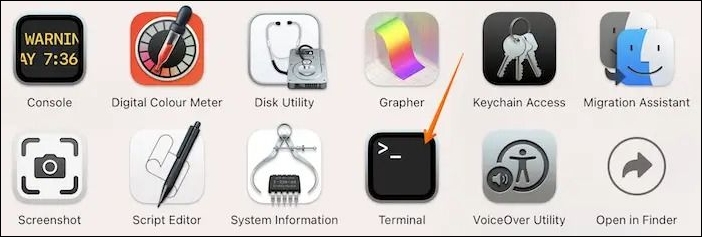
Step 1. Open Terminal. You need to follow "Applications>Utlities>Terminal".
Step 2. Locate the drive you want to mount.
Step 3. Enter diskutil mount /dev/disk1s2.
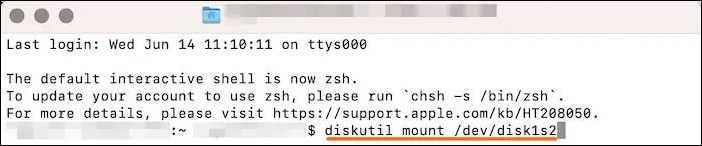
Step 4. Close "Terminal".
Mounting a disk on a Mac is a straightforward process that allows you to access and utilize external storage devices. To do this, start by inserting the disk into the Mac's USB port or connecting it via a different method such as via Thunderbolt or FireWire.
3. Using Finder to Mount a Disk on Mac
To mount a disk on Mac using Mac Finder, you can follow these steps: simply locate the disk you want to mount, click on it, and then click on the "Eject" button. Alternatively, you can also use the Disk Utility app to mount the disk. To do this, go to Applications > Utilities > Disk Utility, select the disk you want to mount from the sidebar, and then click on the "Mount" button.
Step 1. To access the Applications folder on a Mac, go to the "Finder" and click on the "Go" menu at the top. From the drop-down menu, select "Applications".
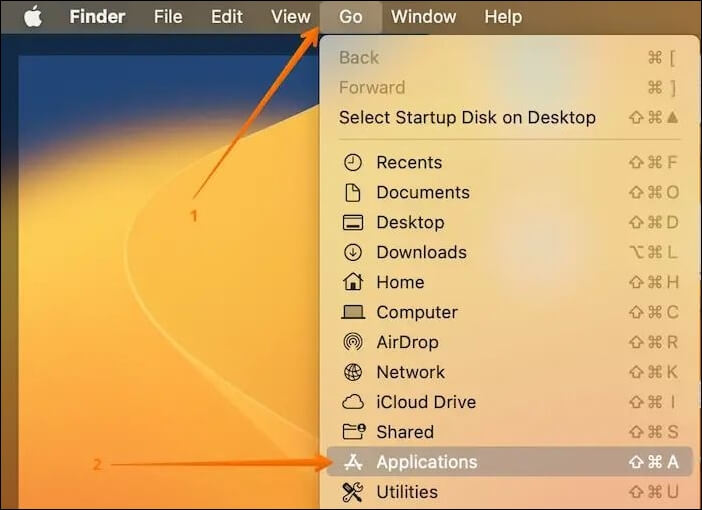
Step 2. Select "Utilities".
Step 3. Click on "Disk Utility".
Step 4. Opt for the external drive you want to mount.
Step 5. Select the "Mount" button.
If the hard drive you want to mount doesn't show up in Finder, you can refer to the proven ways in the article below, which works for internal/external hard drives.
Can't Mount Disk on Mac: Possible Causes
Various causes can lead to hard drives not mounting on a Mac, including issues with disk permissions, file system corruption, and compatibility problems with the drive's file system or the Mac's operating system. Additionally, problems with the drive's physical connection, such as a loose or damaged cable, can also prevent it from mounting. Furthermore, some Macs may not be able to recognize or mount external drives due to software or firmware issues.
🚫Fault USB cable: If you're experiencing issues with mounting a disk on your Mac, try using a different USB cable to see if it resolves the problem, as a damaged or lost cable could be the culprit.
⚠️Damaged USB port: Damage to the USB port on a Mac can cause issues with disk mounting, resulting in a USB flash drive not showing up. To troubleshoot, try connecting another external device to see if it mounts correctly.
💽Corrupted disks: Viruses can corrupt disks, making it impossible for the system to access them, so repairing or replacing the disk is the best solution.
😫Incompatible macOS version: It's crucial to check if your macOS version is compatible with your external storage, as some versions may not support certain disks. Make sure to verify the compatibility of your macOS version with your external storage support.
⚙️Wrong settings: To resolve the issue, check the System Preferences/Settings to see if the external disk is disabled or modified, and try to mount it again.
Can I Restore Data from Unmounted Drive on Mac
If you've experienced a hard disk failure, you're likely anxious about data loss. The Deep Data Recovery software is a professional tool that can help you recover data from an unmounted external hard drive on a Mac.
The Deep Data Recovery for Mac is a reliable tool that helps users restore data, regardless of the type, including audio, video, images, and documents. It also supports data recovery from various storage devices, such as HDD, SSD, and fusion drives.
To recover data from Qiling Mac, you can use a third-party data recovery software. First, download and install a reliable data recovery tool, such as Disk Drill or Deep Data Recovery Wizard, that supports Mac operating systems.
Step 1. Search for lost files
Connect your external hard drive to your Mac, then launch Deep Data Recovery for Mac and select the external hard drive. Click "Search for lost files" to find lost/deleted files on your external device.
Note: Before recovering data from your external hard drive, it's recommended to create a backup of the drive using the software's "Disk Backup" feature from the left sidebar. This ensures that your data is safe and can be recovered if needed. Once the backup is created, you can remove the external hard drive and use it again, and the software will recover data from the backup.

Step 2. Filter and find lost files
After scanning, the left panel will display all file types found. You can then select the desired file type to locate matching files on external devices.

Step 3. Preview and recover
To recover data, click on the file to preview it, select the desired files, and then click the "Recover" button to save them to a local or cloud drive.

Conclusion
If you're having trouble mounting a disk on your Mac, there are three ways to resolve the issue. You can use Disk Utility, Finder, or the Terminal command to mount the disk.
Data loss can occur while mounting a Mac disk, but using professional data recovery software like Deep Data Recovery for Mac can aid in hassle-free data restoration, allowing retrieval of various types of data.
How to Mount a Disk on Mac FAQs
Here are the answers to the questions about mounting a disk on Mac in one paragraph:
1. Can Mac read NTFS external drive?
NTFS external hard drives are read-only on Macs, allowing users to access but not modify NTFS files, regardless of the macOS version used.
2. How do I force a disk to mount on a Mac?
To force a disk to mount on a Mac, you can try the following steps. First, eject the disk from the Finder by right-clicking on the disk icon and selecting "Eject".
Step 1. Open "Terminal" and locate the drive you want to mount.
Step 2. Enter diskutil mount /dev/disk1s2 command in the Terminal app window.
3. Why can't I mount a disk on my Mac?
Various reasons such as faulty USB cables, damaged USB ports, incorrect settings, or damaged hard disks may be preventing the mounting on your Mac.
4. What does it mean to mount a disk on MacBook?
Mounting a disk on a MacBook allows your Mac to access and read information on the external disk, effectively using it as additional storage.
5. How do you mount a disk?
To mount a disk, the most popular method is to use Disk Utility. Launch the "Disk Utility" app, select the volume you want to mount, and click the "Mount" button. This will allow you to access the disk's contents.
Related Articles
- 4 Ways | How to Stop Windows 11 Update Pending Restart
- Any Tools to Check SD/MicroSD Cards Health? Sure!
- 2 Ways to Reinstall Windows 10 [Full Guide]
- How Sonoma Game Mode Boosts Your Mac Performance
- What to Do When You Forgot Thunderbird Password
If you're constantly forgetting your Thunderbird passwords, this article provides a step-by-step guide to help you recover your login password easily. - Guide on Format Partition in Linux [Effective & Easy Solutions]
Formatting a partition in Linux can be a straightforward process, and this page provides a detailed guide on how to do it. It offers step-by-step instructions and solutions to help users achieve their goal. Additionally, it introduces a professional tool that can be used to format partitions and disks, making the process even easier.