How to Repair Install Windows 10 in 3 Different Ways
What Is Repair Install Windows
Repair installing Windows on a PC system is an optional feature in many operating systems. This feature disables Windows' automatic updating mechanism, but it's also the first and best repair window to turn on Windows' repair features, allowing for the repair of system files, similar to throwing the windows in the trash. A repair install of Windows 10 will repair system files.
How to Perform a Windows 10 Repair Install
If a Windows 10 system starts misbehaving, won't load, or crashes frequently, a Repair Install may be necessary. This can cause damage to, loss of, or corruption of Windows 10 system files in the C:\Windows folder hierarchy, worsening performance and stability. To resolve this, users can try performing a Windows 10 Repair Install.
Before proceeding, ensure you have at least 9 GB of free space on your Windows hard drive and have the installation media ready, either as a USB drive or ISO file, in the same language as your existing Windows 10 setup.
Method 1. Repair Install Windows 10 Using an ISO File
To start the installation, download Windows 10 ISO files from Microsoft's website and save them in your desired location.
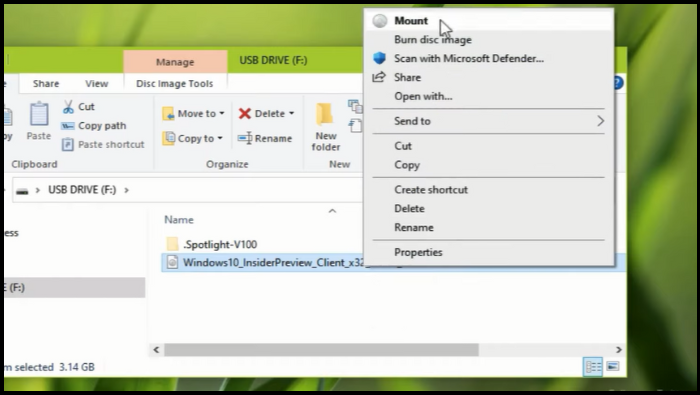
Step 1. Open Windows Explorer and navigate to the folder where you saved the 'Windows.iso' file.
Step 2. To open the ISO file, double-click on it, or right-click and select Mount, which will allow it to be accessed as if it were a physical disk in Explorer.
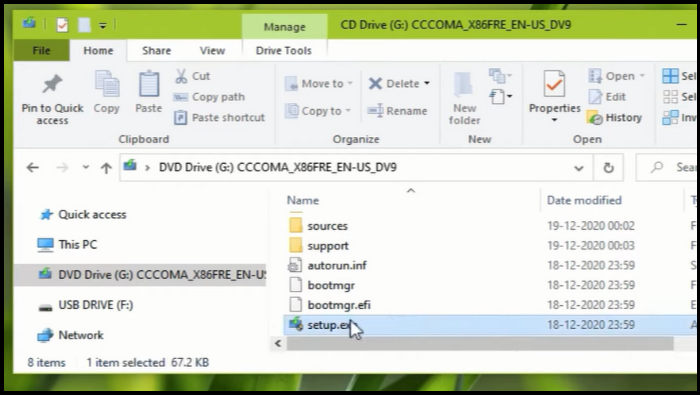
Step 3. At the mounted drive, double-click on the setup.exe application.
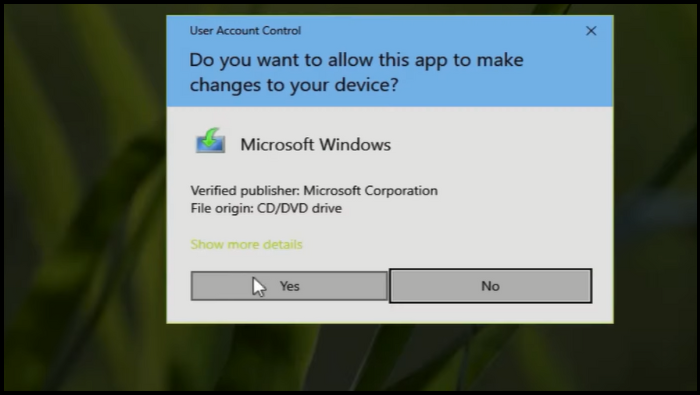
Step 4. Click "Yes" at the UAC warning message and select "Next" to proceed with installing Windows 10.
Step 5. Windows is checking for updates. Please be patient.
Step 6. At the 'Ready to Install' screen, select the 'Keep personal files and apps' option and click 'Install' to repair/upgrade Windows 10.
Step 7. Finally, wait for the upgrade/repair of Windows 10 to complete.
Method 2. Repair Install Windows 10 via Media Creation Tool
To repair and install Windows 10 using the Media Creation Tool, download the latest version of Windows 10 in an ISO file using the Media Creation Tool, which can be downloaded from Microsoft's official website.
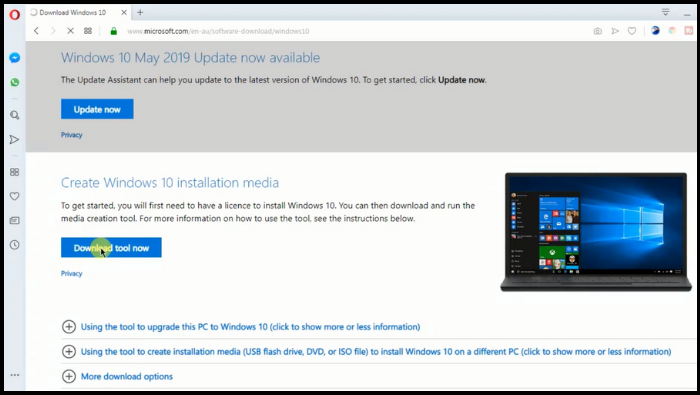
Step 1. Go to Windows 10 download site.
Step 2. Now download the Windows Media Creation Tool (MCT) on your PC/computer.
Step 3. Run the Media Creation Tool (MediaCreationTool.exe) when the download is complete.
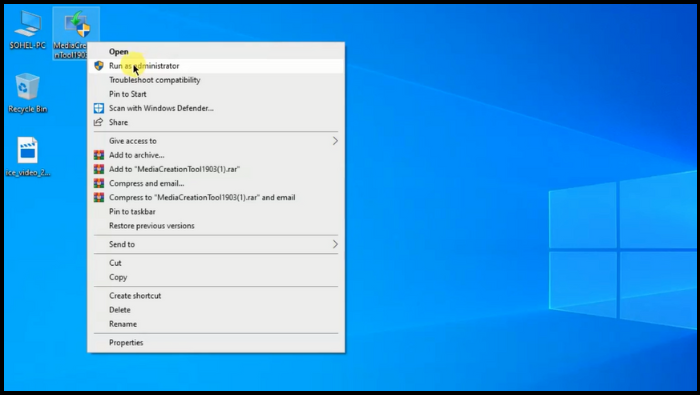
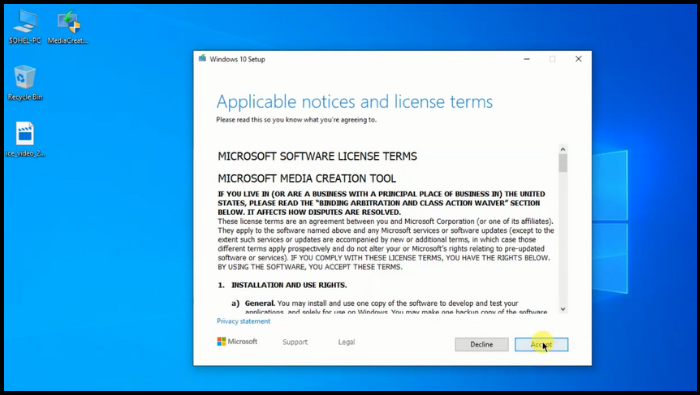
Step 4. Accept the license agreement.
Step 5. Choose to create installation media for another computer/PC and click Next.
Step 6. At the next screen, choose Next.
Note: There is no need to modify anything here. MCT already has chosen the correct version and edition for the current computer.
Step 7. At the 'Choose which media to use' ISO file prompt, click Next.
Step 8. Save the Windows.iso file to a location on your computer, such as the desktop.
Step 9. Wait for the download to finish, then click Finish and proceed to the next step.
Method 3. Repair Install Windows 10 with USB Installation Media
To install Windows, start by ensuring a stable internet connection and preparing an empty USB drive with at least 4 GB for a 32-bit installation or 8 GB for a 64-bit installation. Be aware that using a flash drive with existing data may result in data loss.
The process of deleting your account doesn't delete personal data or files from your account, so you don't need to worry about losing any important information.
Step 1. Download Windows 10 ISO.
Step 2. To create a bootable USB or DVD drive, prepare the ISO file, then boot into the BIOS or UEFI of your computer/PC and select the USB device as the initial boot device, followed by the hard disk. Rufus is a useful tool for this process as it can also download the ISO file.
Step 3. Now Boot from the media and select (Repair your computer.)
When booting from a USB, start the Windows 10 installation, but avoid clicking "next" to prevent installing Windows. Instead, click on the "Repair your computer" link on the first installation screen, which will boot your PC into Advanced Recovery.
Step 4. To access the advanced troubleshooting options, go to the Advanced troubleshooting section, select Advanced Options, then Troubleshoot. From there, you can choose Startup Repair and follow the instructions provided.
The solution will resolve the issue preventing you from booting into your PC. You'll be taken to a screen displaying the admin account, followed by a prompt to select and verify the account using its password.
After verifying, the PC/computer will start diagnosing and resolving any boot-related problems. If this step fails, this post can help you analyze your PC screen and troubleshoot any issues.
Once the problem is solved, the computer/pc should reboot and be useable.
Backup Windows 10 to Protect Everything on It
Creating a system image of your computer is crucial for data security, as it ensures you can restore your system and files in case of a crash or ransomware attack. Fortunately, there are several ways to back up your Windows 10 system and files, such as using the built-in Backup and Restore tool or third-party software like Qiling Disk Master Pro, which can provide a safe and easy backup solution.
To create more flexible backups that offer more features, consider making a system image backup in Windows 10/11 with the free backup software Qiling Disk Master Pro. This backup software allows you to recover your computer/pc simply and quickly without losing stored personal data and installed apps, making it essential to have a recent backup in case of a disaster. With this software, you can recover your data and get back to work quickly, without worrying about losing important files or programs.
- Support backup of files, systems, Outlook emails, partitions, etc.
- Can automatically backup files to an external hard drive.
- Support schedule backup.
- Create 3 Types of Backup methods: full backup, Incremental and differential backup.
Here are the simple steps for you to back up your system with Qiling Disk Master Pro: You can backup your system by selecting the disk you want to backup from the program's main interface, then selecting the backup option from the top menu, and finally choosing the destination to save the backup file. You can also schedule a backup to run automatically at a later time.
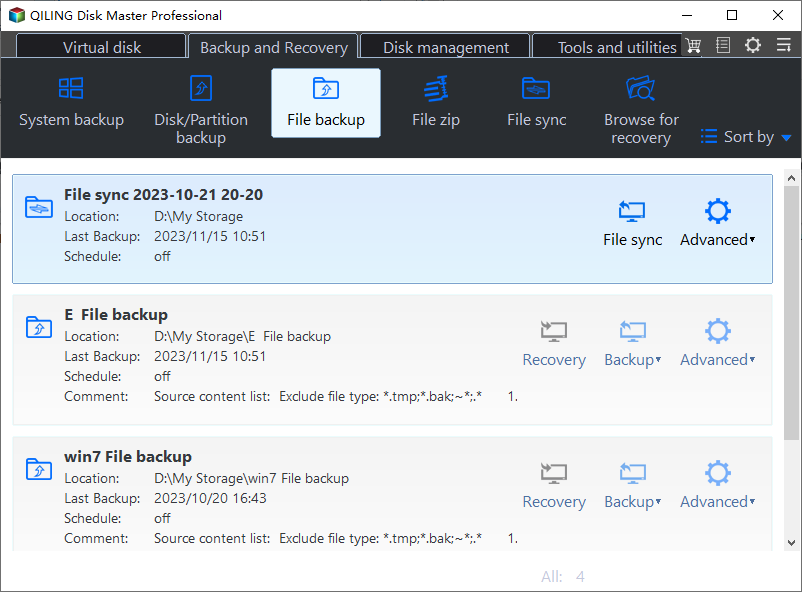
Step 1. Launch Qiling Disk Master and go to the "Backup and recovery" tab page.

Step 2. To start a system backup, click on the "System backup" option from the available categories.
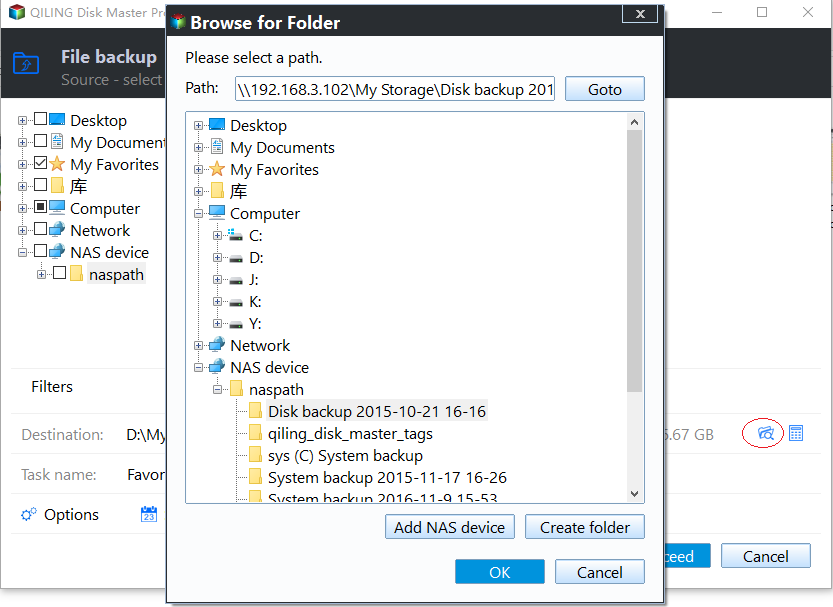
Step 3. The system partition will be automatically selected, so you only need to choose the location for the installation.

Step 4. You can save backup files on your local drive, in the cloud, on a NAS (Network-Attached Storage), or even connect an external hard drive to store system backup files.
Step 5. You can customize the settings in "Options" at the bottom left and then click "Proceed" to start the process.
After completing the backup process, you can check the backup status, recover, open, or delete the backup by right-clicking the backup task on the left.
The Bottom Line
Repairing and installing Windows 10 without losing data is possible using three methods, which can fix system problems. However, these methods are a bit technical. A simpler and more convenient solution is to restore files from a backup to solve Windows issues.
The Qiling Disk Master Pro Regular backups and system maintenance can prevent unexpected issues such as system crashes, disk failure, and computer viruses, while also allowing users to back up their system and hard drive to a cloud drive, protect essential data from ransomware, and provide a complete backup and restore solution, as well as clone, upgrade, or transfer their system.
FAQs
1. How do I force Windows into repair mode?
Windows allows you to "force-To put Windows 10 in repair mode, navigate to Windows Settings > Update & Security > Windows Update > Windows Defender. If this option is not enabled by default, your System will only repair when you address the issues mentioned in the first two sections.
To shut down your PC completely, right-click the Start button, click "Shut Down", and then confirm your choice in the pop-up window. Alternatively, you can click on Windows Settings, then Power Options, and finally select "Turn Off" from the options provided.
2. Does Windows 10 have a repair option?
The "Repair a computer or restore a computer" feature is available in Windows. It allows users to restore their computer to its original settings, which can be helpful if the system becomes corrupted or if a user wants to start over.
To use the feature, follow these steps:
Download the Windows 10 Update Assistant app, open it, and navigate to the Settings icon in the top-right corner of the screen, from which select System.
Next, select Updates & Security > Windows Update.
To update the app, click the "Update Now" button in the bottom-left corner of the App's main window.
Windows 10's Repair a computer feature appears to be a repair utility, but it actually just restarts your PC and brings you back to the login screen.
Windows 10 doesn't have a traditional repair utility like older Windows PCs due to a security feature called password lock, but it has a similar utility called Update Assistant.
3. What command do I use to repair Windows?
Repairing Windows 10 can be easily done using the Command Prompt with the SFC command, which scans and fixes corrupted system files, helping to resolve various issues and keep your operating system running smoothly.
Step 1. Run CMD.
Step 2. Type in SFC /scannow, and press the Enter key. Use SFC command.
Step 3. Wait until the scan is finishing.
4. What is system repair mode?
The System Recovery Options menu provides various tools, including Startup Repair, to help recover Windows from critical errors, and these tools are located on the PC's hard disk and the Windows installation disc.
Related Articles
- How to Fix Windows Boot Manager Error Code 0xc0000225
- How to Fix Virtual Disk Service Error: The Disk Is Not Empty [Full Guide]
- How to Fix Integrated Webcam Not Working on Windows 10 [Full Guide]
- Fix System Was Unable to Find the Specified Registry Key or Value [Four Efficient Solutions!]
Fix the 'System was unable to find the specified registry key or value' error with our expert guide. We cover the most common causes and provide step-by-step solutions to fix them. Follow our instructions and get your system running smoothly again. - [10 Fixes] Error 0x800701b1 Troubleshooting on Windows 11/10
If you're experiencing Error 0x800701b1 on your Windows PC and struggling to copy files, don't worry! This guide provides a simple solution to fix the issue. - Fix Error 1327 Invalid Drive When Installing Programs Windows 10
Error 1327 invalid drive is an error pop-up indicating that the drive for program installation is not valid. Check this article to understand the causes and know how to fix error 1327 invalid drive Windows 10.