How to Split Your Screen on a Windows 10/11? [Step by Step]
If you're someone who likes to juggle multiple tasks at once or keep an eye on one screen while working on another, this article is perfect for you. The splitting screen feature on Windows allows you to multitask efficiently, without constantly minimizing and maximizing one screen at a time.
To split screen on your Windows 10/11 PC, you can use snap layouts or shortcuts. You can use snap layouts to resize windows and arrange them side by side, or use shortcuts such as Windows + Left/Right arrow to quickly snap a window to the left or right side of the screen. This allows you to multitask and have multiple windows open at the same time, making it easier to work on different tasks simultaneously.
How to Split Screen on Windows 10/11 PC?
To split your screen in Windows 10 and 11, you must first ensure the feature is enabled on your computer, which can be done by going to Settings > System > Display and turning on the "Multiple displays" or "Extend desktop to this display" option for each monitor. Then, open two or more windows on your computer, and click and drag the window you want to split to the side of the screen where you want it to be. You can also use the Windows + Left/Right arrow key shortcut to snap a window to the left or right side of the screen. Once you've opened the windows you want to split, you can resize them by dragging the edges or corners of the windows.
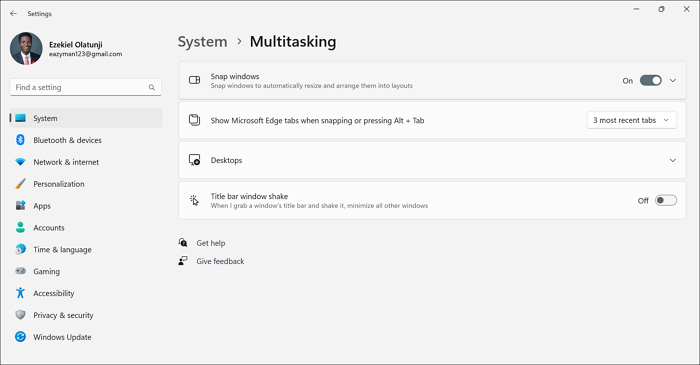
Step 1. To access the settings on your Windows computer, go to the Start Menu search bar and type "Settings" and select the first or best match result.
Step 2. To enable the Snap feature in Windows 10 and 11, go to the Multitasking settings, and toggle on the "Snap windows" switch. Alternatively, for Windows 11, navigate to System, then click on Multitasking, and toggle on the "Snap windows" feature.
To split your Windows into several screens, you can use the Taskbar or the Snap feature. To use the Taskbar, click and hold on the window you want to resize, and then drag it to the side of the screen where you want it to be.
On Windows 10:
Step 1. To move an open window to a corner of the screen, hold down your left mouse button and drag the window until it reaches the corner, at which point it will stay in place. This action effectively "snaps" the window into the corner, keeping it there until you move it again.
Step 2. To split the screen, release the mouse button while dragging the mouse to the edge of the screen. This will create a split in the screen. Then, select any other window you want on the other side of the screen.
Step 3. Resize the windows by dragging the dividing line between them to fit your needs.
On Windows 11:
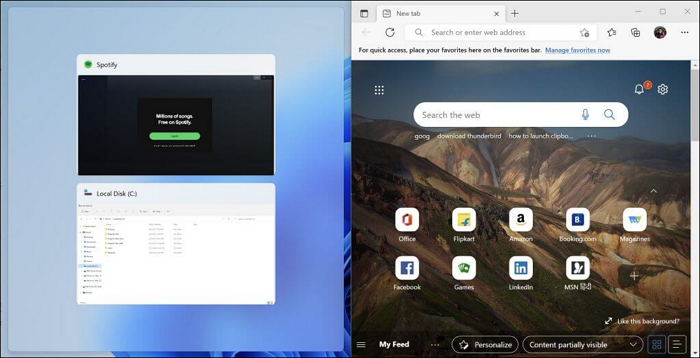
Step 1. To split a window into two, simply drag your preferred window to a corner and leave it there. This will divide the window into two separate panes, allowing you to view and interact with multiple windows or applications simultaneously.
Step 2. To proceed, open the second window from the remaining windows that appear. This should work even if you have multiple windows open.
How to Split Screen into Three Parts?
Similar to how you split the screen into two parts.
Step 1. To start, snap a window into the corner of your screen. This will allow you to view the window in a smaller size while still keeping it easily accessible.
Step 2. To move a window to the other side, bottom, or top corner of the screen, simply drag the window of your choice to the desired location.
You can split your screen into three parts by opening multiple windows and arranging them side by side, filling the third part of your screen with another available window. This splits your screen into three parts.
How to Split Screen into Four Parts?
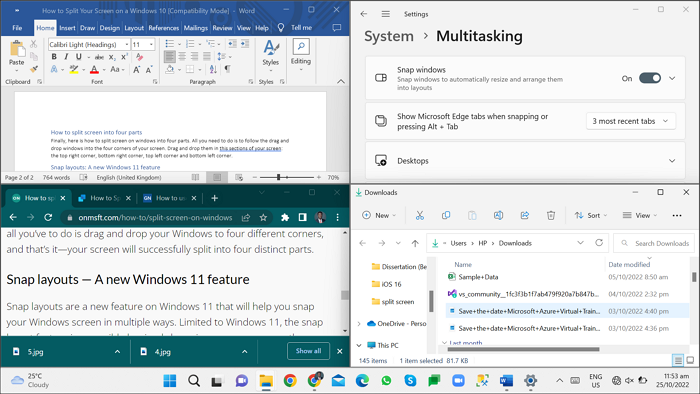
To split the screen on Windows into four parts, you can use the built-in Snap feature. First, open the first window you want to split, then click and drag the top-left corner of the window to the top-left corner of the screen to snap it into place.
Step 1. To customize your screen layout, drag and drop icons into the top right corner, bottom right corner, top left corner, and bottom left corner sections.
Step 2. Follow the drag-and-drop windows into the four corners of your screen.
Snap Layouts: A New Windows 11 Feature
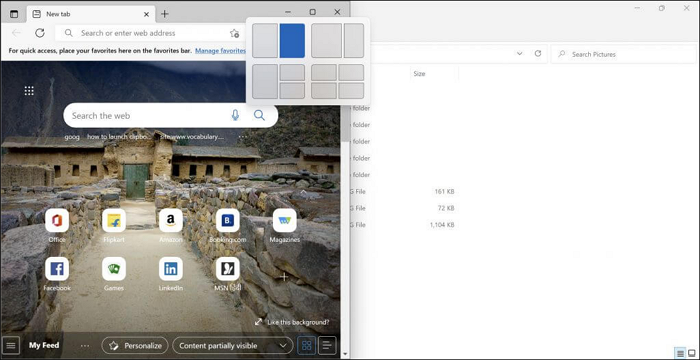
Microsoft introduced a new snap layout feature for Windows 11, which can be accessed by hovering over the minimize feature or using the Windows key + Z keys simultaneously.
When you press these keys, a transparent menu appears at the top right of your screen, allowing you to select your preferred snap. Once chosen, your active window is adjusted to one side, with options to set and select other available windows.
How to Do Split Screen on Windows through Shortcuts?
To split screens on Windows, you can use the Windows key + Left/Right arrow shortcut to move a window to the left or right side of the screen. This will automatically create a split-screen effect.
Step 1. Press the Windows key and either the left or right arrow key to snap your active window to the left or right side of the screen.
Step 2. You can use the Windows key + up or down (arrow) key to place a window in the top or bottom corner of the screen, which is useful when splitting screens into multiple sections.
Step 3. To split your screen into four sections, first use the Windows key + right or left arrow key to split the screen horizontally, then use the Windows key + up or down arrow key to split it vertically. For example, to place a screen at the top right corner, use the Windows key + right arrow key, make the new window active, then use the Windows key + up arrow key.
Final Thoughts
You can multitask on Windows by splitting the screen, using a shortcut to activate one screen and then dragging others to it, with no strict rules about how to do it.
Related Articles
- 2 Ways to Force Update Windows 10 to the Latest Build
- How to Make Mac Dark Mode [for macOS Ventura/Monterey/Big Sur]
- How to Fix Error Code 41 Mac When Coping Files on macOS 13/12/11
- Msvcr100.dll Is Missing? Here Is How to Fix It [2023 Updated]
- How to Keep Hard Drive Cool [Step-by-Step Guide]
Hard drives have a temperature range they can operate within, and excessive heat can reduce their lifespan, decrease performance, and even damage data. To keep your hard drive cool, consider solutions such as using a cooler or heat sink, ensuring good airflow around the device, or relocating it to a cooler environment. Additionally, monitoring the drive's temperature and adjusting its usage accordingly can also help prolong its lifespan. By taking these precautions, you can help prevent overheating and ensure your hard drive continues to function properly. - What Laptop Hard Drive Size Should I Use [2023 Explanation]
The best laptop hard drive size depends on your specific needs, but a general rule of thumb is to have at least 256GB of storage. To check the hard drive size on your laptop, you can follow these steps: 1) Click on the Start menu and select “Settings.” 2) Click on “System” and then click on “Storage” on the left side of the window. 3) Look for the “Total capacity” or “Capacity” section, which will display the total hard drive size.